Filter: Safe | Sun, May 3, 11:55 PM CDT

Renderosity Forums / Cinema 4D


Welcome to the Cinema 4D Forum

Forum Moderators: CHMedia Forum Coordinators: Kalypso

Cinema 4D F.A.Q (Last Updated: 2024 Aug 27 11:07 am)

C4D Gallery Speed Modeling Sessions C4D Freestuff
 
 
Checkout the Renderosity MarketPlace - Your source for digital art content!


Subject: Space 1999 - Project Eagle - A 3D Model In The Making


Becco_UK ( ) posted Tue, 26 May 2009 at 12:54 AM

file_431570.jpg

From above. Now to sort out the command module panelling.


Mandrake7062 ( ) posted Tue, 26 May 2009 at 7:16 PM

Most Beautiful!!
Becco check out the price tag on this ship! Long slow whistle...
http://www.the3dstudio.com/product_details.aspx?id_product=76035
Nice ship though.


Becco_UK ( ) posted Wed, 27 May 2009 at 1:41 AM

Mandrake7062: Thank you. That 'ship' is out of my price range but when you consider how long these models can take to make the price starts to look quite modest. 


FarawayPictures ( ) posted Wed, 27 May 2009 at 2:13 AM

That is looking very, very good.

PORTAL


Chris ( ) posted Wed, 27 May 2009 at 6:44 AM

Quote - contrafibbularities: I will do the 'curve' outline once I see if the idea works in obtaining an accurate Command Module!

Mandrake7062: Yes, have a look at a spline in point mode and you will see it is coloured. For making problem free UV maps, from a lathed spline, the colour graduation should look smooth. If it doesn't try optimising the new spline. If that doesn't do the trick optimise the base mesh before using edge to spline. Broken colour graduation usually come about when a model is formed from several parts. As always, it's easier to do than write about.

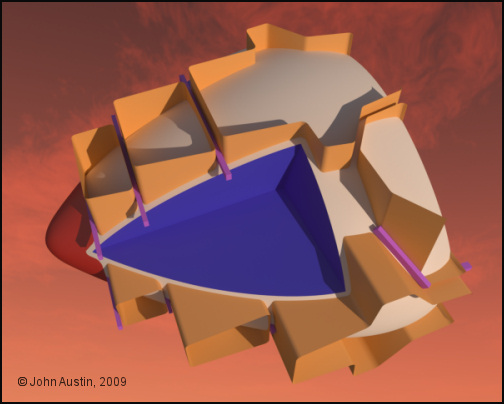
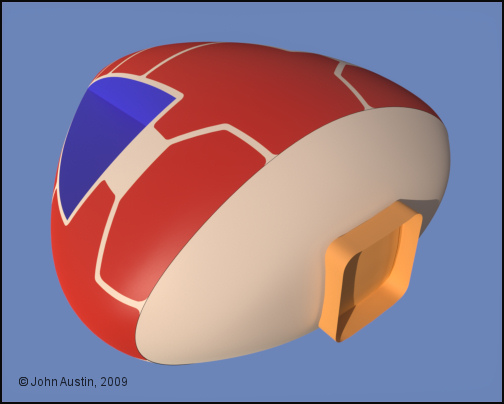
Back to the Command Module a couple of modified cubes inside a HyperNURBS are being used to form the overall front and rear shapes. Control points are kept to a minimum which helps in creating a bump free mesh. Points are moved about so that the mesh fits the window area.

is it possible to post al lil tutorial about making the command module?

Thank you

Chris :)

"It Is Useless To Resist!" - Darth Vader


Becco_UK ( ) posted Wed, 27 May 2009 at 7:06 AM

FarawayPictures: Thank you. Have you made any 3d LEGO models lately?

Chris: Once I have a complete module I will add a few more explanations of anything I've missed out so far. The command module panelling has slowed things down, not because of the difficulty but time consuming. A bit more attention is going into the command module because I will be getting that 3d printed to make a master mould from. The 3d print version will be quite plain, with no window frames, sensor dishes of bevelling added.


FarawayPictures ( ) posted Wed, 27 May 2009 at 12:04 PM · edited Wed, 27 May 2009 at 12:05 PM

Quote - FarawayPictures: Thank you. Have you made any 3d LEGO models lately?

No, I'm actually building the Trumpeter 1/16 scale M16, it's a beast! and quite time consuming.

PORTAL


Becco_UK ( ) posted Wed, 27 May 2009 at 12:25 PM

FarawayPictures: My 1/16 scale Tiger 1 will soon see off the M16 :-) It's the Heng Long Radio controlled one and it fires small plastic pellets. I keep meaning to atke it apart and paint it properly but still haven't got around to that.


Mandrake7062 ( ) posted Wed, 27 May 2009 at 12:30 PM

The M16 looks like fun!


Becco_UK ( ) posted Wed, 27 May 2009 at 12:33 PM · edited Wed, 27 May 2009 at 12:35 PM

Mandrake7062: Those 1/16 tanks are BIG and upgrade parts don't come cheap. I have my eyes on a metal gunbarrel for my Tiger 1.

See one in action at YouTube: http://www.youtube.com/watch?v=WIAaxu7Yp7c


Mandrake7062 ( ) posted Wed, 27 May 2009 at 12:36 PM

Sounds like you need one of those mini laths Becco


Becco_UK ( ) posted Wed, 27 May 2009 at 4:28 PM

file_431729.jpg

**Mandrake7062**: I would need to get shut of my computer system to make room for new machinery.

The command module progresses with some cutting shapes added. The red nose was done first to evaluate this mehod.


Mandrake7062 ( ) posted Wed, 27 May 2009 at 5:13 PM

It looks like your cheating here somehow, can't quite put my finger on how, but, yep your cheating. ;)


FarawayPictures ( ) posted Thu, 28 May 2009 at 2:03 AM

Hi Becco, I'm not too sure what I'm seeing with the cutting method. Are you going to actually slice the model into pieces?

p.s. I'd have loved a 1/16 Tiger, but the Tamiya kits I was looking at are just waaaaaay too expensive.

PORTAL


Becco_UK ( ) posted Thu, 28 May 2009 at 2:30 AM

Mandrake7062: No cheating here - just a method I'm trying out for cutting the panel shapes into the command module mesh.

FarawayPictures: Those shapes will be cut into the other mesh, tidied up and extruded. The Tamiya Tiger is expensive so I opted for a Heng Long tiger - I got mine for about £50


Mandrake7062 ( ) posted Thu, 28 May 2009 at 5:55 AM · edited Thu, 28 May 2009 at 5:57 AM

Looks pretty nice, you know I was kidding. Took me so long to raise those panels.
http://www.renderingsystems.com/index.php
Wolfgang showed me this applet, you've probably seen it by now, or use other means. Good for me though as I'm not so great at photoshop. I like the bake obj as a start off point, on some objs.


Becco_UK ( ) posted Thu, 28 May 2009 at 8:03 AM

Mandrake7062:  I've found all the Eagle to be time consuming but the end is well in sight with mine. When the command modules are made then it's more or less just the walkway details to finish. Still waiting for a Tamiya 1:35 PANTHER  (Sd.kfz.171) Ausf. A model to arrive though. It has taken months to aquire the real parts but I'm sure they they will look nice on the real Eagle.

I mostly use only Bodypaint for texturing models. I also use Genetica (there is also a free version) http://www.spiralgraphics.biz/ and MapZone (free)  http://www.mapzoneeditor.com/ for making textures to use in Bodypaint.


Becco_UK ( ) posted Thu, 28 May 2009 at 2:26 PM

file_431787.jpg

Using a Cinema Boole, the panel shapes were cut into the Command Module mesh. Edges were tidied up by hand and the new panel areas given a new material (so they are visible for this render before extruding!). This takes longer than using just HyperNurbs for raising panels but I think the end result will look more like panels glued onto the Eagle (as the real one was made).


Becco_UK ( ) posted Thu, 28 May 2009 at 4:02 PM

file_431791.jpg

A test extrusion of the panelling.


Chris ( ) posted Fri, 29 May 2009 at 2:19 AM

wow ... looking very clean! good work!

Chris :)

"It Is Useless To Resist!" - Darth Vader


Becco_UK ( ) posted Fri, 29 May 2009 at 7:14 AM

file_431831.jpg

**Chris**: Thank you. It's all starting to look nice now. The test panel extrusion was at the correct value (0.75mm) but for the 3d version I may increase that slightly. The 3d printer version will have the correct extrusion.

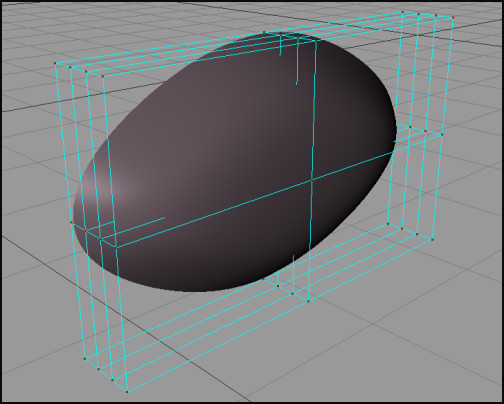
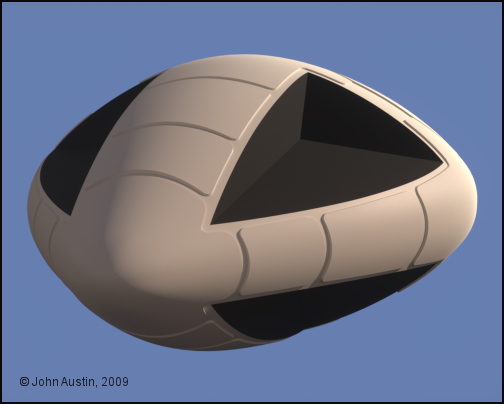
Now onto the rear section of the command module. Using very few control points at the HyperNurbs stage meant the shape needs refining. For this I use a Cinema  **FFD **(deformer). The deformation is confined within the confines of the FFD - this was positioned so that the front loop of points are not affected. 

More time with another tool but all being well it will be time well spent!


Becco_UK ( ) posted Fri, 29 May 2009 at 11:53 AM

file_431836.jpg

The Command Module/Walkway Connection is used as a guide when refining the rear of the Command Module - there is a small gap left between the parts to take into account the panel extrusion. 


Mandrake7062 ( ) posted Sun, 31 May 2009 at 6:35 AM

Looks real nice. Cut those sensor disks in yet? Man that came out smooth as a babys butt.


Becco_UK ( ) posted Sun, 31 May 2009 at 7:25 AM

Mandrake7062: Thank you. I'm not cutting the sensor dishes (and windows) until the base mesh has had some more attention. The rear panelling has been done though. Just moving edges around to remove 'undercut' surfaces when I make a mould from the 3d printed version.


Becco_UK ( ) posted Mon, 01 June 2009 at 2:30 PM · edited Mon, 01 June 2009 at 2:32 PM

file_432069.jpg

This is the command module version that will be used for a 3d print. It needs another subdivision or two but I'm putting that to one side for the time being though.


Becco_UK ( ) posted Mon, 01 June 2009 at 2:31 PM

file_432070.jpg

This is the command module version for my 3d model, now with windows and sensor dishes added.


Mandrake7062 ( ) posted Mon, 01 June 2009 at 2:33 PM

Nice!!!!


Chris ( ) posted Tue, 02 June 2009 at 3:40 AM

looks damn clean ... good work!

Chris

"It Is Useless To Resist!" - Darth Vader


Becco_UK ( ) posted Thu, 04 June 2009 at 2:13 PM

file_432335.jpg

**Mandrake7062**  &** Chris**: Thank you.

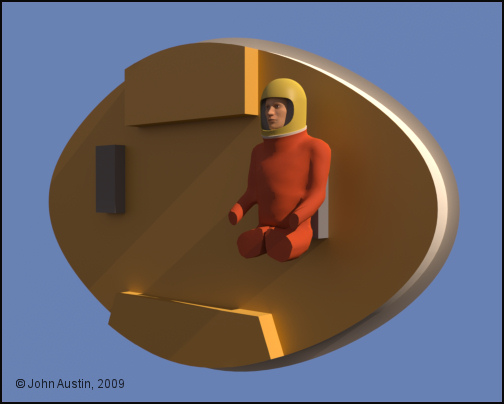
A basic interior similar to the original Eagle has now been added. The real Gemini kit pilot has more surface detail than my digital version but this should be ok. The pilot was made with the free MakeHuman software from: http://www.makehuman.org/blog/index.php


Becco_UK ( ) posted Thu, 04 June 2009 at 2:17 PM

file_432337.jpg

The Eagle has a pilot. I might add some interior lighting when the model is finished.


Becco_UK ( ) posted Mon, 08 June 2009 at 7:47 AM

file_432600.jpg

Back to the walkways and shelves. Here, the front ones have now had all the model Panther and Leopard kit parts added. Measurements were taken directly from the parts in question. Surface detail such as bolts, grills etc will be formed with a bump map at the texturing stage of these components.


Mandrake7062 ( ) posted Mon, 08 June 2009 at 8:05 AM

Very nice detail you have going there Becco!
I've been playing with the AT-AT-Walker
http://www.kdf-computers.com/download/at01f.jpg


Becco_UK ( ) posted Tue, 09 June 2009 at 8:53 AM · edited Tue, 09 June 2009 at 8:54 AM

Mandrake7062: Thank you - the 'detail' has slowed progress down! I have no idea what an AT Walker is but the detail look nice enough - did you make it? I notice that Terragen renders cylinders faceted - is that a problem with Terragen or something caused by you?


Mandrake7062 ( ) posted Tue, 09 June 2009 at 9:08 AM

That's from Star Wars. The phong is something I'm struggling with, and why that test was done. I keep trying to target in on the right curving angle in PoseRay to export with proper obj. & .mtl file for TG2.  I don't want to use the hypernurb because I think your right and it makes it look to plastic.
The knee joint is hypernurb.
The hip joint is not, nor the trans.
So I just need some more testing to get everything like the hip joint and I should be able to move on..

I've been formulating some bodypaint, ideas and strategies in my head, but I'm going to keep mulling them over. In a month or so I'd like to shoot you a pm about them and see what you think.
Your getting closer to your bodypaint work. :)


Becco_UK ( ) posted Tue, 09 June 2009 at 11:05 AM

file_432651.jpg

**Mandrake7062**: Once you get a basic understanding of Bodypaint you should find it simple enough. Practice on simple objects and work up from there. Bodypaint is no more complex than any other 3d software - it's just a case of getting used to it over time.

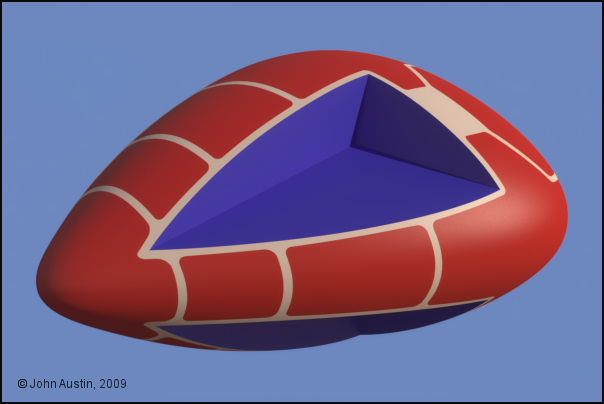
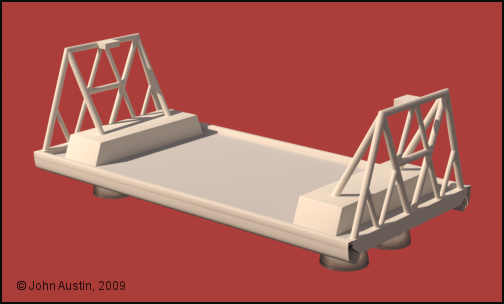
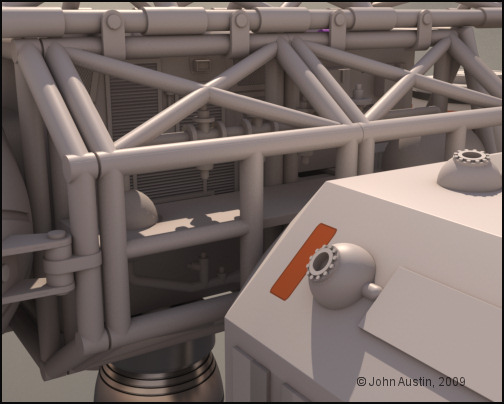
I've been Bodypainting some of the walkway and shelves. These have mostly been UV mapped seperately so I can use the textures on any future Eagle model/s which have different details. So the walkway 'box' and shelves are sort of generic items. 


Becco_UK ( ) posted Wed, 10 June 2009 at 10:49 AM

file_432715.jpg

Break time from UV mapping and texturing. A Cargo Pod for the Eagle has been started.


Mandrake7062 ( ) posted Wed, 10 June 2009 at 11:10 AM

Nice, I need one of those. That bad boy had engines on it? Seems a bit odd.


Becco_UK ( ) posted Wed, 10 June 2009 at 11:58 AM · edited Wed, 10 June 2009 at 12:00 PM

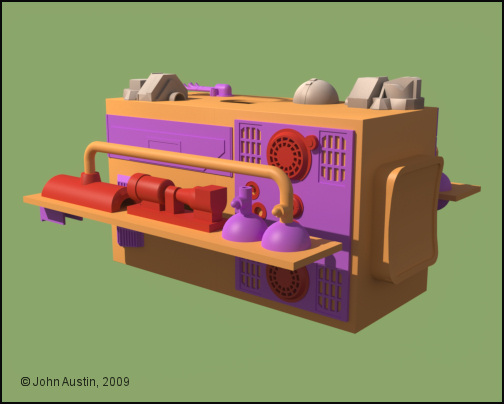
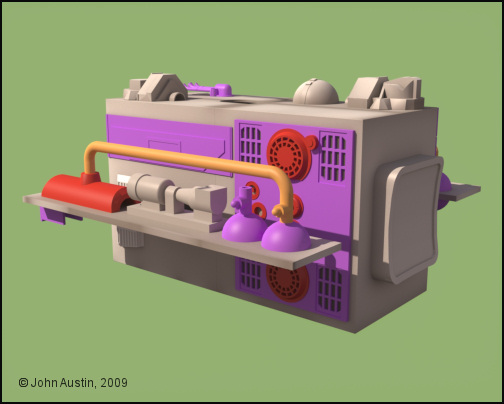
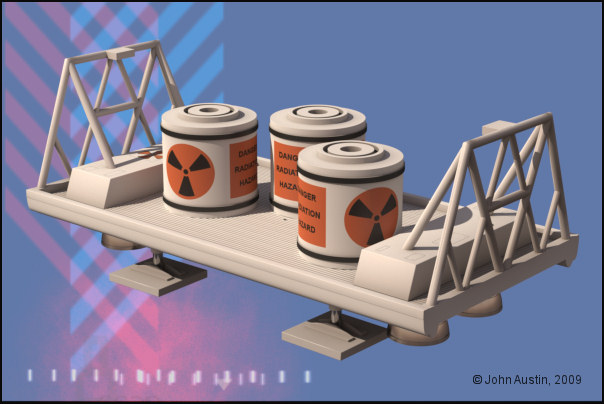
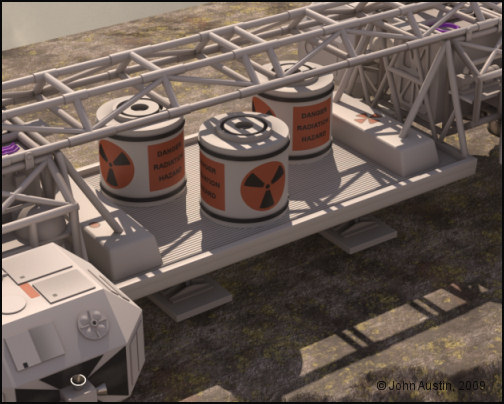
Mandrake7062: Thank you. You can have my Cargo Pod (and a radio active container) when it's painted. You will to need tweak the Cinema materials though because I use duel materials - a rough cinema one for texture development with Bodypaint and a corresponding Maxwell one. My cargo pod doesn't have many connected tubes - just simple poke through!


Mandrake7062 ( ) posted Wed, 10 June 2009 at 12:19 PM

Beauty! Becco I remember the show having the two small quads on it. Or was that a reference render. Dang getting old. hehe


Becco_UK ( ) posted Thu, 11 June 2009 at 8:00 AM

file_432765.jpg

The Cargo Pod modelling is finished and it's overall height increased to something more correct. A number of polygon selection tags have been made ready for Bodypaint work. Also added is a nuclear waste container that can simply be copied when painted.


Becco_UK ( ) posted Fri, 12 June 2009 at 9:47 AM

file_432846.jpg

The cargo pod is UV mapped, ambient dirt added, and some texture detail started. The nuclear waste container was UV mapped and textured as a seperate component. Two instances of the container fill out the cargo pod.


Becco_UK ( ) posted Fri, 12 June 2009 at 12:52 PM · edited Fri, 12 June 2009 at 12:57 PM

file_432853.jpg

The new cargo pod with the rest of the Eagle.


Becco_UK ( ) posted Mon, 15 June 2009 at 2:35 AM

file_432977.jpg

Over the weekend I finally got around to adding the command module fittings and UV mapping it. This is how it looked with some baked ambient ambient occlusion 'dirt' and minor rough texture work. Just some walkway and shelves details to finish modelling and texture. The Eagle is very close to be useable :-) 


Mandrake7062 ( ) posted Mon, 15 June 2009 at 10:30 PM

Nice Looks great with the cargo carrier, Cockpit came out great also, makes mine look beat up. hehe How about a slot along the side to indicate the pull out ramp? I know, not shown on the original. ;)
A progress update on my Walker. Made an Evil Empire Insignia for the front.
http://www.kdf-computers.com/download/Capture58.jpg


Becco_UK ( ) posted Tue, 16 June 2009 at 7:53 AM

Mandrake7062: Thank you. My command module could be better too - that's why I'm calling it 'version 1'. Room for improvement, so a 'version 2' command module will be made after the whole Eagle is up to being usable. There is some texture detail still to be added along the sides of the Cargo Pod but I don't know if this will represent a pull out ramp.

Your 'Walker' is coming along nicely - are you leaving the texturing to last? I manage to texture complex models by UV mapping and texturing sub assemblies as they are modelled - I find it so tedious leaving making selection tags until the end! I doubt my Eagle would have got this close to being finished if I had left all the painting until last.


Mandrake7062 ( ) posted Tue, 16 June 2009 at 8:08 AM

I have been looking at the map for the body, but that's about it so far.
The body gets streaks of dirt coming off each one of those small boxes, sort of what I wanted to talk to you about.. getting that lined up right.
Have to stay focused on the modeling though because there are all sorts of design flaws in the blueprint, overlapping feet, no connection between the frame and transmission, fun stuff.


Becco_UK ( ) posted Thu, 18 June 2009 at 7:01 PM

file_433150.jpg

The completed front walkway - the textured panel grills turned out better than I expected.


Becco_UK ( ) posted Sat, 20 June 2009 at 6:14 PM

file_433231.jpg

The large blocks in the command module have been modified - the edges of those have been given a 1/4" radius to match the diameter of the cargo pods framework tubes.


Mandrake7062 ( ) posted Sun, 21 June 2009 at 6:36 PM

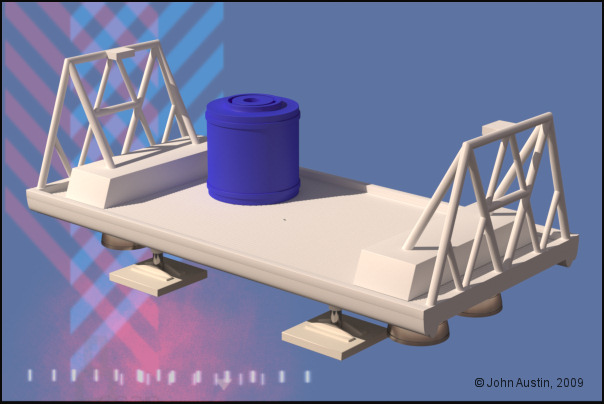
Looks great Becco, like your Sun light too. That walkway render is a beauty also, model is really looking sharp. I like the detail seen at the back walkway door!
Update on Walker: I finished the engine in the rear, worked on the neck, and did some basic head points. UV mapped the body, as per your suggestion, baked it and added a touch of zinc, So there is no AO activated in this render.
http://www.kdf-computers.com/download/Capture89.jpg


Mandrake7062 ( ) posted Mon, 22 June 2009 at 7:06 AM

After studying the backdoor more closely, wouldn't it make sense to have those support beams spread across more and the crossmember a bit higher and maybe a step box, so they can get in and out of the door. Just a little nitpicking.


Privacy Notice

This site uses cookies to deliver the best experience. Our own cookies make user accounts and other features possible. Third-party cookies are used to display relevant ads and to analyze how Renderosity is used. By using our site, you acknowledge that you have read and understood our Terms of Service, including our Cookie Policy and our Privacy Policy.
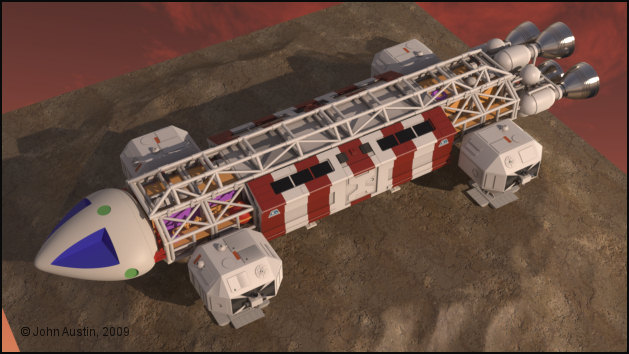
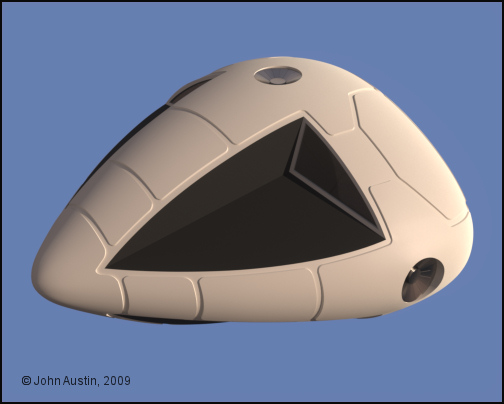
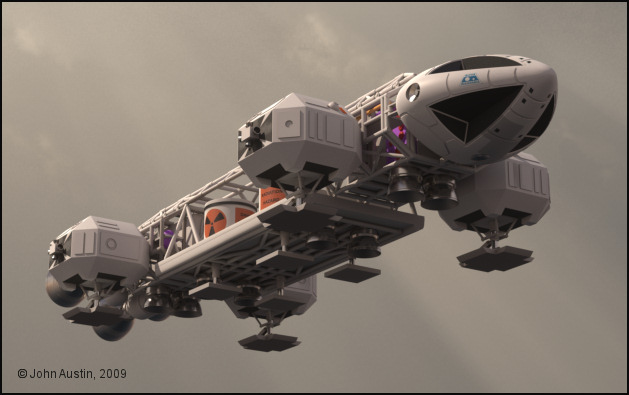