Renderosity Forums / 3DS MAX
Welcome to the 3DS MAX Forum
Forum Moderators: wheatpenny
3DS MAX F.A.Q (Last Updated: 2024 Aug 27 11:07 am)
Welcome to the 3DS Max Forum!
Considering 3ds Max? Download the FREE 30-day trial here

Ready to purchase 3ds Max? Go here
Renderosity maintains a zero tolerance policy concerning the trading/use of illegal software.
Refer to the Terms Of Service for the lowdown concerning warez.
POSER/MAX FAQ - This covers MANY of the issues involved when using Max in conjunction with Poser.
Take the time to look over this post before starting a thread in the forum.
Checkout the Renderosity MarketPlace - Your source for digital art content!

Enjoy your stay and keep coming back!

Subject: Modelling assistance - reverse chamfer?

- 1
- 2

Joker Martini has a nice solution to creating all kinds of simulated welds, and as luck would have it, it's free.
It's called Welder. It's a plugin maxscript that works like a charm to create simulated concave and convex weld lines between objects.
______________________________________
My Store
My Free Models
My Video Tutorials
My CG Animations
Instagram: @luxxeon3d
Facebook: https://www.facebook.com/luxxeon
If you want an even more integrated solution that works for many more issues, and replaces the native chamfer entirely. It's Quad Chamfer by Marius Silaghi. This modifier is amazing, and being a modifier, you can work with it procedurally in the stack, just like any other modifier. It can push or pull your chamfer to create convex curved or extruded chamfers, and best part is, it quads the corners beautifully. Just like the new bevel tool in C4D r15.
It's well worth the price, and I expect this plugin to appear in future versions of Max as a standard tool.
______________________________________
My Store
My Free Models
My Video Tutorials
My CG Animations
Instagram: @luxxeon3d
Facebook: https://www.facebook.com/luxxeon

Wow, that Weld script looks great, lux! Nice find.
I purchased the Quad Chamfer modifier by Marius last year, and it has totally replaced the chamfer in my workflow. In fact it's changed the way I model almost entirely now. I use it in place of extruding edges, chamfering, and a variety of things. It's super handy to have this as a modifier too. The push feature built into it makes it amazingly useful and powerful modelling tool.
Tools : 3dsmax 2015, Daz Studio 4.6, PoserPro 2012, Blender
v2.74
System: Pentium QuadCore i7, under Win 8, GeForce GTX 780 / 2GB
GPU.
Thanks. Welder is cute. Quad Chamfer is awesome. But 40 Euros for a modifier is hard to justify as a hobbyist. : (
<strong>bandolin</strong><br />
[Former 3DS Max forum coordinator]<br />
<br />
<a href="http://www.renderosity.com/homepage.php">Homepage</a> ||
<a href="http://www.renderosity.com/mod/sitemail/">SiteMail</a> ||
<a href="http://excalibur.renderosity.com/mod/gallery/browse.php?user_id=70375">
Gallery</a> || <a href="http://www.renderosity.com/mod/freestuff/index.php?username=bandolin">
Freestuff</a>
<p><em>Caution: just a hobbyist</em></p>Now Maxx is having me look into my wallet to see if I can't find a way to fork over the bucks to buy it. The video was impressive.
<strong>bandolin</strong><br />
[Former 3DS Max forum coordinator]<br />
<br />
<a href="http://www.renderosity.com/homepage.php">Homepage</a> ||
<a href="http://www.renderosity.com/mod/sitemail/">SiteMail</a> ||
<a href="http://excalibur.renderosity.com/mod/gallery/browse.php?user_id=70375">
Gallery</a> || <a href="http://www.renderosity.com/mod/freestuff/index.php?username=bandolin">
Freestuff</a>
<p><em>Caution: just a hobbyist</em></p>Marius is a genius in my opinion, and many of his plugins should become integrated, standard tools in 3dsmax. Quad Chamfer is probably one of the top 5 most useful and intelligent plugins available for 3dsmax. So if you have the money, I highly recommend it. I think the price is more than fair for what it brings to the table. There's other plugins out there that can do quad chamfering too (the RappaTools plugin has a version of it integrated), but they don't work as a modifier, and they don't have the optional push feature. You can use Quad Chamfer on faces, edges, border, and even vertex selections, with options to quad the ends, and intersections, and apply multiple segments. It's handy anywhere you use chamfer, or extruded/intruded edges previously.
______________________________________
My Store
My Free Models
My Video Tutorials
My CG Animations
Instagram: @luxxeon3d
Facebook: https://www.facebook.com/luxxeon
What happens when you upgrade Max? Do you have to buy it all over again?
<strong>bandolin</strong><br />
[Former 3DS Max forum coordinator]<br />
<br />
<a href="http://www.renderosity.com/homepage.php">Homepage</a> ||
<a href="http://www.renderosity.com/mod/sitemail/">SiteMail</a> ||
<a href="http://excalibur.renderosity.com/mod/gallery/browse.php?user_id=70375">
Gallery</a> || <a href="http://www.renderosity.com/mod/freestuff/index.php?username=bandolin">
Freestuff</a>
<p><em>Caution: just a hobbyist</em></p>Compatibility
The Quad Chamfer modifier works with 3ds Max and 3ds Max Design 9/2008/2009/2010/2011/2012/2013/2014 (32 & 64 Bit).
It works with every version of Max from version 9 on up, so if you have 2013, it will work in 2014 when you upgrade. We don't know yet how 2015 will break things, but Marius only charges an upgrade price when he adds new stuff to his plugins. I have a suspicion we will see some of his plugins as integrated features in new versions of Max anyway. Quad chamfer is one of the most voted on new features at the Autodesk wishlist for 2015.
______________________________________
My Store
My Free Models
My Video Tutorials
My CG Animations
Instagram: @luxxeon3d
Facebook: https://www.facebook.com/luxxeon
If Autodesk incorporates it like they did guruware's import/export it will boost Max's modeling convenience enormously. Thanks for the info.
<strong>bandolin</strong><br />
[Former 3DS Max forum coordinator]<br />
<br />
<a href="http://www.renderosity.com/homepage.php">Homepage</a> ||
<a href="http://www.renderosity.com/mod/sitemail/">SiteMail</a> ||
<a href="http://excalibur.renderosity.com/mod/gallery/browse.php?user_id=70375">
Gallery</a> || <a href="http://www.renderosity.com/mod/freestuff/index.php?username=bandolin">
Freestuff</a>
<p><em>Caution: just a hobbyist</em></p>Quote - If Autodesk incorporates it like they did guruware's import/export it will boost Max's modeling convenience enormously. Thanks for the info.
Yes, it's bound to become part of the native workflow. It's even superior to C4D's new bevel tool, and Maxon built an entire release around that feature. The quesiton is, will AD make it a modifier, like Marius's version of it, or will they just incorporate quad chamfering into the current chamfer tool, as an extended parameter. My personal opinion is that it should be a modifier, just as Marius had created it. This allows for the most versatility, and ease of use, and allows you to do a lot more things with it than just chamfer edges.
While you are at it, bandolin, you might want to incorporate VG's Megabevel into your modeling workflow. It's totally free, and compatible with Max 8 or higher. This powerful bevel modifier not only expands on the standard bevel tool in 3dsmax, as a modifier, but also incorporates many interesting parameters and features that I have not seen done with a bevel tool in any other modeling package. Very useful.
______________________________________
My Store
My Free Models
My Video Tutorials
My CG Animations
Instagram: @luxxeon3d
Facebook: https://www.facebook.com/luxxeon
Can't wait to get home to try it out.
<strong>bandolin</strong><br />
[Former 3DS Max forum coordinator]<br />
<br />
<a href="http://www.renderosity.com/homepage.php">Homepage</a> ||
<a href="http://www.renderosity.com/mod/sitemail/">SiteMail</a> ||
<a href="http://excalibur.renderosity.com/mod/gallery/browse.php?user_id=70375">
Gallery</a> || <a href="http://www.renderosity.com/mod/freestuff/index.php?username=bandolin">
Freestuff</a>
<p><em>Caution: just a hobbyist</em></p>
This is one way Quad Chamfer has impacted my workflow for the better. Creating shapes like this can be done a variety of ways in 3dsmax, depending on your preference. You could do it with the bridge tool, taper modifier, the set flow tools in Graphite, etc., etc. But very few of those solutions are as simple and flexible as selecting just one edge loop, apply Quad Chamfer to it, adjust the amount and segments, and use the push parameter to scale it in or out. Everything you need is right there in one modifier, and easily accessed.
Tools : 3dsmax 2015, Daz Studio 4.6, PoserPro 2012, Blender
v2.74
System: Pentium QuadCore i7, under Win 8, GeForce GTX 780 / 2GB
GPU.

<strong>bandolin</strong><br />
[Former 3DS Max forum coordinator]<br />
<br />
<a href="http://www.renderosity.com/homepage.php">Homepage</a> ||
<a href="http://www.renderosity.com/mod/sitemail/">SiteMail</a> ||
<a href="http://excalibur.renderosity.com/mod/gallery/browse.php?user_id=70375">
Gallery</a> || <a href="http://www.renderosity.com/mod/freestuff/index.php?username=bandolin">
Freestuff</a>
<p><em>Caution: just a hobbyist</em></p>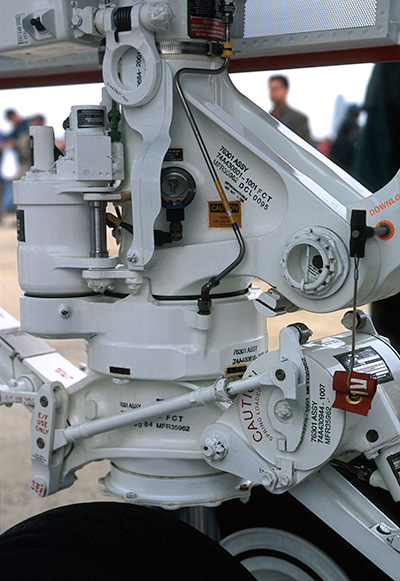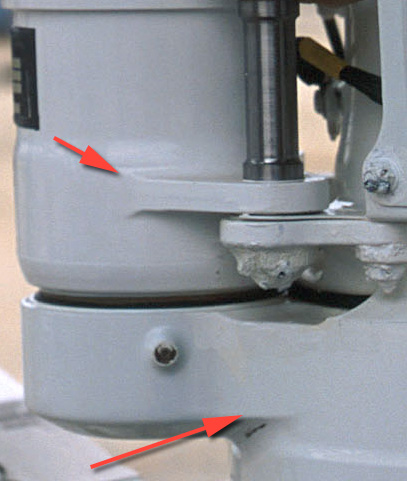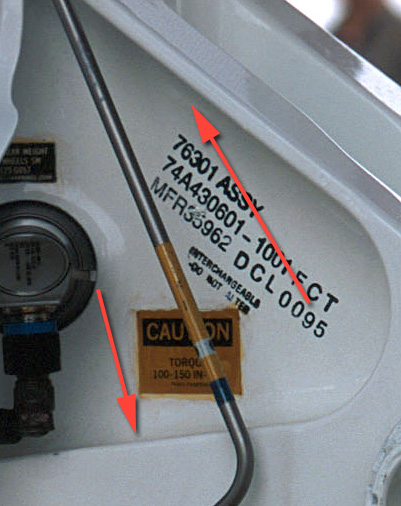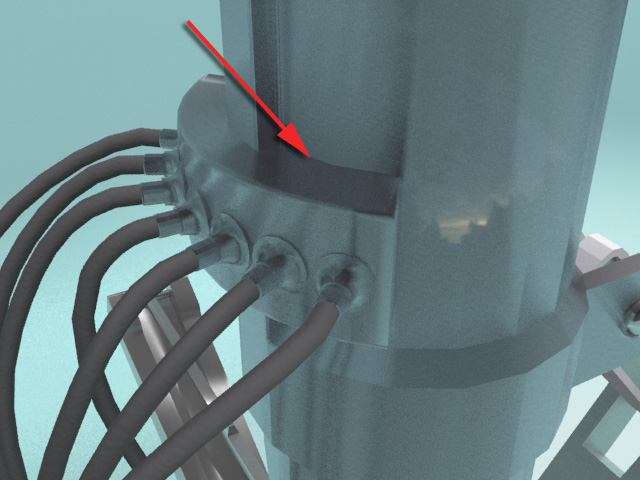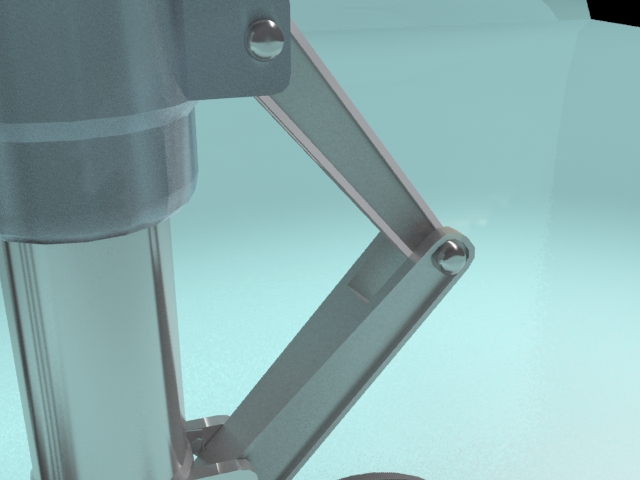
<strong>bandolin</strong><br />
[Former 3DS Max forum coordinator]<br />
<br />
<a href="http://www.renderosity.com/homepage.php">Homepage</a> ||
<a href="http://www.renderosity.com/mod/sitemail/">SiteMail</a> ||
<a href="http://excalibur.renderosity.com/mod/gallery/browse.php?user_id=70375">
Gallery</a> || <a href="http://www.renderosity.com/mod/freestuff/index.php?username=bandolin">
Freestuff</a>
<p><em>Caution: just a hobbyist</em></p>Quote - Notice the subtle but important integration of the various parts. In this example we have (from a modelling perspective) a shape attached to a cylinder. This seamless yet almost organic melding of metal parts is the effect I'm trying to achieve.
Seems like pretty straight forward hard surface subD modeling. Is there a topology issue you're having trouble with, or are you stuck on how to achieve something in particular? Those shapes are perfect candidates for the Quad Chamfer modifier we are talking about, in the sense that there's a lot of beveling and chamfering required, where the push option, and smoothing params within the modifier would make short work of it.
The set flow and other commands in the Loop tools of the Graphite ribbon should be of great assistance here as well. Especially for making the concave blending in some of those shapes.
______________________________________
My Store
My Free Models
My Video Tutorials
My CG Animations
Instagram: @luxxeon3d
Facebook: https://www.facebook.com/luxxeon
I know the Quad Chamfer is exactly what I need. I am intrigued about the Set Flow you are talking about. Not familiar with that.
<strong>bandolin</strong><br />
[Former 3DS Max forum coordinator]<br />
<br />
<a href="http://www.renderosity.com/homepage.php">Homepage</a> ||
<a href="http://www.renderosity.com/mod/sitemail/">SiteMail</a> ||
<a href="http://excalibur.renderosity.com/mod/gallery/browse.php?user_id=70375">
Gallery</a> || <a href="http://www.renderosity.com/mod/freestuff/index.php?username=bandolin">
Freestuff</a>
<p><em>Caution: just a hobbyist</em></p>Here's an example of what I mean about the Loop tools, and how you can use them to make some nice shape blending for hard surface modeling.
Let's say you have a planar box shape, and you want to make a specific part of it concave, or as if a tube was booleand into one side...

You can use the Curve edges command in the Loop Tools panel for this, very easily, without messing up the topology. Here's how. On the side you want a concave curvature, select two points at either end, and push (or pull) them in as deep as you need the curve to be. These points are your "markers". They will indicate the deepest part of the curved surface, so you can be quite precise and use snapping or precise measurements. The only critical part is that you pick points that are within the area you want to make concave or convex.

Then, switch to edges, and select the exact edges you want to make concave (or convex).

Now, in the Loops Tools panel, just click on "Curve".

The result is that the edges will automatically become adjusted to the depth indicated by the vertex "markers".
This can be used, as you can imagine, in many circumstances where you need to blend planar surfaces with curved ones, without using booleans, or modeling with patch or nurbs surfaces.
The Quad Chamfer modifier can do this even easier, and all you would need is one edge loop to start, as in the image Maxxmodels posted.
Some of the shapes you posted can be done easily this way, or with similar tools in Graphite, like Set Flow.
______________________________________
My Store
My Free Models
My Video Tutorials
My CG Animations
Instagram: @luxxeon3d
Facebook: https://www.facebook.com/luxxeon
I forgot to mention, in the example above, when you switch from vertex to edges, make sure the vertex "markers" you moved are still selected. In other words, when you go into edge mode, don't deselect the verts you moved, just leave them selected. The Curve edges command will use the selected verts that you moved as markers to interpolate the curvature of the edges you have selected.
______________________________________
My Store
My Free Models
My Video Tutorials
My CG Animations
Instagram: @luxxeon3d
Facebook: https://www.facebook.com/luxxeon
Got it. Very nice. So much stuff. Its easy to miss things in Max. This progam is so deep.
<strong>bandolin</strong><br />
[Former 3DS Max forum coordinator]<br />
<br />
<a href="http://www.renderosity.com/homepage.php">Homepage</a> ||
<a href="http://www.renderosity.com/mod/sitemail/">SiteMail</a> ||
<a href="http://excalibur.renderosity.com/mod/gallery/browse.php?user_id=70375">
Gallery</a> || <a href="http://www.renderosity.com/mod/freestuff/index.php?username=bandolin">
Freestuff</a>
<p><em>Caution: just a hobbyist</em></p>I'll be damned. Thanks for this! They should have you writing the help files, Lux. Now I understand how that works, and where it's useful. I didn't quite get it before, because the help file example is a bit convoluted, and doesn't explain what's going on all that well. Even with the Quad Chamfer modifier in my arsenal, I can now imagine certain situations where using this feature might make more sense, and it's been in front of me all along!
Tools : 3dsmax 2015, Daz Studio 4.6, PoserPro 2012, Blender
v2.74
System: Pentium QuadCore i7, under Win 8, GeForce GTX 780 / 2GB
GPU.
I'm guessing also if the "AutoLoop" ticker is checked, then the curvature would be applied to the entire edge loop where the edges are selected? So you'd only have to select one edge on that loop, tick the "AutoLoop" box, and the entire loop would be curved to the desired depth of the vertices? That's pretty slick I have to say.
Tools : 3dsmax 2015, Daz Studio 4.6, PoserPro 2012, Blender
v2.74
System: Pentium QuadCore i7, under Win 8, GeForce GTX 780 / 2GB
GPU.
Just to get back on topic here, I'd also suggest starting with spline modeling to achieve some of those shapes, like the lip on that cylinder. You can create the profile as a spline, then extrude the shape, and tweak it as polys.
This also goes for many of those indented shapes in the surface. I would start with say a capsule, then remove half, make it planar, then use Shift-drag on the border to extend the polys, then make the border of that square. Very easy way to achieve the indented parts. If you want, I'll give you an illustrated example later.
______________________________________
My Store
My Free Models
My Video Tutorials
My CG Animations
Instagram: @luxxeon3d
Facebook: https://www.facebook.com/luxxeon
This I've always known. I was looking for a faster method and you gave me one in the form of Quad Chamfer. However, I don't think it works on two separate objects. I believe it has to be part of the whole, if I'm understanding how that modifier works.
Therefore, your suggestion of using splines are really my only option.
<strong>bandolin</strong><br />
[Former 3DS Max forum coordinator]<br />
<br />
<a href="http://www.renderosity.com/homepage.php">Homepage</a> ||
<a href="http://www.renderosity.com/mod/sitemail/">SiteMail</a> ||
<a href="http://excalibur.renderosity.com/mod/gallery/browse.php?user_id=70375">
Gallery</a> || <a href="http://www.renderosity.com/mod/freestuff/index.php?username=bandolin">
Freestuff</a>
<p><em>Caution: just a hobbyist</em></p>Quote - This I've always known. I was looking for a faster method and you gave me one in the form of Quad Chamfer. However, I don't think it works on two separate objects. I believe it has to be part of the whole, if I'm understanding how that modifier works.
Therefore, your suggestion of using splines are really my only option.
Bandolin, why not just take the two separate objects, and attach them as sub-objects to one large editable poly? If you have two objects that are editable poly, select one, then click attach. This makes them both part of the same object, and Quad Chamfer will work as a modifier on them.
______________________________________
My Store
My Free Models
My Video Tutorials
My CG Animations
Instagram: @luxxeon3d
Facebook: https://www.facebook.com/luxxeon
Also, spline modeling is just one technique I would use. Many of those shapes are just primitives. I would also impliment hinge from edge, for example, to create the lips on some of those cylinders, and the Loop Tools and set flow tool to create the indents. Shouldn't take long really, once you get a hang of the workflow in the loop tools.
However, if you want modifiers to work on two objects together, just attach them as subobject elements of the same object.
______________________________________
My Store
My Free Models
My Video Tutorials
My CG Animations
Instagram: @luxxeon3d
Facebook: https://www.facebook.com/luxxeon
Ok, I didn't know that quad chamfer would work on two objects that have been attached. I don't pay close attention when I model and attach objects to each other they kind of pass inside somewhat.
Example: a cylinder into a box, let's say, the base of the cylinder will be inside the box and not precisely on the surface. If I use Quad Chamfer won't it try to chamfer the base of the cylinder? Or where the two objects actually intersect as if I had created a boolean?
" I would also impliment hinge from edge, for example, to create the lips on some of those cylinders, and the Loop Tools and set flow tool to create the indents. "
Not following you on this one.
<strong>bandolin</strong><br />
[Former 3DS Max forum coordinator]<br />
<br />
<a href="http://www.renderosity.com/homepage.php">Homepage</a> ||
<a href="http://www.renderosity.com/mod/sitemail/">SiteMail</a> ||
<a href="http://excalibur.renderosity.com/mod/gallery/browse.php?user_id=70375">
Gallery</a> || <a href="http://www.renderosity.com/mod/freestuff/index.php?username=bandolin">
Freestuff</a>
<p><em>Caution: just a hobbyist</em></p>Quote - Ok, I didn't know that quad chamfer would work on two objects that have been attached. I don't pay close attention when I model and attach objects to each other they kind of pass inside somewhat.
Example: a cylinder into a box, let's say, the base of the cylinder will be inside the box and not precisely on the surface. If I use Quad Chamfer won't it try to chamfer the base of the cylinder? Or where the two objects actually intersect as if I had created a boolean?
" I would also impliment hinge from edge, for example, to create the lips on some of those cylinders, and the Loop Tools and set flow tool to create the indents. "
Not following you on this one.
Ok, first, you should always model objects like you are talking about as one object, for that exact reason. A cylinder is very easy to extrude from anywhere on a box, and doing it this way will give you the greatest level of editing freedom. Being that you have modeled them as two distinctly different objects, then no, it's probably not going to work as you intended it to.
The box/cylinder example, I would suggest, creating them as ONE single object. More flexibility this way for creating bevels and chamfers where you want them. Even if you need to separate them later for whatever reason, at least you can simply detach them from each other, and continue working on one or the other later, separately.
For example:

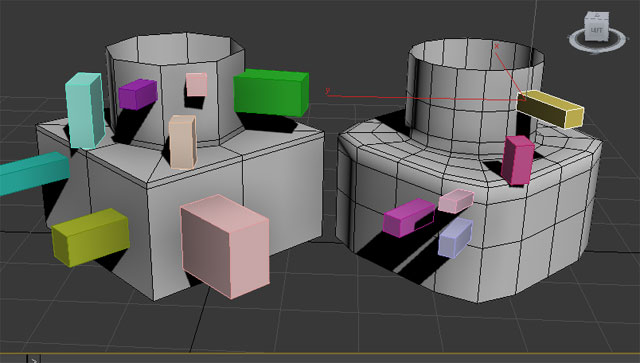
Here I've quickly modeled a cylilnder extruding from the box (base object on left, turbosmooth with 1 iteration on right), I have the option now to do any number of edit operations or modifications to the object to make them appear how I wish.
Is there a reason you modeled them separately?
______________________________________
My Store
My Free Models
My Video Tutorials
My CG Animations
Instagram: @luxxeon3d
Facebook: https://www.facebook.com/luxxeon
Rats. I'm at work and the image you provided won't display. I'll have to wait until I get home tonight.
<strong>bandolin</strong><br />
[Former 3DS Max forum coordinator]<br />
<br />
<a href="http://www.renderosity.com/homepage.php">Homepage</a> ||
<a href="http://www.renderosity.com/mod/sitemail/">SiteMail</a> ||
<a href="http://excalibur.renderosity.com/mod/gallery/browse.php?user_id=70375">
Gallery</a> || <a href="http://www.renderosity.com/mod/freestuff/index.php?username=bandolin">
Freestuff</a>
<p><em>Caution: just a hobbyist</em></p>Quote - Ok, I didn't know that quad chamfer would work on two objects that have been attached. I don't pay close attention when I model and attach objects to each other they kind of pass inside somewhat.
Bandolin, use either "snap to surface" in your snap options, or create your cylinder on the box using Autogrid. Either one of those tools will ensure your objects are touching, but not intersecting, while you model.
Hinge from edge that lux is talking about is a tool used to extrude curved shapes.
See here:
Tools : 3dsmax 2015, Daz Studio 4.6, PoserPro 2012, Blender
v2.74
System: Pentium QuadCore i7, under Win 8, GeForce GTX 780 / 2GB
GPU.

Maybe it's the free image host I'm using. Here's the image, attached to the post. Click to enlarge if necessary. Making this was literally a two step process. Very simple, and with some support loops, you can tighten all the corners nicely, and also add chamfers and bevels to any edge loop where needed. If I were to model this as two separate objects, with different vert count, etc, then I'm limited as to how to make them look like one piece.
Rule of thumb; if you're modeling something that is supposed to be one piece in real life, or something welded together as one piece in real life, then best to model it as such.
______________________________________
My Store
My Free Models
My Video Tutorials
My CG Animations
Instagram: @luxxeon3d
Facebook: https://www.facebook.com/luxxeon
Maybe snap to, but Autogrid sucks. It creates geometry at all kinds of weird angles. the only time it works if if the surface is on one of the axis and is not rotated in any way.
Autogrid has caused more problems for me than it solved. I refuse to use any longer. Its a great idea, but does not implement well.
<strong>bandolin</strong><br />
[Former 3DS Max forum coordinator]<br />
<br />
<a href="http://www.renderosity.com/homepage.php">Homepage</a> ||
<a href="http://www.renderosity.com/mod/sitemail/">SiteMail</a> ||
<a href="http://excalibur.renderosity.com/mod/gallery/browse.php?user_id=70375">
Gallery</a> || <a href="http://www.renderosity.com/mod/freestuff/index.php?username=bandolin">
Freestuff</a>
<p><em>Caution: just a hobbyist</em></p>Quote - Maybe snap to, but Autogrid sucks. It creates geometry at all kinds of weird angles. the only time it works if if the surface is on one of the axis and is not rotated in any way.
Autogrid has caused more problems for me than it solved. I refuse to use any longer. Its a great idea, but does not implement well.
That's the first time I've heard that complaint. Autogrid works as expected as far as I can tell, in every version of Max that I've used. The only exception, is if you are trying to autogrid on an object that was non-uniformly scaled, or scaled at the object level, where the pivot or normals were affected. On a smoothed object, it will use the smoothed normal, not the unsmoothed normal.
However, for more options and control, there's a ton of maxscripts dedicated to snapping objects to a surface,which expand on the already existing function in Max.
Here's just a few.
http://www.scriptspot.com/3ds-max/scripts/autoplace
http://www.scriptspot.com/3ds-max/scripts/snap2object-tool
http://www.scriptspot.com/3ds-max/scripts/instance-align
At any rate, I still suggest modeling as one object, if in fact your object is supposed to be connected in real life. Solves all your problems.
______________________________________
My Store
My Free Models
My Video Tutorials
My CG Animations
Instagram: @luxxeon3d
Facebook: https://www.facebook.com/luxxeon
Quote - Maybe snap to, but Autogrid sucks. It creates geometry at all kinds of weird angles. the only time it works if if the surface is on one of the axis and is not rotated in any way.
Autogrid has caused more problems for me than it solved. I refuse to use any longer. Its a great idea, but does not implement well.
Autogrid uses the face normals. I don't know how you were trying to use it, but it does what it says, and never any probs with that.
Edit: if your triangulation on a quad is screwed up, then that might cause unpredictable placement, but otherwise, can you show an example of how it isn't working right?
Tools : 3dsmax 2015, Daz Studio 4.6, PoserPro 2012, Blender
v2.74
System: Pentium QuadCore i7, under Win 8, GeForce GTX 780 / 2GB
GPU.
You know, I used to be a very strict modeller. I would read game design sites, ArchViz articles and industry animators on subjects of topology and modelling. However, it would take me an age and a day to create the stuff I wanted. My models were basically production ready.
Then it dawned me. I'm not in any industry working to do this stuff. My models will never be used for games or movies. Then I read a blog of this guy who did a project called "10 Days of Robots".
He created a project whereby he made 1 robot every day. Really high quality stuff. Amazing work. How did he do it 1 day? Well he explains quite well. He threw all the convential production methods out the window and just hacked things together. And the models were amazing.
So, I decided to adopt that philosophy. I've been creating stuff much faster, and quite frankly I've been having more fun as I see results in a timely manner.
<strong>bandolin</strong><br />
[Former 3DS Max forum coordinator]<br />
<br />
<a href="http://www.renderosity.com/homepage.php">Homepage</a> ||
<a href="http://www.renderosity.com/mod/sitemail/">SiteMail</a> ||
<a href="http://excalibur.renderosity.com/mod/gallery/browse.php?user_id=70375">
Gallery</a> || <a href="http://www.renderosity.com/mod/freestuff/index.php?username=bandolin">
Freestuff</a>
<p><em>Caution: just a hobbyist</em></p>I don't subscribe to that philosophy, but if it works for you, then that's all good. How you decide to model is up to you in the end, but I can tell you from experience, creating one high quality object per day is not that difficult, even if you do it "correctly". By correctly, I mean, of course, good logical modeling technques.
I've modeled 6 freebies, and an entire fully furnished office, from scratch, in about 4 weeks, using only Max and 3dCoat for texturing. All together, I was averaging like 2 models per day. I don't think I skimped on any quality doing so, but that's in the eye of the beholder I guess. I try to maintain a high level of quality in my work, because I plan to redistribute my objects for others to use. You never know if someone will want to edit my objects to suite their needs, and I allow that, so I try to keep things clean and easy to manage.
One thing I hate is trying to edit someone else's objects, where they've not taken a reasonable approach to modeling whatever it is, and I end up finding it quicker just to model it from scratch rather than try to manipulate their mesh.
In most cases, the speed at which you can create something has everything to do with knowing your tools. You can easily model things with proper topology, and logical edge flow, as quickly as someone just kit bashing something together, if you know how to begin with. That's my philosophy. Mileage of course may vary.
______________________________________
My Store
My Free Models
My Video Tutorials
My CG Animations
Instagram: @luxxeon3d
Facebook: https://www.facebook.com/luxxeon
I placed all these squares on both the base and turbosmoothed models with the Autogrid tool. It worked as expected each time, as it placed them on each poly face normal. I don't see any unusual behavior going on, even in the turbosmoothed version. It's using the smoothed normals, but that's to be expected.
Does Maya have a similar tool? If so, how does it differ/improve upon this feature?
______________________________________
My Store
My Free Models
My Video Tutorials
My CG Animations
Instagram: @luxxeon3d
Facebook: https://www.facebook.com/luxxeon
I agree completely. The two model sets I have on sale here at Rendo were created in the way you described above. But I'm a hobbyist. The amount of time I have to spend in front of my computer is limited, largely predicated upon my wife's mood so my ability to learn new techniques is curtailed as well.
But she's away visiting family for a month, which is why you've probably noticed I've been more active here than usual. So, I'm up till midnight every night playing in Max and I'm having a ball.:thumbupboth:
<strong>bandolin</strong><br />
[Former 3DS Max forum coordinator]<br />
<br />
<a href="http://www.renderosity.com/homepage.php">Homepage</a> ||
<a href="http://www.renderosity.com/mod/sitemail/">SiteMail</a> ||
<a href="http://excalibur.renderosity.com/mod/gallery/browse.php?user_id=70375">
Gallery</a> || <a href="http://www.renderosity.com/mod/freestuff/index.php?username=bandolin">
Freestuff</a>
<p><em>Caution: just a hobbyist</em></p>You are responding faster than I can. So, my response is one behind yours. lol.
In regards to Autogrid. I was creating a Sci Fi environment whereby control panels had to rest upon station surfaces. The panels had to be right on them as if they were bolted to them. As an example (sorry I'm not trying to push my site here) but if you visit www.bandolin.net > Digital Art > 3D Art > Environments > NX-01 Project, you'll see what I mean.
When I tried to use Autogrid the panels would not be at the perfect angle, it would be ever so slightly off. Enough to notice. So, I gave up using it.
<strong>bandolin</strong><br />
[Former 3DS Max forum coordinator]<br />
<br />
<a href="http://www.renderosity.com/homepage.php">Homepage</a> ||
<a href="http://www.renderosity.com/mod/sitemail/">SiteMail</a> ||
<a href="http://excalibur.renderosity.com/mod/gallery/browse.php?user_id=70375">
Gallery</a> || <a href="http://www.renderosity.com/mod/freestuff/index.php?username=bandolin">
Freestuff</a>
<p><em>Caution: just a hobbyist</em></p>Quote - You are responding faster than I can. So, my response is one behind yours. lol.
In regards to Autogrid. I was creating a Sci Fi environment whereby control panels had to rest upon station surfaces. The panels had to be right on them as if they were bolted to them. As an example (sorry I'm not trying to push my site here) but if you visit www.bandolin.net > Digital Art > 3D Art > Environments > NX-01 Project, you'll see what I mean.
When I tried to use Autogrid the panels would not be at the perfect angle, it would be ever so slightly off. Enough to notice. So, I gave up using it.
I'll have to check out the example you mean to see what's going on there for sure, but I have an idea of what went wrong. The reason I think it failed you in that case is because you may have been trying to place a large object onto a heavily divided or tessellated object. It won't work presicely in that situation, because the larger object needs a surface normal to use for placement, and if the receiving surface is heavily subdivided, or has many normals facing different angles, it has nowhere to go, and has to pick just one polygon normal. This isn't a job for the autogrid, and it would be no wonder you got frustrated. Autogrid will not "average" the normals of a surface. It picks just ONE polygon normal, and uses it.
In that case, I may have suggested using Object Paint tools in the Graphite Panel, which has many options for object placement on a surface, and can work in many situations where the surface is complex. Or perhaps a maxscript like Advanced Painter, or Ultimate Painter. Same concept as the Object Paint tools.
When considering when to use autogrid, just consider if your polygons, on the object you are placing to, constain large enough planar surface area, and make sure you aren't trying to autogrid on a polygon with some odd normals issue, or bad triangulation.
Also, be sure to reset your pivot point transforms before doing certain operations, because that can screw up so many things in Max, it isn't funny. Never rescale at object level, and if you do, always reset your transforms.
______________________________________
My Store
My Free Models
My Video Tutorials
My CG Animations
Instagram: @luxxeon3d
Facebook: https://www.facebook.com/luxxeon
All great suggestions. Thanks
<strong>bandolin</strong><br />
[Former 3DS Max forum coordinator]<br />
<br />
<a href="http://www.renderosity.com/homepage.php">Homepage</a> ||
<a href="http://www.renderosity.com/mod/sitemail/">SiteMail</a> ||
<a href="http://excalibur.renderosity.com/mod/gallery/browse.php?user_id=70375">
Gallery</a> || <a href="http://www.renderosity.com/mod/freestuff/index.php?username=bandolin">
Freestuff</a>
<p><em>Caution: just a hobbyist</em></p>Great thread, guys! I've been modelling now for almost 10 years in 3dsmax. I have been using it as my primary modelling tool for a good 8 of those 10. I didn't use it exclusively for modelling until 2010, with the addition of the Graphite tools. I really felt it was lacking some features before then. But now it's 4 years later, and I'm actually still learning what all these tools in the ribbon can do, and how they can compliment my previous modelling workflow.
I'd like to point out too, that I never got into using Maxscripts until recently, and my god, what I have been missing! I really suggest anyone who is wishing Max had this tool or that tool to go over to Scriptspot and look around. Chances are very high that someone out there invented a Maxscript that can do whatever it is you want. I've started really using some of the free scripts from there, and they have helped take my workflow to a new level of productivity.
Which brings me to this... Have either of you guys tried Rappatools yet? Rappatools 3 looks unbelievably cool! Some stuff I have never seen before. He claims there's 200+ features in there, mostly for modelling, and the website shows you exactly what everything does. Scroll down to where the tool panel is, and click on the buttons. It shows you a display of what each tool does. Many of them are just repeated tools we have in Graphite already, but in a much easier to access layout, but he has some stuff in there that are not possible in Max at all yet. Like the spline bridge function, and the SmartQuads feature. Looks amazing!
http://remusjuncu.com/rappatools/
I'd like to hear what you guys think about it, because I'm about ready to buy this thing. I have the free version, and love it, but I really want those added features.
Tools : 3dsmax 2015, Daz Studio 4.6, PoserPro 2012, Blender
v2.74
System: Pentium QuadCore i7, under Win 8, GeForce GTX 780 / 2GB
GPU.
@ maxxxmodelz,
Check your email.
______________________________________
My Store
My Free Models
My Video Tutorials
My CG Animations
Instagram: @luxxeon3d
Facebook: https://www.facebook.com/luxxeon
@Bandolin,
Here's an alternative to Quad Chamfer, at about $15 cheaper. It's called EdgeChEx. Looks like it can do some of the same stuff, but missing a lot of the features of Marius's version. Has a demo also, if you wanna test drive it. $40 US.
http://www.vg2max.spb.ru/EdgeChEx.htm
For the extra cash, I think Quad Chamfer is worth it.
______________________________________
My Store
My Free Models
My Video Tutorials
My CG Animations
Instagram: @luxxeon3d
Facebook: https://www.facebook.com/luxxeon
Yeah I came across that last night. I actually thought it was the pared down version of Quad Chamfer, it looked that similar. But if I'm going to shell out money I'd rather go for the cadillac tools. 
<strong>bandolin</strong><br />
[Former 3DS Max forum coordinator]<br />
<br />
<a href="http://www.renderosity.com/homepage.php">Homepage</a> ||
<a href="http://www.renderosity.com/mod/sitemail/">SiteMail</a> ||
<a href="http://excalibur.renderosity.com/mod/gallery/browse.php?user_id=70375">
Gallery</a> || <a href="http://www.renderosity.com/mod/freestuff/index.php?username=bandolin">
Freestuff</a>
<p><em>Caution: just a hobbyist</em></p>Quote - Yeah I came across that last night. I actually thought it was the pared down version of Quad Chamfer, it looked that similar. But if I'm going to shell out money I'd rather go for the cadillac tools.
Good idea, because I just downloaded the EdgChEx demo to see what the differences were between the two. While EdgChEX is certainly a very useful and clever plugin, with many options, it's simply not as robust as Quad Chamfer modifier. Quad Chamfer allows you to work on all available sub-objects (faces,borders,edges, and vertex), while EdgChEx works only with edges and borders. The extrude feature in EdgeChex is a little sloppy in my opinion (granted it's also crippled in the demo), and you need to use a weld parameter to clean up the operation, or the ends of the new extruded edges are messed up. I can see where that might be handy when making very narrow chamfers, where edges might overlap, but it still didn't seem to work right. Quad Chamfer uses a much more simple and elegant solution, and the built-in push and inset parameters create much cleaner, and arguably more logical, geometry beveling, which can be used to fillet, or create domed bevels.
______________________________________
My Store
My Free Models
My Video Tutorials
My CG Animations
Instagram: @luxxeon3d
Facebook: https://www.facebook.com/luxxeon
I was browsing the scriptspot site. The scripts aren't organized by category (they should make a script that'll do it for them lol) so its a little tedious having to scroll through all the pages.
Also, some scripts end in mse and not just ms. How do you install those?
<strong>bandolin</strong><br />
[Former 3DS Max forum coordinator]<br />
<br />
<a href="http://www.renderosity.com/homepage.php">Homepage</a> ||
<a href="http://www.renderosity.com/mod/sitemail/">SiteMail</a> ||
<a href="http://excalibur.renderosity.com/mod/gallery/browse.php?user_id=70375">
Gallery</a> || <a href="http://www.renderosity.com/mod/freestuff/index.php?username=bandolin">
Freestuff</a>
<p><em>Caution: just a hobbyist</em></p>- 1
- 2
Privacy Notice
This site uses cookies to deliver the best experience. Our own cookies make user accounts and other features possible. Third-party cookies are used to display relevant ads and to analyze how Renderosity is used. By using our site, you acknowledge that you have read and understood our Terms of Service, including our Cookie Policy and our Privacy Policy.
We all know how to create a chamfer. Nice rounded corners are essential to creating realism. That anistropic hilight the runs along the edge of an object goes a long way to creating a convincing scene.
However, that is for an exterior edge or convex curve. What about an interior edge or concave curve. The Chamfer function works sometimes but not consistently and certainly not when you have two objects.
Example: a box sitting on a plane and let's say they are two metal objects. You can create a nice chamfer at the top of the box, but how about the base where the two objects meet as if there is a weld seam there. A nice concave chamfer to make the two objects appear to be connect as one.
I've been looking for a elegant method to model this. Maya actually has a tool that does this quite nicely. I saw it in a vid tut once. Does Max have something similar?