Renderosity Forums / Poser - OFFICIAL
Welcome to the Poser - OFFICIAL Forum
Forum Moderators: RedPhantom Forum Coordinators: Anim8dtoon
Poser - OFFICIAL F.A.Q (Last Updated: 2026 Jun 17 11:08 am)

Subject: How do you Dirty Up Texture Maps and Procedurals for realism.txt

As far as I know, everyone does dirty and weathered stuff in Photoshop and similar. Yes, you can add dirt and grime using shaders - I've done it with brickwork - but a lot of the time it's simpler to do in a graphics app.
I think there are some tutorials here and maybe at DAZ, if they still have them.
Coppula eam se non posit acceptera jocularum.

Thanks for the reply's
Hum,Perhaps I should have reworded my post
I did not mention that I meant to use Photoshop for applied textures not doing "Post Working " the textures. I plan on making video animations, so "Post Work" would not be practical. Texture Baking is not available in Poser and for animations it only works for static objects in fixed lighting conditions.
I was specifically thinking of applied textures, as opposed to postwork. A dead simple approach would be to take a copy of the original textures, duplicate the layer and delete everything on it except the actual textures themselves. Then, use an effect such as Inner Glow set to black or dark brown. This will give you dirty edges to every surface, which is a start.
Coppula eam se non posit acceptera jocularum.

Another idea you can try is to create some "scratch" brushes. Draw a few jagged lines using a 1 pixel brush, in an area of 32 x 32 pixels. Grab that and use "Define Brush", then save it as Scratch 1. Repeat the process with different patterns of lines, saving them all under different names.
Create a new layer and select one of your brushes. Switch on Brush Dynamics, and vary Roundness and Angle. This will ensure your brush changes orientation and shape as you paint with it. Select black as your Foreground colour and use a low opacity.
Paint on the new blank layer with this brush. Change brushes after a while and repeat the process. With care, you'll have a layer full of fine scratches which you can then blend with the painted textures. Duplicating the layer and changing the colours can also give the effect of scratches through to bare metal, or just into an undercoat or primer.
If you create a layer of scratches only you can also use them to make a bump/displacement map.
Paint over some areas in plain grey, as if the paint has worn off. Add brown and orange speckles for rust.
A low opacity Clouds layer in browns can also give the appearance of varying levels of dirt across otherwise plain areas.
Coppula eam se non posit acceptera jocularum.


you could add a noise node to add a bit of grit to the too shiny surfaces.
snow machine?
ooo, could it do like beer suds?
♥ My Gallery Albums ♥ My YT ♥ Party in the CarrarArtists Forum ♪♪♪ 10 years of Carrara forum ♥ My FreeStuff

Attached Link: http://www.runtimedna.com/ShaderWorks-Python-script-for-Dirty-Shaders-light-version.html
try this:-I aim to update it about once a month. Oh, and it's free!
esthersau
"Attached Link: http://www.runtimedna.com/ShaderWorks-Python-script-for-Dirty-Shaders-light-version.html "
Says it Is for Poser 7 only does it work for 2012 ?

I have the dirty shaders and the script, don't think it's really what he's looking for...
If you do any kind of post-work in photoshop you might want to consider using a recorded action to batch process the animation frames. I've done this to short animation files in Adobe ImageReady.
I'm still leaning toward the use of artifact heavy AO lights... There's a thread in the archives about creating Dirt Maps Using AO. I'll try to track it down.

Scroll down a bit here; it's for skin but should work on cars....
http://www.renderosity.com/mod/forumpro/showthread.php?thread_id=2759780&page=5
----------------------------------------------------------------------------------------
The Wisdom of bagginsbill:
"Oh - the manual says that? I have never read the manual - this must be why."“I could buy better software, but then I'd have to be an artist and what's the point of that?"
"The [R'osity Forum Search] 'Default' label should actually say 'Don't Find What I'm Looking For'".
bagginsbill's Free Stuff... https://web.archive.org/web/20201010171535/https://sites.google.com/site/bagginsbill/Home

Would this work?
http://www.daz3d.com/shop/hybrid-grunge-bundle-for-poser
That is the entire bundle, there are items for grime or rust only.
I got the ragerator part of it some time ago and it works fine.
Love esther
I aim to update it about once a month. Oh, and it's free!

thanks semidieu.
OMG see shaderworks libary manager 2 is out, and on sale!
Love esther
I aim to update it about once a month. Oh, and it's free!
PoserPro 2014, PS CS5.5 Ext, Nikon D300. Win 8, i7-4770 @ 3.4 GHz, AMD Radeon 8570, 12 GB RAM.

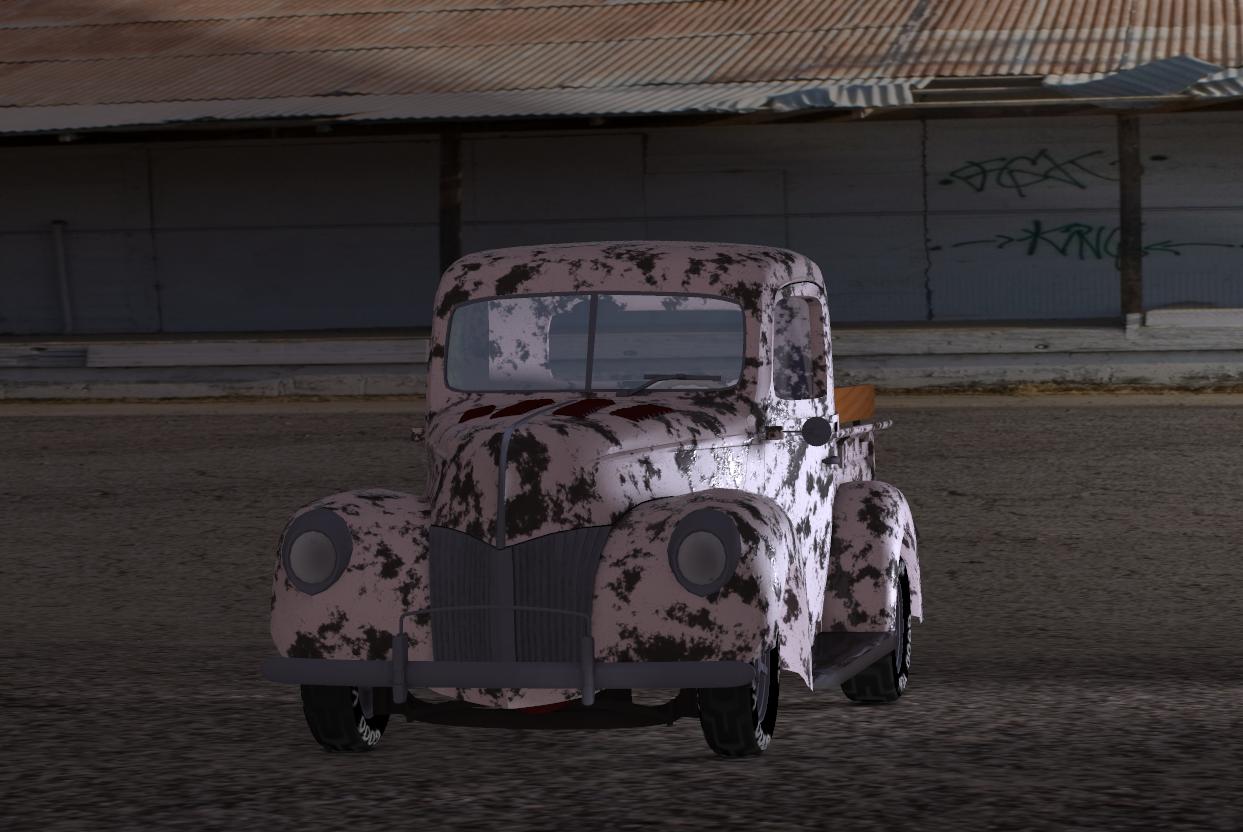
Here's my attempt at rusting up the WW2 Jeep from Daz... (click the image for much larger Gallery view)

The rust patches and the dirt on the tyres are procedural blends (using the math blend node) to mix BB's car paint shaders with some scratch / damage color_map nodes, that are driving both color and negative displacement in the rust patches.
The blending is driven by a procedural spots node.
Still working on this... e.g. per Sam's suggestion in the comments I'm taking down the gloss and trying to get the effect of lots of tiny scratches / scours / abrasions on the paintwork.
I thought the displaced, erosion effect turned out looking okay in places at least...
e.g. on the radiator grill and, in particular, on the inside rims of the wheels.

Military paint is usually almost matte finish (blurry) and no clear coat (so low IOR).
I'd reduce IOR to 1.2 and reflectivity to .2 or less and increase blur to 1 or more.
Renderosity forum reply notifications are wonky. If I read a follow-up in a thread, but I don't myself reply, then notifications no longer happen AT ALL on that thread. So if I seem to be ignoring a question, that's why. (Updated September 23, 2019)

If you're using the Chevy Panel Van car paint, I foolishly did not include a PM node for blur (Reflect softness). You will find the Reflect node in the 5th column of nodes to the right of the PoserSurface.
Renderosity forum reply notifications are wonky. If I read a follow-up in a thread, but I don't myself reply, then notifications no longer happen AT ALL on that thread. So if I seem to be ignoring a question, that's why. (Updated September 23, 2019)
Quote - If you're using the Chevy Panel Van car paint, I foolishly did not include a PM node for blur (Reflect softness). You will find the Reflect node in the 5th column of nodes to the right of the PoserSurface.
Ah, thanks - I'll track down that node... and get to understand a tiny bit more about the structure of that shader in the process then, he he... 
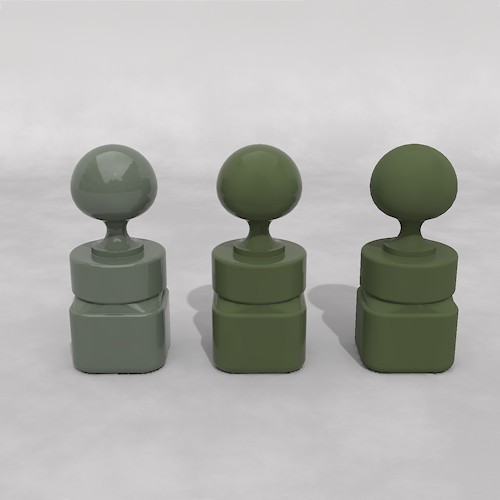
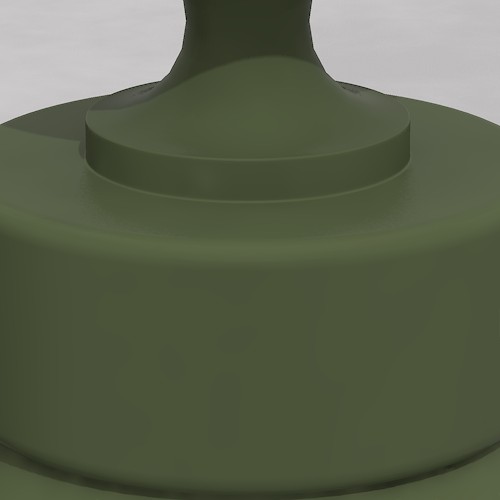
For comparison, left to right:
Paint Olive (showing the usual high shine of car paint)
Paint Army (as delivered)
Paint Army modified: Reflection Value=.2, Reflect:Softness=1
Renderosity forum reply notifications are wonky. If I read a follow-up in a thread, but I don't myself reply, then notifications no longer happen AT ALL on that thread. So if I seem to be ignoring a question, that's why. (Updated September 23, 2019)
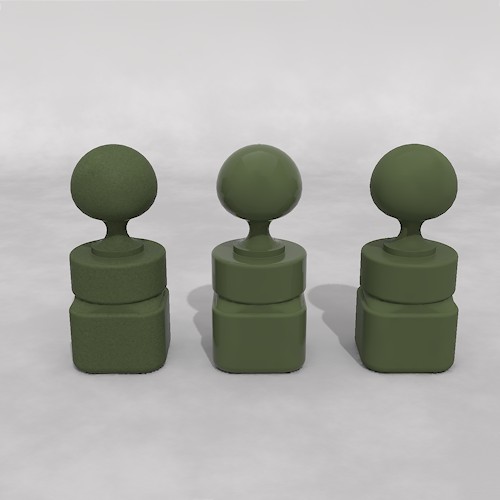
I changed the first pawn here to Pole Paint, copying the Diffuse Color from the Paint Army.
The Pole Paint has a PM:Blur node for easy access to that, and also built in modulation of the paint, as if it is non-uniformly weathered.
Renderosity forum reply notifications are wonky. If I read a follow-up in a thread, but I don't myself reply, then notifications no longer happen AT ALL on that thread. So if I seem to be ignoring a question, that's why. (Updated September 23, 2019)
Notice there is still some Fresnel reflection but very subtle - look near the neck.
Renderosity forum reply notifications are wonky. If I read a follow-up in a thread, but I don't myself reply, then notifications no longer happen AT ALL on that thread. So if I seem to be ignoring a question, that's why. (Updated September 23, 2019)
Renderosity forum reply notifications are wonky. If I read a follow-up in a thread, but I don't myself reply, then notifications no longer happen AT ALL on that thread. So if I seem to be ignoring a question, that's why. (Updated September 23, 2019)
Just as an overview, I think realistic looks have "noise," and "dirt." There is a fair amount of overlap, but think of the former as being overall iregularity, and the latter as being specific spots. Or the former as being amenable to procedural methods, the latter as being better-suited to texture maps.
Take a windshield. All of it will get scratched, dusty, and water-spotted (more-or-less). Grime will collect in the corners -- which can possibly be done with advanced procedurals. But the streak and scratch patterns of the wipers are specific to where those wipers hit, and are best handled in paint.
For a nicely-used Army jeep, I'd try using a procedure to bleach the paint on the upper-facing surfaces and generically add dust on the lower parts. And add a general procedural for the small-scale irregularities of the paint/surface. But combine these with a rust-and-grime map that paints in where mud splashes from the tires, where oil drips, where boots scuff getting in and out, and more wear/scratches/bleaching on the higher traffic areas.
Or just one big hand-painted map, plus an additional noise procedure to add a little fine-scale noise.
Read up in any plastic model magazine/forum, Fine Scale Modelers et al, or the equivalent in the Model Railroad community, for how they approach what they call "Weathering." Physical props people -- my favorite blog right now is Volpin Props -- also go into the techniques of weathering.
Which us theater people used to call "distressing." Still call it that. I'm rambling. Starting up on texturing some steampunk stuff right now and that's a whole load of grime and patina and so on.
Thanks nomuse... yeah, I should seek out and look at some of those scale modeller resources, good suggestion.
I've been deliberating whether to paint some control maps.... as much as I quite like what's happening in some places, using just the procedural spots and clouds nodes to distribute the rust etc.
As you're suggesting, a lot of the distribution patterns are not just mesh planar orientation based... but defined by all sorts of different physical effects... splash, spray, bouncing grit.
In the case of the army jeep, maybe some inbound shrapnel etc.
I wouldn't paint the diffuse... I don't think... but rather just a series of grayscale maps to control math blender nodes... maybe two or three different maps, one for each effect?
That way I can entirely adjust the actual color, etc, procedurally... just generally blend it in different ways. But I'll have the more precise, heuristic control of where different effects, and extremes of effect are happening on the jeep body.
That Army Green paint would be perfect for the Ironsides Dalek, if I ever get round to it. :D
Coppula eam se non posit acceptera jocularum.
Privacy Notice
This site uses cookies to deliver the best experience. Our own cookies make user accounts and other features possible. Third-party cookies are used to display relevant ads and to analyze how Renderosity is used. By using our site, you acknowledge that you have read and understood our Terms of Service, including our Cookie Policy and our Privacy Policy.
I have created scenes in Poser using graphic model cars in parking lots or on roads and freeways. They do not look very realistic because they all looked like they are too clean and shiny and were driven off a showroom floor. This also goes for aircraft,boats or anything in a outside evironment.
I was wondering if I could get some advice or someone to point to where I can find information on how to modify any of the models supplied textures to make the props look more like they would really look.
For textures its obvious that one could import the textures in Photoshop and smudge up some layers with a dirt brush, but I am sure there must be some technique involved to get adequate results. Then there are procedural textures! --- how would you handle that???
Any advice and infromation would be much appreciated