Renderosity Forums / Poser - OFFICIAL
Welcome to the Poser - OFFICIAL Forum
Forum Moderators: RedPhantom Forum Coordinators: Anim8dtoon
Poser - OFFICIAL F.A.Q (Last Updated: 2026 Jun 02 2:04 pm)

Subject: Prepping a mannequin in order to model shoes...


Great tips, Bopper, and a nice outfit, too. Did you ever finish it?
Thank you, considering the outfit, I'm still working on it from time to time, my biggest frustation is the fact that when I render it without any morphing in poser 8 or poserpro 2010 with IDL, I get good results. But when I apply some body morphs I get dark spots everywhere, caused by transparancy isues. I'm afraid I have to do the morphs all over again.
I'm a perfectionist and I want to make it work in every version of poser, but it takes a lot of time. I wanted to sell it and I had everything ready: morphs, textures, but with the release of poser8 I encountered problems I hadn't foreseen. I'm still looking for solutions. IDL is a great feature, but it sucks with things that are transparant like hair. I hope I will have some spare time the coming weeks to spent some attention on it to finish it.
Best regards,
Bopper.
-How can you improve things when you don't make mistakes?

Quote - Thank you, considering the outfit, I'm still working on it from time to time, my biggest frustation is the fact that when I render it without any morphing in poser 8 or poserpro 2010 with IDL, I get good results. But when I apply some body morphs I get dark spots everywhere, caused by transparancy isues. I'm afraid I have to do the morphs all over again.
Not to hijack Laurie's thread (I hope she doesn't sic her kitty on me!) but I've had similar issues with P8 IDL. I think that because of the distance between the item and the skin, Poser thinks there should be Ambient Occusion there. I usually end up making the article invisible to raytracing, but then the AO effect is lost where it should be occuring. I wish I could get a handle on IDL settings-I really don't understand them well...
----------------------------------------------------------------------------------------
The Wisdom of bagginsbill:
"Oh - the manual says that? I have never read the manual - this must be why."“I could buy better software, but then I'd have to be an artist and what's the point of that?"
"The [R'osity Forum Search] 'Default' label should actually say 'Don't Find What I'm Looking For'".
bagginsbill's Free Stuff... https://web.archive.org/web/20201010171535/https://sites.google.com/site/bagginsbill/Home

Laurie


A significant downside of Hexagon is that it cannot do spin quad/spin edge to adjust topology. If I were you I'd look at Blender (free).
Which version? Very recently they overhauled the whole interface and made it less scream-inducing (version 2.5 I think).
Yeah, I looked at that one too. I guess it's all the options and controls that gets me. Too much stuff to root thru to get at what little of if I do want to use and diametrically different than the program I learned to model in ;o). It would be like learning to model all over again - not that I'm so skilled in modeling at the current time...lol ;o).
Now, there's that little pesky morph dial stripping thing? I'm not sure what I'm to pitch and what I'm to keep in the .cr2. Is there a tute to tell you that sort of thing? The few tutorials I've found on shoes are so basic and for someone that knows nothing about the entire process (me), most just don't go far enough ;o). Or was that info in the links you sent me to read? Ugh...methinks I'm beginning to suffer from slight information overload...lol.
Laurie
The first step is to clean out any morph data that may have come from your donor (actually at some point you want to clean out the rig donor, which is why people call them "Blank CR2s"). This morph data is never any good, even JCM data, because the vertex count and vertex order of your new model has nothing to do with the donor. It's all garbage and needs to go.
Morph data can appear in every body part block. Parameter dials linked to morph channels also typically appear in the BODY, sometimes in other body parts besides. The morph data blocks are located in each body part (usually only in the body parts they affect) and prefaced with "targetGeom". The parameter dials that control them from the BODY are in the BODY block and are prefaced with "valueParm". They are all named with an Internal Name as well as a Name, like bones are - Internal Name and Name may not match (for DAZ-origin morphs they usually don't).
JCMs (joint controlled morphs) are also sometimes controlled by chunks of code in individual body parts; I don't do it this way in my conformers but other people might - I don't really look at how other people do things too much, but it's good to be aware of.
Also, any material configuration from the donor needs to come out. These are towards the end of the CR2 in the "figure" block, and are prefaced with "material".
ps: this is the really nasty part, if you have a plaintext editor.
oops: nobody really puts these steps into their tutorials as far as I've seen, because it's ridiculously hard with a plaintext editor (sorry if I keep repeating this) and impossible to boil down to step-by-step. If you have a CR2 editor on the other hand it's going to depend on which CR2 editor you have.
Quote - The first step is to clean out any morph data that may have come from your donor (actually at some point you want to clean out the rig donor, which is why people call them "Blank CR2s"). This morph data is never any good, even JCM data, because the vertex count and vertex order of your new model has nothing to do with the donor. It's all garbage and needs to go.
Morph data can appear in every body part block. Parameter dials linked to morph channels also typically appear in the BODY, sometimes in other body parts besides. The morph data blocks are located in each body part (usually only in the body parts they affect) and prefaced with "targetGeom". The parameter dials that control them from the BODY are in the BODY block and are prefaced with "valueParm". They are all named with an Internal Name as well as a Name, like bones are - Internal Name and Name may not match (for DAZ-origin morphs they usually don't).
JCMs (joint controlled morphs) are also sometimes controlled by chunks of code in individual body parts; I don't do it this way in my conformers but other people might - I don't really look at how other people do things too much, but it's good to be aware of.
Also, any material configuration from the donor needs to come out. These are towards the end of the CR2 in the "figure" block, and are prefaced with "material".
ps: this is the really nasty part, if you have a plaintext editor.
oops: nobody really puts these steps into their tutorials as far as I've seen, because it's ridiculously hard with a plaintext editor (sorry if I keep repeating this) and impossible to boil down to step-by-step. If you have a CR2 editor on the other hand it's going to depend on which CR2 editor you have.
Thanks! :o). That's helpful. I'll be sure to backup the current .cr2 since I'm sure I'll bugger it a few times until I get it right....lol.
Laurie
This is another step:
http://www.renderosity.com/mod/forumpro/showthread.php?thread_id=2818810
When you first rig something, Poser writes a new OBJ into the RuntimeLibrariesCharacter* directory that you saved the CR2 at. There's nothing technically wrong with this, but if you move the CR2 and OBJ file, the figure won't load any more, because the CR2 references the directory path that you originally saved the figure to the library in. A common practice is to make a directory under RuntimeGeometries to store the OBJ file in permanently, and change the lines that refer to it in your CR2. This way the CR2 can be moved anywhere and it will still load the OBJ file. You can consider this a last step.
Thanks. At least that last bit was something I was already used to since I started doing external geometry for my props ;o).
I've got one more question: when you first rig your shoes and go back to the pose room to zero them in the joint editor before trying the first conform - do you zero the body only? Or the hip too. I zeroed the hip before and alas, my rig is f*d...lol. I'm thinking I'm not supposed to zero that. So, it's another do-over, but at least I know what I've got to correct for these shoes anyway.
Laurie
What's different about the OBJ that Poser writes out? For one thing, the geometry is cut apart at the borders of body parts. Keep this in mind if you want to modify the OBJ later on, after you've rigged it. If you import the Poser-written OBJ into your modeler again you'll see how this affects you. Just using it inside of Poser you won't notice it because Poser quietly re-welds it back together again when it's loaded.
Why does Poser do this horrible stuff to your wonderful watertight model? I have no earthly idea, I'm sure at one point there was a good reason but this is one of those mysterious things that will make your life very, very hard if you're trying to do fitting morphs for conformers in an external application. Since the vertex order and vertex count is completely different between your original model and the Poser-written version, moving morphs in and out of Poser is frightfully weird. People have written applications to make this less painful (D3D's Poser File Editor does this also, and there is Colorcurvature's morph loader script).
Quote - I've got one more question: when you first rig your shoes and go back to the pose room to zero them in the joint editor before trying the first conform - do you zero the body only? Or the hip too. I zeroed the hip before and alas, my rig is f*d...lol. I'm thinking I'm not supposed to zero that. So, it's another do-over, but at least I know what I've got to correct for these shoes anyway.
When you do Joint Editor -> Zero Figure, it zeroes all bends for the whole figure everywhere. It does NOT change any translation values (these must be zeroed manually, typically only at hip and BODY). Be aware there may be some rubbish stored by "Memorize Figure" coming from the donor rig including bends or translation values, that should be cleaned out also. After you get the figure properly zeroed, do Edit menu -> Memorize -> Figure. This records initialization values for bends, translations etc that will be activated when the figure is conformed (I think, it's something I avoid using).
Joint Editor -> Zero Figure does not act the same when you're in the Setup room, I noticed what you're talking about a long time ago and never did it again (it broke my rig). Unless this has been changed, only use Zero Figure in the Pose room.
There was something else that I thought was fairly important to tell you but it's slipping my mind. :(
Here's a little thing: Setting the figure's Name (the friendly name, what the user sees in menus and stuff) is done in the "figure" block towards the end of the CR2. This will be the same as what your donor was, until you change it. Typically I set this name before saving the new rig to the Library but if you forget this step, that's where you find it.
Oh right: Figure -> Symmetry -> Left to Right (or Right to Left) -> Include joint setup. Probably you already figured this out though.
Quote - Oh right: Figure -> Symmetry -> Left to Right (or Right to Left) -> Include joint setup. Probably you already figured this out though.
Yeah. I'd really go nuts if I had to set both shoes up separately..lol.
But I'm still perplexed at what keeps screwing up the hip in the rig...sigh.
When I use the joint editor (I always use it in the pose room), I select the body and make all zeroes in each of the boxes where it says center point then push the Zero Rotations button, then do the same for the hip. Is that wrong?
Laurie
Ack, yes, that will trash your rig. Don't manually enter zeroes, hit the "Zero Figure" button.
edit: for translations, you want to make those values zero on the Parameter Dials window.
edit2: only make the translation values zero, ignore "offset" values.

Sorry, I was going from memory - "Zero Rotations" at the bottom.
edit: that's the ONLY control you want to touch on Joint Editor, for this purpose of zeroing a figure. Leave all the other textboxes and dials on Joint Editor alone. :)

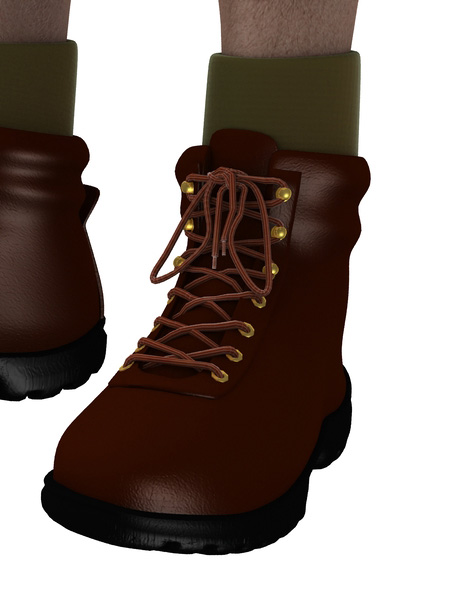
The ruffled tongue on this pair should prolly have it's own bone, but since I'm not up to that skill level yet, this'll have to do. I'm surprised enough that they conform ;o).
I didn't have too much trouble with these heels since I modeled this shoe on Vicky's zeroed foot - no odd poses.
Laurie

I still don't really see how you got the model done around a zeroed foot but great results :) Can you show a pic of what the modeling scene was set up like?

Laurie
Hmm, if that method works well for you then great ^^ I've tried working that way and it's quite hard, especially getting the tip of the heel to line up with the flat part of the toe when the toe is bent.
Anyway the tricky part of adjusting the rig that we never got to - in case you do model around a posed foot later on - was to a) conform the shoe onto a V4, b) pose the V4 foot and c) adjust the end point of the foot bone (the point where the foot ends and the toe bone begins) until it's correct.
Great job!
Quote - Hmm, if that method works well for you then great ^^ I've tried working that way and it's quite hard, especially getting the tip of the heel to line up with the flat part of the toe when the toe is bent.
I would think that the taller the heel, the harder that would be, yep ;o)
Quote - Anyway the tricky part of adjusting the rig that we never got to - in case you do model around a posed foot later on - was to a) conform the shoe onto a V4, b) pose the V4 foot and c) adjust the end point of the foot bone (the point where the foot ends and the toe bone begins) until it's correct.
I'll give it a shot ;o). I still wanna get those pumps set up...lol.
Laurie

Good stuff! Most people give up on shoes because it's a pretty difficult topic both for modeling and rigging, congratulations!

Any updates, Laurie? :)
----------------------------------------------------------------------------------------
The Wisdom of bagginsbill:
"Oh - the manual says that? I have never read the manual - this must be why."“I could buy better software, but then I'd have to be an artist and what's the point of that?"
"The [R'osity Forum Search] 'Default' label should actually say 'Don't Find What I'm Looking For'".
bagginsbill's Free Stuff... https://web.archive.org/web/20201010171535/https://sites.google.com/site/bagginsbill/Home

Import/export of OBJ and getting material selections and polygon groups through intact are probably going to be things you want to figure out right away.

LOL I understand that...but it's still a good challenge for someone who hasn't done it yet.
Bump... 
----------------------------------------------------------------------------------------
The Wisdom of bagginsbill:
"Oh - the manual says that? I have never read the manual - this must be why."“I could buy better software, but then I'd have to be an artist and what's the point of that?"
"The [R'osity Forum Search] 'Default' label should actually say 'Don't Find What I'm Looking For'".
bagginsbill's Free Stuff... https://web.archive.org/web/20201010171535/https://sites.google.com/site/bagginsbill/Home

Wow!
I was sent here from the Antonia thread.
Laurie I am blown away by these shoes you made. They look great.
Are they ever going to be made available?
A lot of the shoes for V4 I see are clunky and make her already LOOOOOONG Foot look bigger. These are real fashion statements and seem to nicely streamline the foot.
When you get it down.....and it looks you may have already from what little i have seen here, get these out there.

Quote - Now, there's that little pesky morph dial stripping thing?
I came to this thread rather late, but better late than never, as they say. I use "Morph Manager 4" (MM4) when I want to strip all the morphs from a figure, but there is a trick you need to use to do it.
Fire up MM4, and load any pz2 file into one of the windows. Loading a pz2 forces MM4 to display a "More Options" button. Load your cr2 into the same window as the pz2, click the More Options button and select the "Delete all morph targets from file" option, then save the file back to disk.
When you save a file from MM4, it replaces tab stops with spaces, making the file size larger. To fix that, load the cr2 in Poser, and save it back to disk, Poser will reformat the spaces as tabs. The process is a bit long winded, but I think it is still faster that deleting the morphs by hand in CR2Editor or CR2Builder, and there is less opertunity to make a mistake.
The above process still leaves the valueParm channels in the BODY, so you still need to delete them, and the material blocks using a cr2 editor.
Quote - Wow!
I was sent here from the Antonia thread.
Laurie I am blown away by these shoes you made. They look great.
Are they ever going to be made available?
A lot of the shoes for V4 I see are clunky and make her already LOOOOOONG Foot look bigger. These are real fashion statements and seem to nicely streamline the foot.
When you get it down.....and it looks you may have already from what little i have seen here, get these out there.
I was thinking of releasing the Mary Janes, but current circumstances negate the time needed for me to get them properly mapped, textured and set up ;). Maybe later :D
Laurie

Bumped because this is worth knowing. I'm in the process of modeling boots with high heels. So far, I'm using an exported zero-posed vicki with just her feet bent. Then I can model the boots around her feet. Just have to remember to pose her feet whenever I use these boots.
Anyone happen to know if there is some sort of standard bent foot angle used for all these vicky poses I have with her standing on her toes? So no matter which pose I pick, my boots will be level on the ground?
www.youtube.com/user/ShawnDriscollCG

test
Software: Daz Studio 4.15, Photoshop CC, Zbrush 2022, Blender 3.3, Silo 2.3, Filter Forge 4. Marvelous Designer 7
Hardware: self built Intel Core i7 8086K, 64GB RAM, RTX 3090 .
"If you spend too much time arguing about software, you're spending too little time creating art!" ~ SomeSmartAss
"A critic is a legless man who teaches running." ~ Channing Pollock
Privacy Notice
This site uses cookies to deliver the best experience. Our own cookies make user accounts and other features possible. Third-party cookies are used to display relevant ads and to analyze how Renderosity is used. By using our site, you acknowledge that you have read and understood our Terms of Service, including our Cookie Policy and our Privacy Policy.
Great tips, Bopper, and a nice outfit, too. Did you ever finish it?
----------------------------------------------------------------------------------------
The Wisdom of bagginsbill:
"Oh - the manual says that? I have never read the manual - this must be why."“I could buy better software, but then I'd have to be an artist and what's the point of that?"
"The [R'osity Forum Search] 'Default' label should actually say 'Don't Find What I'm Looking For'".
bagginsbill's Free Stuff... https://web.archive.org/web/20201010171535/https://sites.google.com/site/bagginsbill/Home