
LaurieA opened this issue on Dec 26, 2010 · 102 posts
LaurieA posted Sun, 26 December 2010 at 6:04 PM
What does one do? Do you pose the feet first? Model the shoes around the default pose foot? I'm at a loss. I can model the shoes just fine...it's just that I'm going to use said shoes to practice rigging which I've never done ;o). The shoes I have in mind are pumps (what else?)...lol.
Any and all help would be greatly appreciated :o).
Laurie
markschum posted Sun, 26 December 2010 at 6:22 PM
Model around the zero pose feet I think. That sets you up to use a donor cr2 , the dev or blank cr2. You only need the toe, foot and calf , maybe thigh inless they are thigh highs.
LaurieA posted Sun, 26 December 2010 at 6:26 PM
nah, just need the foot, toe and calf...even the calf only to make sure I don't go above the back of the heel ;).
How does one model a high heel pump on a flat foot? lol
Laurie

pjz99 posted Sun, 26 December 2010 at 6:27 PM
While normally I'd say model around zero pose, heeled shoes are the exception - I model around a posed foot and then manually adjust the donor rig to fit the shoes. I've tried it both ways and I never could get heeled shoes to look good when modeled around a zeroed foot and afterward posing the foot, I get a lot better results using a posed foot as a reference. For a really snug shoe with a thin, flexible sole, like a ballet slipper or some kind of sandal perhaps, zeroed would be fine, anything with a hard sole I'd suggest working around a posed foot though. Be aware the rigging phase is significantly harder this way.
If you've never rigged anything before I strongly recommend you start with something easier, like a tank top shirt or some such.
pjz99 posted Sun, 26 December 2010 at 6:29 PM
Quote - How does one model a high heel pump on a flat foot? lol
Yeah exactly.
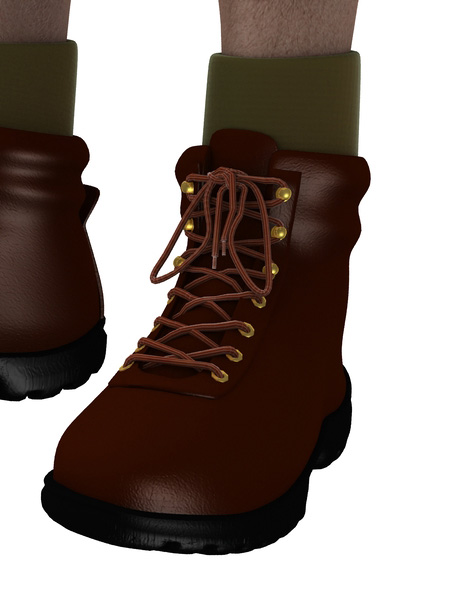
edit: if you want to take a close look at how the results come out when I work this way, you can look at the free set I just finished which includes a heeled hard-sole calf boot, in the great majority of reasonable poses it works very well:
https://sites.google.com/site/fleshforge2/Home/free-stuff/encounter-v4
LaurieA posted Sun, 26 December 2010 at 6:31 PM
Never let it be said that I start with the easiest first...lol. I like to dive headlong into frustration ;o).
Laurie

bopperthijs posted Sun, 26 December 2010 at 6:33 PM
I made some shoes in hexagon for V4, and I used posed feet, the problem is that you have to adapt the shoes with joint editor after you did the rigging, I wrote about this problem some months ago, here's the link:
http://www.renderosity.com/mod/forumpro/showthread.php?thread_id=2757746&page=2#message_3350062
good luck,
Bopper.
-How can you improve things when you don't make mistakes?
pjz99 posted Sun, 26 December 2010 at 6:34 PM
Well I'll be around if you have problems, I'll try to help you. If you're set on doing this as your first rigging project, maybe test first with a rough model to make sure you can figure out the rigging phase, becase honestly it's going to be pretty hard (even after doing it a dozen times now it's still difficult for me).
LaurieA posted Sun, 26 December 2010 at 6:37 PM
Um, I kinda already did the shoes...lol. Around the posed foot of a zeroed Vicky. How much harder is it that way? LOL
Laurie
edit: dang crosspost...lol
JoEtzold posted Sun, 26 December 2010 at 6:38 PM
Markschum is right.
Everytime model around the original zero posed figure. As best you load it directly from the geometries. You need not to export from poser and therefor avoid some trouble with that.
All what is modeled around that original figure will (most) easily be rigged with a donor from orginal figure or similar clothing/shoes. You need not split the mesh between foot and toe. But toe-actor is needed in cr2 to move the toes even if they are part of the foot geometry. You may have a look to one of my models at shareCG.
The only point been tricky while modeling in that pose is to define correct bending area for toe and the correct length and angle of a heel. It's best done (for me) finding the break between toe and foot in the mesh and have a square plane with the rotation axis in that break line. Now you may vary the horizontal angle of that plane to have a new dummy floor depending how high your heel shall come out. For example V4's normal foot position zeroed is an angle of around 19° to the floor. If you need more or less you have to vary the dummy plane and than construct the heel in more or less right angle to that plane ... depending of your taste who the heel shall look. That dummy plane should lay a bit lower than the mesh break line foot/toe depending on how big you will design the sole. Platform = big distance, mocassin type flat sole = nearly no distance.
And have enough polygons around that foot/toe breakline. This part is bending !
Have fun with that modelling. It sounds more difficult than it is in the end.
Edited: One I forgot. If you have a difficult pose in mind like super high heel. The workflow is like above. But you will make a additional model exported from poser with the exact foot pose (export toe, foot, shin). Import this model additional into your modeller and without changing your shoe model use the new leg model to control your work. For this purpose angle the leg model with a fix point at the foot's back end. The foot heel is not bending much, so you can use this than a angle point. Don't worry that using this model the shin isn't any more parallel to the figures shin. This is normal. That additinal model is only used to control the foot and toe design.
pjz99 posted Sun, 26 December 2010 at 6:40 PM
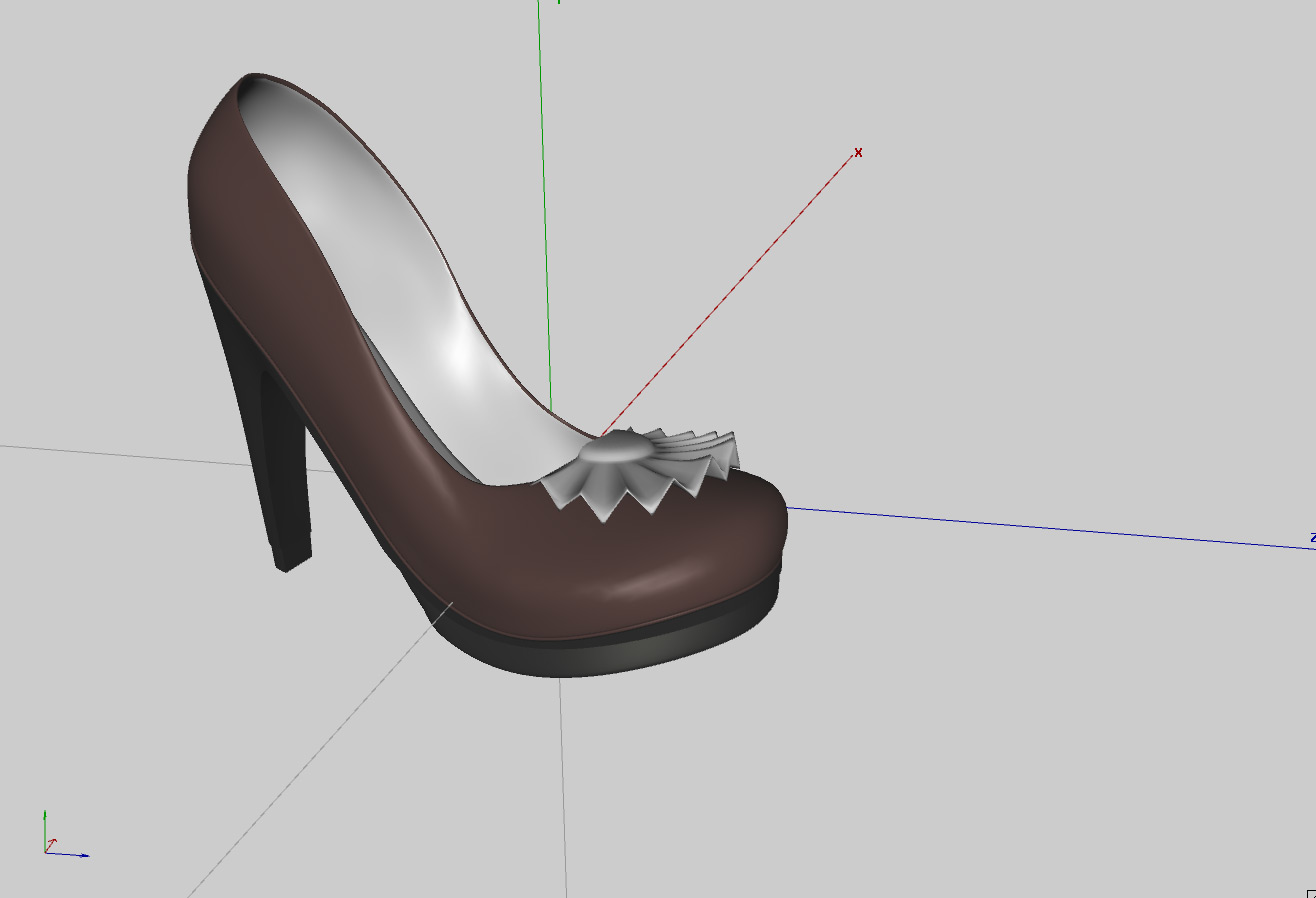
Shrug, if you already have the model done then you might as well try to rig it. There is no question that IT CAN BE DONE, even with that particular shape I can tell you that for sure. The detail ruffle towards the toe may bend a bit more than you'd like but that's about the only problem I see coming at you. Pretty model there, good job :)
LaurieA posted Sun, 26 December 2010 at 6:41 PM
Thanks so much for the link bopperthijs! :o)
Laurie
pjz99 posted Sun, 26 December 2010 at 6:41 PM
By the way, if you are OK with the toe not being able to bend (as in shoes with a truly hard sole, or platforms) this is much easier, the hard part is getting the toe bend to look good.
LaurieA posted Sun, 26 December 2010 at 6:43 PM
Quote - Shrug, if you already have the model done then you might as well try to rig it. There is no question that IT CAN BE DONE, even with that particular shapeI can tell you that for sure. The detail ruffle towards the toe may bend a bit more than you'd like but that's about the only problem I see coming at you. Pretty model there, good job :)
Thanks...I was bored...lol.
The ruffle can go if it needs to if it makes things easier on me ;o).
Laurie
pjz99 posted Sun, 26 December 2010 at 6:44 PM
Since you have a thick sole with a hard appearance, it'd be reasonable to expect the toe cannot bend, why not make it easy on yourself this first time and don't worry about the toe?
LaurieA posted Sun, 26 December 2010 at 6:45 PM
Quote - By the way, if you are OK with the toe not being able to bend (as in shoes with a truly hard sole, or platforms) this is much easier, the hard part is getting the toe bend to look good.
I was planning on this. I've worn high heels and some don't bend all that much...hehe. Really, I just want the darn thing to stick to the foot. I can (and probably will) just make the toes invisible.
Laurie
pjz99 posted Sun, 26 December 2010 at 6:52 PM
While there's a really cheapass way to handle this, just consider the shoes to be props and make them children of each foot, I hated this as a user and never bothered with it as a content creator, you can make the donor rig work. Under P8+ and DAZ|Studio it even works perfectly with the Proportions type body part scaling stuff going on in the variations of V4, as well as other applications of scaling.
LaurieA posted Sun, 26 December 2010 at 7:00 PM
No idea how to make them children of the foot...lol. I guess I'd better find a good conforming tutorial ;o).
For what it's worth, I did try to parent them to the foot, but everytime I do, they move of course ;o). The only time they don't is when I parent them to Vicky's body. Then of course, they don't move when you bend her leg...lol.
Laurie
pjz99 posted Sun, 26 December 2010 at 7:15 PM
Quote - No idea how to make them children of the foot... For what it's worth, I did try to parent them to the foot
We're talking about the same thing, just that terminology of "parenting X to Y" is not really accurate so I don't say it that way.
There are a lot of tutorials out there, here's one that's pretty concise:
http://artzone.daz3d.com/wiki/doku.php/pub/tutorials/poser/poser-rigging07
You're already done up to step 4. Probably you have not grouped the model; for your shoe, imo it's simplest to just put all polys in the right shoe into "rFoot" group, and all polys in the left shoe into "lFoot" group. The tutorial there explains these steps, if you get stuck I'll be around. You don't need to create a group for the toe since it's an end bone with nothing nearby, and anyway you probably don't need it to bend. There is more to do, to make sure the toe WON'T bend, but when you get to that point we'll take it from there.
LaurieA posted Sun, 26 December 2010 at 7:23 PM
Thanks for the link :o). I'll give it a good read.
Laurie
pjz99 posted Sun, 26 December 2010 at 7:25 PM
Do you have a good CR2 editor? While not absolutely necessary, it's immensely harder to do stuff like this with a plain text editor.
LaurieA posted Sun, 26 December 2010 at 7:38 PM
I use Notepad++ which lays everything out nicely and has a search and replace feature. I think I can probably get away with using it ;o).
Laurie
pjz99 posted Sun, 26 December 2010 at 7:43 PM
I have to tell you, of all the various junk I've bought for Poser, Dimension3D's Poser File Editor is about the only thing I use aside from the modeler and Morphing Clothes, it's saved me thousands of hours of work and associated frustration (not exaggerating). I pretty much never gush over a product, and I still love this utility after a few years of blissful honeymoon:
http://www.renderosity.com/mod/bcs/index.php?ViewProduct=62322&Start=31&vendor=288865
LaurieA posted Sun, 26 December 2010 at 8:40 PM
Looks like a great thing to have and I've looked at it before, but a bit steep for me at the current time. I've declared a moratorium on all Poser purchases for the forseeable future...lmao :o). A text editor it is ;o).
Laurie
LaurieA posted Sun, 26 December 2010 at 10:24 PM
Oh crap...I go into the setup room, do my thing, come back out...Poser 8 goes boom.
On to plan B...
Laurie
pjz99 posted Sun, 26 December 2010 at 10:29 PM
What exactly was the thing you did? I've rigged a bunch of things (e.g. those boots I mentioned earlier) in P8 and not had this kind of thing happen.
LaurieA posted Sun, 26 December 2010 at 10:32 PM
I used Vicky's skeleton as a donor rig, deleted everything but the right foot, toe and shin, grouped the stuff, clicked the Pose room tab and Poser quit...lol.
I'm gonna try Poser 7 and see if that makes a difference. Tomorrow...lol.
BTW, is it correct to call the shoe Right Foot? I mean, that's the name of it (Vicky's foot) in the heirarchy editor. Don't think it was that specifically anyway...
Laurie
pjz99 posted Sun, 26 December 2010 at 10:35 PM
Yeah oops you don't really want to use the actual figure, you want to use the "V4 DEV" rig. There is a lot of crap in the main figure that you don't want in a conformer, e.g. the magnets and JCM data. The V4 DEV rig should be included in all versions of download of V4, I know for sure it was in the "V4 Complete" package.
LaurieA posted Sun, 26 December 2010 at 10:36 PM
Quote - Yeah oops you don't really want to use the actual figure, you want to use the "V4 DEV" rig. There is a lot of crap in the main figure that you don't want in a conformer, e.g. the magnets and JCM data. The V4 DEV rig should be included in all versions of download of V4, I know for sure it was in the "V4 Complete" package.
Welp, that might be it then...lol.
Maybe I should see if I have another pair of shoes for Vicky I can borrow from and make it a little easier...lol.
Laurie
pjz99 posted Sun, 26 December 2010 at 10:40 PM
Quote - BTW, is it correct to call the shoe Right Foot? I mean, that's the name of it in the heirarchy editor. Don't think it was that specifically anyway...
All kinds of objects in Poser, including all body parts in a figure, have an Internal Name and an External Name. When you are assigning polygon groups, if the name of the poly group matches the Internal Name of a bone (e.g. rFoot for the right foot) then that bone will bend those polys. The "Name" (or external name) is what is shown in the pulldown menus when you're picking a body part or prop or whatever. This "Name" can be anything and does not have to match the Internal Name, although it is a good idea to have them similar so that your rig makes sense. When you apply a donor rig, the Internal Name and Name for every body part will already be set by the donor.
I meant to ask, why are you rigging one leg at a time? I know some riggers do that but it never made much sense to me, if you only want one shoe in your scene then you can hide the unwanted one.
pjz99 posted Sun, 26 December 2010 at 10:42 PM
Quote - Welp, that might be it then...lol. Maybe I should see if I have another pair of shoes for Vicky I can borrow from and make it a little easier...lol.
Even then you're going to have to cut out all the morph data for all body parts. When you get to that step you're going to see why I was suggesting a strong CR2 editor.
Feel free to use my adjusted rig, you have my blessing:
https://sites.google.com/site/fleshforge2/Home/free-stuff/encounter-v4
Your heel is a little taller I think but this should be an OK starting point.
edit: the heel for this rig is a little taller and might work better, plus there is less morph garbage to cut out:
https://sites.google.com/site/fleshforge/Home/free-stuff-1/revelation-of-the-seraphim-v4
LaurieA posted Sun, 26 December 2010 at 11:06 PM
Thanks! :o)
I'll give it a shot tomorrow. I'll keep ya updated.
Laurie
LaurieA posted Mon, 27 December 2010 at 12:17 PM
If I rig them both at once I have to import them both as one object, correct?
Anyway, I've tried this all sorts of ways. Individually and together.
I'm obviously doing something wrong: when I go to the setup room and add the V4 dev and delete all but the r and l foot, r and l toe and r and l shin and exit, the shoes act like a figure...they even conform...but they do not move with the figure. I'm not sure what I'm not doing. It has to be something I'm not doing ;o).
When I leave the setup room and try and go back to the pose room it does say that I have something not grouped to a bone, even if I group all. So, I'm stumped for now ;). I am really stupid when it comes to rigging. As many years as I've been using Poser I've never, ever done this. Never even tried.
Laurie
pjz99 posted Mon, 27 December 2010 at 12:23 PM
Quote - If I rig them both at once I have to import them both as one object, correct?
Yes.
Quote - I'm obviously doing something wrong: when I go to the setup room and add the V4 dev and delete all but the r and l foot, r and l toe and r and l shin and exit...
You can't delete stuff higher up in the hierarchy than the bones you're going to use, that's probably your problem. Don't delete the hip and thighs. You need:
BODY
-Hip
--Thighs
---Shins
----Feet
-----(you don't really need the toes for this particular shoe if the toe is not going to bend)
pjz99 posted Mon, 27 December 2010 at 12:25 PM
LaurieA posted Mon, 27 December 2010 at 1:30 PM
Quote - > Quote - I am really stupid
And you can cut that shit out right now young lady.
LOL...I know. It's just that I get frustrated with my efforts (or lack thereof) sometimes ;o). I realize everyone who does this was at the point I'm at right now. It's just that, right now, I can't understand how any of you got past it...lmao.
I'll try leaving the bones you specified above and see what happens...hehe.
Thanks so much for your continued help - I really appreciate it.
Laurie
pjz99 posted Mon, 27 December 2010 at 1:36 PM
Quote - It's just that, right now, I can't understand how any of you got past it...lmao.
Oh you haven't even gotten to the REALLY nasty part, save your bitching for that.
LaurieA posted Mon, 27 December 2010 at 2:27 PM
K, I think I have all the groups right, but when I try to conform, the shoes go to the waist...lol.
Is this where the real bitching comes in? Joint editor? ;o)
Laurie
pjz99 posted Mon, 27 December 2010 at 3:35 PM
Oh no, this is still the fairly easy part with the tools you have. Can you take the model to the Setup room and take a screenshot of how the bones are laid out and post that?
LaurieA posted Mon, 27 December 2010 at 3:54 PM
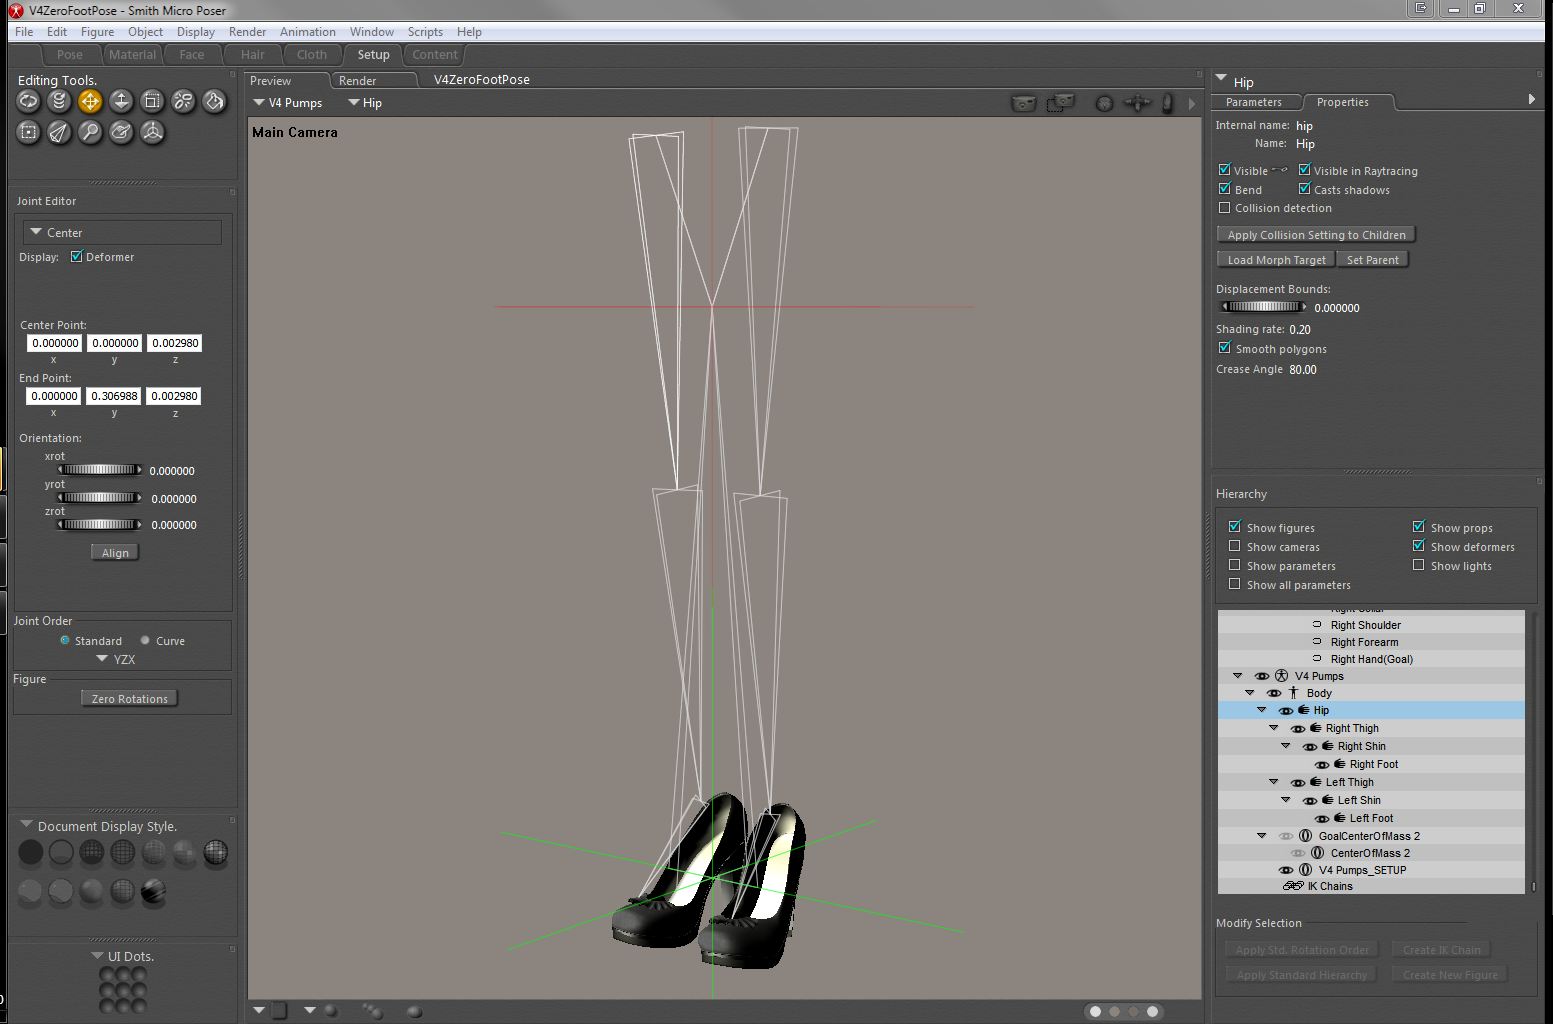
Laurie
pjz99 posted Mon, 27 December 2010 at 3:58 PM
The hip is borked, you have to redo the rig. Keep in mind that undo usually doesn't work for that stage. Try loading one of mine and looking at it in the setup room (it will complain about morph targets when you switch, ignore that unless it provokes a crash). You may need to start from a new blank scene and re-import the OBJ, depending on what happened.
When you are deleting bones, work from the end bones inward; e.g. delete the finger3 bone, finger 2 bone, finger1 bone for each finger and thumb, and then the hand, and then the forearm, shoulder and collar, for each arm; delete the head, neck; THEN delete the chest, then abdomen. If you delete bones that have children it may cause problems or crashes.
As painful as this seems right now, once you do one and get it working right, you can save it and reuse it on later projects.
LaurieA posted Mon, 27 December 2010 at 5:20 PM
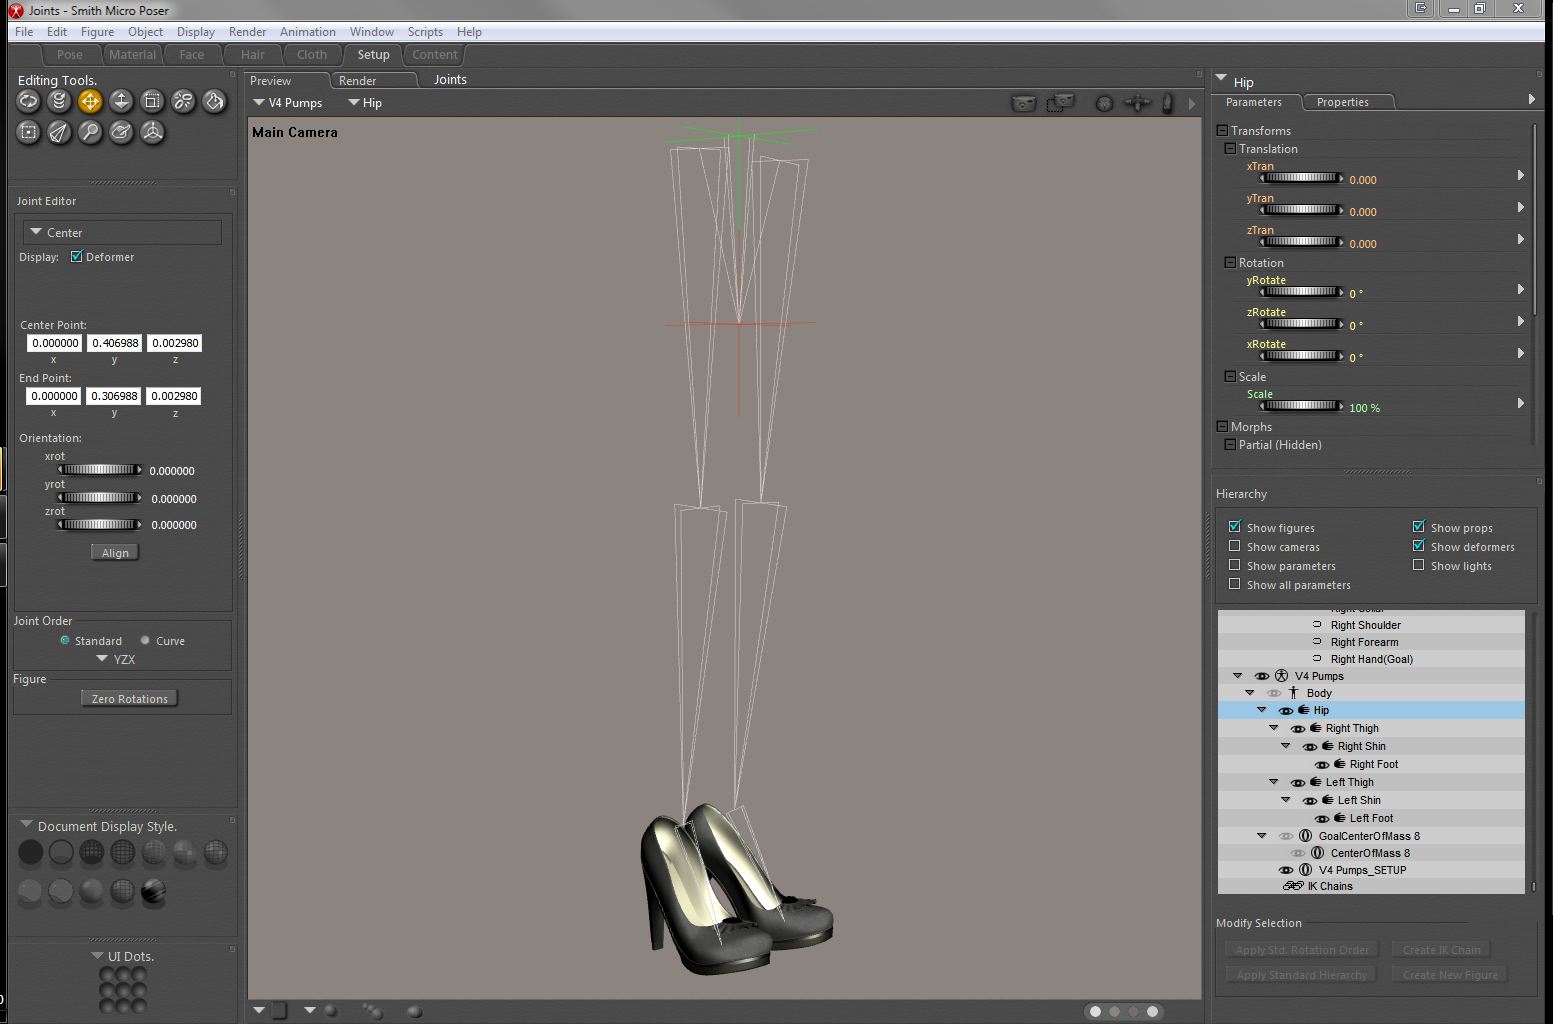
Does that look like it should? When I conform, the shoes stay at the feet, but they're looking pretty distorted ;o).
Laurie
pjz99 posted Mon, 27 December 2010 at 6:34 PM
Yes that looks a lot better. What happens if you leave the Setup Room at this point? If you are nagged about polygons that do not belong to a bone's group, you may be tempted to let Poser's Group Editor auto-group it for you in this case, but remember it will screw up at the toes for models that have toes you want to bend.
VERY IMPORTANT: If you have "Use External Binary Morph Targets" enabled, TURN IT OFF NOW.
If Poser lets you out of the Setup Room without complaining, it can save a lot of sanity if you start saving the scene file in increments (meaning, keep multiple copies as you progress with different filenames). This lets you revert to an earlier state that worked when you goof, and trust me you will goof. Undo is not trustworthy for a great many of these operations.
It's also a good time to save what you have to the Poser Library. Again, whenever you reach a big milestone (yay I got the foot to bend correctly, e.g.) you should re-save incrementally (multiple copies with different filenames).
Now we go on to the ADJUSTING JOINT PARAMETERS part of the job :) First, catch up to the info I just gave you and then go watch this video by Phil Cooke (such a great man):
http://www.youtube.com/watch?v=PfcPu83gZNs (part 1 of 2)
http://www.youtube.com/watch?v=434MJDE4gEA&feature=related (part 2 of 2)
edit: please just watch these videos first, and think about what he's teaching you; then come back and we'll talk about what you need to do to make your shoes work, okay? we only need to make a pretty small change (hopefully) but I wanted to let you have exposure to this excellent, thorough tutorial first so you understand what's going on.
LaurieA posted Mon, 27 December 2010 at 6:44 PM
I have those videos saved in my youtube faves...lol. I'll definitely watch them a little later :o).
As for the joint parameters, I did manage to get them to conform to the feet pretty well using the joint parameters. They stray a little bit when the figure bends her knees tho. I'm sure I have to tweak something ;o).
Rest assured as well, I have been saving every time I manage to get something right without screwing it up...lol.
And no, I got out of the setup room without it complaining. I did use autogroup, but I grouped the toes back into the foot since I won't be bending those. Hope that was ok.
Laurie
pjz99 posted Mon, 27 December 2010 at 6:49 PM
Yes that's fine, we want all the polys for the right shoe in "rFoot" and all the polys for the left shoe in "lFoot". Can you show me a pic of how it bends, what aspect isn't right?
LaurieA posted Mon, 27 December 2010 at 8:39 PM
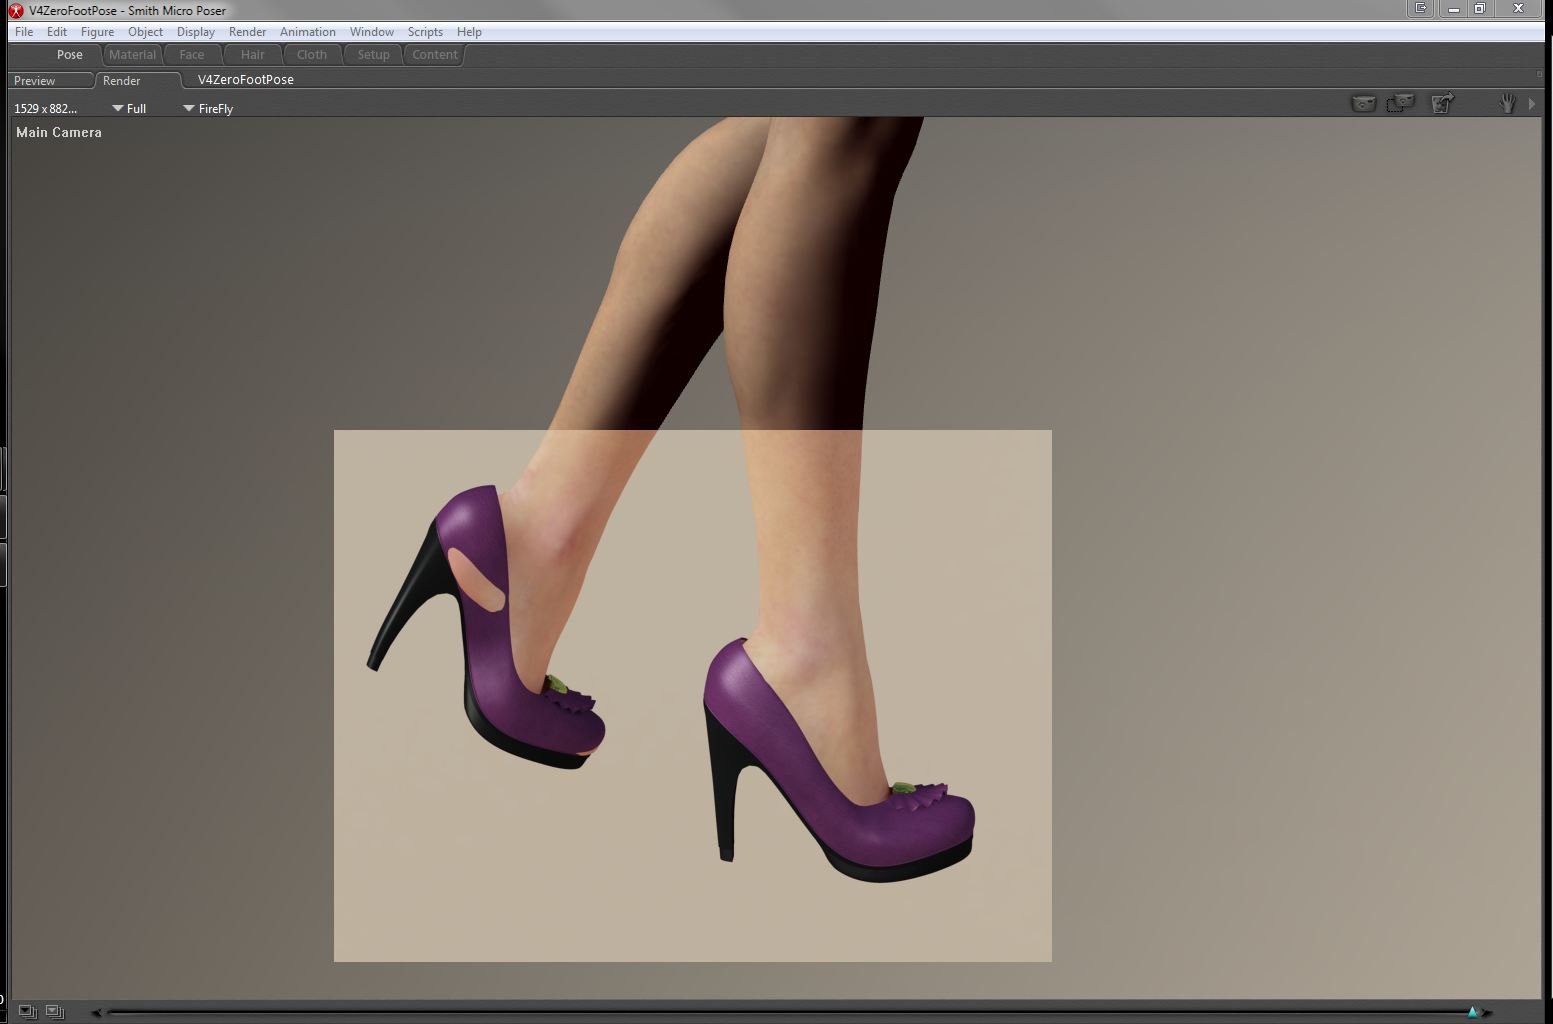
Laurie
pjz99 posted Mon, 27 December 2010 at 11:47 PM
Oh dear. When you did the model and set up your reference character (the mannequin) did you first a) disable IK and then b) zero everything except the foot and toe? and then export that?
You didn't scale any bones or dial up any morphs did you?
pjz99 posted Tue, 28 December 2010 at 4:57 AM
Ah, from looking at the tip of the heel I'm fairly sure it's only that you need to expand the inner falloff sphere in joint parameters - how you do this is covered in the second Joint Parameter video by Phil Cooke:
LaurieA posted Tue, 28 December 2010 at 5:03 AM
As far as I know, I did turn off IK, yep :o).
That's not to say that my model is perfect in every way...lol I'm still a modeling noob hehe.
Laurie
pjz99 posted Tue, 28 December 2010 at 5:09 AM
Take a look at that second JP editor movie and look at expanding the green/inner falloff sphere, I think that's what's causing your problem.
LaurieA posted Tue, 28 December 2010 at 5:21 AM
Will do :o).
Laurie

WandW posted Tue, 28 December 2010 at 1:11 PM
Quote - I made some shoes in hexagon for V4, and I used posed feet, the problem is that you have to adapt the shoes with joint editor after you did the rigging, I wrote about this problem some months ago, here's the link: http://www.renderosity.com/mod/forumpro/showthread.php?thread_id=2757746&page=2#message_3350062
Great tips, Bopper, and a nice outfit, too. Did you ever finish it?
----------------------------------------------------------------------------------------
The Wisdom of bagginsbill:
"Oh - the manual says that? I have never read the manual - this must be why."
bopperthijs posted Tue, 28 December 2010 at 7:35 PM
Great tips, Bopper, and a nice outfit, too. Did you ever finish it?
Thank you, considering the outfit, I'm still working on it from time to time, my biggest frustation is the fact that when I render it without any morphing in poser 8 or poserpro 2010 with IDL, I get good results. But when I apply some body morphs I get dark spots everywhere, caused by transparancy isues. I'm afraid I have to do the morphs all over again.
I'm a perfectionist and I want to make it work in every version of poser, but it takes a lot of time. I wanted to sell it and I had everything ready: morphs, textures, but with the release of poser8 I encountered problems I hadn't foreseen. I'm still looking for solutions. IDL is a great feature, but it sucks with things that are transparant like hair. I hope I will have some spare time the coming weeks to spent some attention on it to finish it.
Best regards,
Bopper.
-How can you improve things when you don't make mistakes?
WandW posted Wed, 29 December 2010 at 11:23 AM
Quote - Thank you, considering the outfit, I'm still working on it from time to time, my biggest frustation is the fact that when I render it without any morphing in poser 8 or poserpro 2010 with IDL, I get good results. But when I apply some body morphs I get dark spots everywhere, caused by transparancy isues. I'm afraid I have to do the morphs all over again.
Not to hijack Laurie's thread (I hope she doesn't sic her kitty on me!) but I've had similar issues with P8 IDL. I think that because of the distance between the item and the skin, Poser thinks there should be Ambient Occusion there. I usually end up making the article invisible to raytracing, but then the AO effect is lost where it should be occuring. I wish I could get a handle on IDL settings-I really don't understand them well...
----------------------------------------------------------------------------------------
The Wisdom of bagginsbill:
"Oh - the manual says that? I have never read the manual - this must be why."
LaurieA posted Thu, 30 December 2010 at 7:49 AM

Laurie

Lzy724 posted Thu, 30 December 2010 at 8:46 AM
Wow Laurie, I know you are having some issues, but these are really great attempts!! Im sure you will figure it out and then it will be easy peasy! ;)
LaurieA posted Thu, 30 December 2010 at 8:56 AM
Nothing about this has been easy peasy so far...lmao ;o). I think I might not use Wings for modeling this type of thing and dust off Hexagon and learn to use it ;o).
Laurie
LaurieA posted Thu, 30 December 2010 at 10:02 AM

It was the toe bend sphere zone that was the culprit. They conform now...hehe. I is a happy girl ;o).
Laurie
pjz99 posted Thu, 30 December 2010 at 10:11 AM

A significant downside of Hexagon is that it cannot do spin quad/spin edge to adjust topology. If I were you I'd look at Blender (free).
LaurieA posted Thu, 30 December 2010 at 10:17 AM
Thanks Paul. Couldn't have done it without your help!!! :o)
Oh, and I did look at Blender. Long enough to know that it makes me run screaming...lmao.
Laurie
pjz99 posted Thu, 30 December 2010 at 10:47 AM
Which version? Very recently they overhauled the whole interface and made it less scream-inducing (version 2.5 I think).
LaurieA posted Thu, 30 December 2010 at 10:51 AM
Yeah, I looked at that one too. I guess it's all the options and controls that gets me. Too much stuff to root thru to get at what little of if I do want to use and diametrically different than the program I learned to model in ;o). It would be like learning to model all over again - not that I'm so skilled in modeling at the current time...lol ;o).
Now, there's that little pesky morph dial stripping thing? I'm not sure what I'm to pitch and what I'm to keep in the .cr2. Is there a tute to tell you that sort of thing? The few tutorials I've found on shoes are so basic and for someone that knows nothing about the entire process (me), most just don't go far enough ;o). Or was that info in the links you sent me to read? Ugh...methinks I'm beginning to suffer from slight information overload...lol.
Laurie
pjz99 posted Thu, 30 December 2010 at 11:15 AM
The first step is to clean out any morph data that may have come from your donor (actually at some point you want to clean out the rig donor, which is why people call them "Blank CR2s"). This morph data is never any good, even JCM data, because the vertex count and vertex order of your new model has nothing to do with the donor. It's all garbage and needs to go.
Morph data can appear in every body part block. Parameter dials linked to morph channels also typically appear in the BODY, sometimes in other body parts besides. The morph data blocks are located in each body part (usually only in the body parts they affect) and prefaced with "targetGeom". The parameter dials that control them from the BODY are in the BODY block and are prefaced with "valueParm". They are all named with an Internal Name as well as a Name, like bones are - Internal Name and Name may not match (for DAZ-origin morphs they usually don't).
JCMs (joint controlled morphs) are also sometimes controlled by chunks of code in individual body parts; I don't do it this way in my conformers but other people might - I don't really look at how other people do things too much, but it's good to be aware of.
Also, any material configuration from the donor needs to come out. These are towards the end of the CR2 in the "figure" block, and are prefaced with "material".
ps: this is the really nasty part, if you have a plaintext editor.
oops: nobody really puts these steps into their tutorials as far as I've seen, because it's ridiculously hard with a plaintext editor (sorry if I keep repeating this) and impossible to boil down to step-by-step. If you have a CR2 editor on the other hand it's going to depend on which CR2 editor you have.
Lzy724 posted Thu, 30 December 2010 at 11:16 AM
Quote - OH HAPPY DAY!! SUCCESS!! LOL
It was the toe bend sphere zone that was the culprit. They conform now...hehe. I is a happy girl ;o).
Laurie
Fabulous!!
As far as hex goes, good luck with that, I can understand the tools, just cant get it to do what I want. :)
LaurieA posted Thu, 30 December 2010 at 11:20 AM
Quote - The first step is to clean out any morph data that may have come from your donor (actually at some point you want to clean out the rig donor, which is why people call them "Blank CR2s"). This morph data is never any good, even JCM data, because the vertex count and vertex order of your new model has nothing to do with the donor. It's all garbage and needs to go.
Morph data can appear in every body part block. Parameter dials linked to morph channels also typically appear in the BODY, sometimes in other body parts besides. The morph data blocks are located in each body part (usually only in the body parts they affect) and prefaced with "targetGeom". The parameter dials that control them from the BODY are in the BODY block and are prefaced with "valueParm". They are all named with an Internal Name as well as a Name, like bones are - Internal Name and Name may not match (for DAZ-origin morphs they usually don't).
JCMs (joint controlled morphs) are also sometimes controlled by chunks of code in individual body parts; I don't do it this way in my conformers but other people might - I don't really look at how other people do things too much, but it's good to be aware of.
Also, any material configuration from the donor needs to come out. These are towards the end of the CR2 in the "figure" block, and are prefaced with "material".
ps: this is the really nasty part, if you have a plaintext editor.
oops: nobody really puts these steps into their tutorials as far as I've seen, because it's ridiculously hard with a plaintext editor (sorry if I keep repeating this) and impossible to boil down to step-by-step. If you have a CR2 editor on the other hand it's going to depend on which CR2 editor you have.
Thanks! :o). That's helpful. I'll be sure to backup the current .cr2 since I'm sure I'll bugger it a few times until I get it right....lol.
Laurie
pjz99 posted Thu, 30 December 2010 at 11:24 AM
Well I'll be here a-workin' if you get stuck.
pjz99 posted Thu, 30 December 2010 at 11:29 AM
This is another step:
http://www.renderosity.com/mod/forumpro/showthread.php?thread_id=2818810
When you first rig something, Poser writes a new OBJ into the RuntimeLibrariesCharacter* directory that you saved the CR2 at. There's nothing technically wrong with this, but if you move the CR2 and OBJ file, the figure won't load any more, because the CR2 references the directory path that you originally saved the figure to the library in. A common practice is to make a directory under RuntimeGeometries to store the OBJ file in permanently, and change the lines that refer to it in your CR2. This way the CR2 can be moved anywhere and it will still load the OBJ file. You can consider this a last step.
LaurieA posted Thu, 30 December 2010 at 11:33 AM
Thanks. At least that last bit was something I was already used to since I started doing external geometry for my props ;o).
I've got one more question: when you first rig your shoes and go back to the pose room to zero them in the joint editor before trying the first conform - do you zero the body only? Or the hip too. I zeroed the hip before and alas, my rig is f*d...lol. I'm thinking I'm not supposed to zero that. So, it's another do-over, but at least I know what I've got to correct for these shoes anyway.
Laurie
pjz99 posted Thu, 30 December 2010 at 11:36 AM
What's different about the OBJ that Poser writes out? For one thing, the geometry is cut apart at the borders of body parts. Keep this in mind if you want to modify the OBJ later on, after you've rigged it. If you import the Poser-written OBJ into your modeler again you'll see how this affects you. Just using it inside of Poser you won't notice it because Poser quietly re-welds it back together again when it's loaded.
Why does Poser do this horrible stuff to your wonderful watertight model? I have no earthly idea, I'm sure at one point there was a good reason but this is one of those mysterious things that will make your life very, very hard if you're trying to do fitting morphs for conformers in an external application. Since the vertex order and vertex count is completely different between your original model and the Poser-written version, moving morphs in and out of Poser is frightfully weird. People have written applications to make this less painful (D3D's Poser File Editor does this also, and there is Colorcurvature's morph loader script).
pjz99 posted Thu, 30 December 2010 at 11:42 AM
Quote - I've got one more question: when you first rig your shoes and go back to the pose room to zero them in the joint editor before trying the first conform - do you zero the body only? Or the hip too. I zeroed the hip before and alas, my rig is f*d...lol. I'm thinking I'm not supposed to zero that. So, it's another do-over, but at least I know what I've got to correct for these shoes anyway.
When you do Joint Editor -> Zero Figure, it zeroes all bends for the whole figure everywhere. It does NOT change any translation values (these must be zeroed manually, typically only at hip and BODY). Be aware there may be some rubbish stored by "Memorize Figure" coming from the donor rig including bends or translation values, that should be cleaned out also. After you get the figure properly zeroed, do Edit menu -> Memorize -> Figure. This records initialization values for bends, translations etc that will be activated when the figure is conformed (I think, it's something I avoid using).
Joint Editor -> Zero Figure does not act the same when you're in the Setup room, I noticed what you're talking about a long time ago and never did it again (it broke my rig). Unless this has been changed, only use Zero Figure in the Pose room.
There was something else that I thought was fairly important to tell you but it's slipping my mind. :(
pjz99 posted Thu, 30 December 2010 at 11:47 AM
Here's a little thing: Setting the figure's Name (the friendly name, what the user sees in menus and stuff) is done in the "figure" block towards the end of the CR2. This will be the same as what your donor was, until you change it. Typically I set this name before saving the new rig to the Library but if you forget this step, that's where you find it.
pjz99 posted Thu, 30 December 2010 at 11:54 AM
Oh right: Figure -> Symmetry -> Left to Right (or Right to Left) -> Include joint setup. Probably you already figured this out though.
LaurieA posted Thu, 30 December 2010 at 12:04 PM
Quote - Oh right: Figure -> Symmetry -> Left to Right (or Right to Left) -> Include joint setup. Probably you already figured this out though.
Yeah. I'd really go nuts if I had to set both shoes up separately..lol.
But I'm still perplexed at what keeps screwing up the hip in the rig...sigh.
When I use the joint editor (I always use it in the pose room), I select the body and make all zeroes in each of the boxes where it says center point then push the Zero Rotations button, then do the same for the hip. Is that wrong?
Laurie
pjz99 posted Thu, 30 December 2010 at 12:12 PM
Ack, yes, that will trash your rig. Don't manually enter zeroes, hit the "Zero Figure" button.
edit: for translations, you want to make those values zero on the Parameter Dials window.
edit2: only make the translation values zero, ignore "offset" values.
LaurieA posted Thu, 30 December 2010 at 1:56 PM

Gawd, I feel so stupid ;o).
Laurie
pjz99 posted Thu, 30 December 2010 at 2:06 PM
Sorry, I was going from memory - "Zero Rotations" at the bottom.
edit: that's the ONLY control you want to touch on Joint Editor, for this purpose of zeroing a figure. Leave all the other textboxes and dials on Joint Editor alone. :)
LaurieA posted Thu, 30 December 2010 at 2:08 PM
Okie doke...that makes it a lot clearer. I wasn't sure if it was the same thing ;o).
That was my blond moment for the day...
Laurie
pjz99 posted Thu, 30 December 2010 at 2:10 PM
No that's really my fault for not making it clear, don't worry about it.
LaurieA posted Fri, 31 December 2010 at 7:58 PM

The ruffled tongue on this pair should prolly have it's own bone, but since I'm not up to that skill level yet, this'll have to do. I'm surprised enough that they conform ;o).
I didn't have too much trouble with these heels since I modeled this shoe on Vicky's zeroed foot - no odd poses.
Laurie
pjz99 posted Fri, 31 December 2010 at 8:17 PM

I still don't really see how you got the model done around a zeroed foot but great results :) Can you show a pic of what the modeling scene was set up like?
LaurieA posted Fri, 31 December 2010 at 8:34 PM

Laurie
pjz99 posted Fri, 31 December 2010 at 9:04 PM
Hmm, if that method works well for you then great ^^ I've tried working that way and it's quite hard, especially getting the tip of the heel to line up with the flat part of the toe when the toe is bent.
Anyway the tricky part of adjusting the rig that we never got to - in case you do model around a posed foot later on - was to a) conform the shoe onto a V4, b) pose the V4 foot and c) adjust the end point of the foot bone (the point where the foot ends and the toe bone begins) until it's correct.
Great job!
LaurieA posted Fri, 31 December 2010 at 9:11 PM
Quote - Hmm, if that method works well for you then great ^^ I've tried working that way and it's quite hard, especially getting the tip of the heel to line up with the flat part of the toe when the toe is bent.
I would think that the taller the heel, the harder that would be, yep ;o)
Quote - Anyway the tricky part of adjusting the rig that we never got to - in case you do model around a posed foot later on - was to a) conform the shoe onto a V4, b) pose the V4 foot and c) adjust the end point of the foot bone (the point where the foot ends and the toe bone begins) until it's correct.
I'll give it a shot ;o). I still wanna get those pumps set up...lol.
Laurie
LaurieA posted Sat, 08 January 2011 at 11:31 PM

I'm a modeling fool...lol.
Laurie
Lzy724 posted Sun, 09 January 2011 at 12:09 AM
Wow Laurie, these are really cool!!! Great job!
pjz99 posted Sun, 09 January 2011 at 8:44 AM
Good stuff! Most people give up on shoes because it's a pretty difficult topic both for modeling and rigging, congratulations!
LaurieA posted Sun, 09 January 2011 at 9:07 AM
Quote - Good stuff! Most people give up on shoes because it's a pretty difficult topic both for modeling and rigging, congratulations!
I'm a determined person - most of the time...lol ;o).
Laurie

MagnusGreel posted Sun, 09 January 2011 at 9:16 AM
now we prep the next challenge for her.....
Airport security is a burden we must all shoulder. Do your part, and please grope yourself in advance.
WandW posted Tue, 18 January 2011 at 11:12 AM
Any updates, Laurie? :)
----------------------------------------------------------------------------------------
The Wisdom of bagginsbill:
"Oh - the manual says that? I have never read the manual - this must be why."
LaurieA posted Tue, 18 January 2011 at 11:35 AM

Laurie
pjz99 posted Tue, 18 January 2011 at 12:23 PM
Import/export of OBJ and getting material selections and polygon groups through intact are probably going to be things you want to figure out right away.
MagnusGreel posted Tue, 18 January 2011 at 12:29 PM
I'd go with actually getting blender to do something.. it's like they looked at everyother program and said "we ignore that right off."
Airport security is a burden we must all shoulder. Do your part, and please grope yourself in advance.
bob1965 posted Tue, 18 January 2011 at 12:35 PM
Quote - now we prep the next challenge for her.....
Shoes with good laces? mwahahahaha
pjz99 posted Tue, 18 January 2011 at 1:22 PM

bob1965 posted Tue, 18 January 2011 at 2:26 PM
LOL I understand that...but it's still a good challenge for someone who hasn't done it yet.
WandW posted Mon, 14 March 2011 at 8:13 AM
Bump... 
----------------------------------------------------------------------------------------
The Wisdom of bagginsbill:
"Oh - the manual says that? I have never read the manual - this must be why."
shante posted Fri, 15 April 2011 at 1:39 PM
Wow!
I was sent here from the Antonia thread.
Laurie I am blown away by these shoes you made. They look great.
Are they ever going to be made available?
A lot of the shoes for V4 I see are clunky and make her already LOOOOOONG Foot look bigger. These are real fashion statements and seem to nicely streamline the foot.
When you get it down.....and it looks you may have already from what little i have seen here, get these out there.

lesbentley posted Tue, 19 April 2011 at 9:54 AM
Quote - Now, there's that little pesky morph dial stripping thing?
I came to this thread rather late, but better late than never, as they say. I use "Morph Manager 4" (MM4) when I want to strip all the morphs from a figure, but there is a trick you need to use to do it.
Fire up MM4, and load any pz2 file into one of the windows. Loading a pz2 forces MM4 to display a "More Options" button. Load your cr2 into the same window as the pz2, click the More Options button and select the "Delete all morph targets from file" option, then save the file back to disk.
When you save a file from MM4, it replaces tab stops with spaces, making the file size larger. To fix that, load the cr2 in Poser, and save it back to disk, Poser will reformat the spaces as tabs. The process is a bit long winded, but I think it is still faster that deleting the morphs by hand in CR2Editor or CR2Builder, and there is less opertunity to make a mistake.
The above process still leaves the valueParm channels in the BODY, so you still need to delete them, and the material blocks using a cr2 editor.
LaurieA posted Tue, 19 April 2011 at 10:11 AM
Quote - Wow!
I was sent here from the Antonia thread.
Laurie I am blown away by these shoes you made. They look great.
Are they ever going to be made available?
A lot of the shoes for V4 I see are clunky and make her already LOOOOOONG Foot look bigger. These are real fashion statements and seem to nicely streamline the foot.
When you get it down.....and it looks you may have already from what little i have seen here, get these out there.
I was thinking of releasing the Mary Janes, but current circumstances negate the time needed for me to get them properly mapped, textured and set up ;). Maybe later :D
Laurie

ShawnDriscoll posted Tue, 19 March 2013 at 2:40 AM
Bumped because this is worth knowing. I'm in the process of modeling boots with high heels. So far, I'm using an exported zero-posed vicki with just her feet bent. Then I can model the boots around her feet. Just have to remember to pose her feet whenever I use these boots.
Anyone happen to know if there is some sort of standard bent foot angle used for all these vicky poses I have with her standing on her toes? So no matter which pose I pick, my boots will be level on the ground?

JVRenderer posted Tue, 21 April 2015 at 5:36 PM
test
Software: Daz Studio 4.15, Photoshop CC, Zbrush 2022, Blender 3.3, Silo 2.3, Filter Forge 4. Marvelous Designer 7
Hardware: self built Intel Core i7 8086K, 64GB RAM, RTX 3090 .
"If you spend too much time arguing about software, you're spending too little time creating art!" ~ SomeSmartAss
"A critic is a legless man who teaches running." ~ Channing Pollock

primorge posted Tue, 21 April 2015 at 7:34 PM
Cool