Renderosity Forums / Poser - OFFICIAL
Welcome to the Poser - OFFICIAL Forum
Forum Moderators: RedPhantom Forum Coordinators: Anim8dtoon
Poser - OFFICIAL F.A.Q (Last Updated: 2026 Jun 02 2:04 pm)

Subject: Prepping a mannequin in order to model shoes...


While normally I'd say model around zero pose, heeled shoes are the exception - I model around a posed foot and then manually adjust the donor rig to fit the shoes. I've tried it both ways and I never could get heeled shoes to look good when modeled around a zeroed foot and afterward posing the foot, I get a lot better results using a posed foot as a reference. For a really snug shoe with a thin, flexible sole, like a ballet slipper or some kind of sandal perhaps, zeroed would be fine, anything with a hard sole I'd suggest working around a posed foot though. Be aware the rigging phase is significantly harder this way.
If you've never rigged anything before I strongly recommend you start with something easier, like a tank top shirt or some such.
Quote - How does one model a high heel pump on a flat foot? lol
Yeah exactly.
edit: if you want to take a close look at how the results come out when I work this way, you can look at the free set I just finished which includes a heeled hard-sole calf boot, in the great majority of reasonable poses it works very well:
https://sites.google.com/site/fleshforge2/Home/free-stuff/encounter-v4

I made some shoes in hexagon for V4, and I used posed feet, the problem is that you have to adapt the shoes with joint editor after you did the rigging, I wrote about this problem some months ago, here's the link:
http://www.renderosity.com/mod/forumpro/showthread.php?thread_id=2757746&page=2#message_3350062
good luck,
Bopper.
-How can you improve things when you don't make mistakes?
Well I'll be around if you have problems, I'll try to help you. If you're set on doing this as your first rigging project, maybe test first with a rough model to make sure you can figure out the rigging phase, becase honestly it's going to be pretty hard (even after doing it a dozen times now it's still difficult for me).
Markschum is right.
Everytime model around the original zero posed figure. As best you load it directly from the geometries. You need not to export from poser and therefor avoid some trouble with that.
All what is modeled around that original figure will (most) easily be rigged with a donor from orginal figure or similar clothing/shoes. You need not split the mesh between foot and toe. But toe-actor is needed in cr2 to move the toes even if they are part of the foot geometry. You may have a look to one of my models at shareCG.
The only point been tricky while modeling in that pose is to define correct bending area for toe and the correct length and angle of a heel. It's best done (for me) finding the break between toe and foot in the mesh and have a square plane with the rotation axis in that break line. Now you may vary the horizontal angle of that plane to have a new dummy floor depending how high your heel shall come out. For example V4's normal foot position zeroed is an angle of around 19° to the floor. If you need more or less you have to vary the dummy plane and than construct the heel in more or less right angle to that plane ... depending of your taste who the heel shall look. That dummy plane should lay a bit lower than the mesh break line foot/toe depending on how big you will design the sole. Platform = big distance, mocassin type flat sole = nearly no distance.
And have enough polygons around that foot/toe breakline. This part is bending !
Have fun with that modelling. It sounds more difficult than it is in the end.
Edited: One I forgot. If you have a difficult pose in mind like super high heel. The workflow is like above. But you will make a additional model exported from poser with the exact foot pose (export toe, foot, shin). Import this model additional into your modeller and without changing your shoe model use the new leg model to control your work. For this purpose angle the leg model with a fix point at the foot's back end. The foot heel is not bending much, so you can use this than a angle point. Don't worry that using this model the shin isn't any more parallel to the figures shin. This is normal. That additinal model is only used to control the foot and toe design.
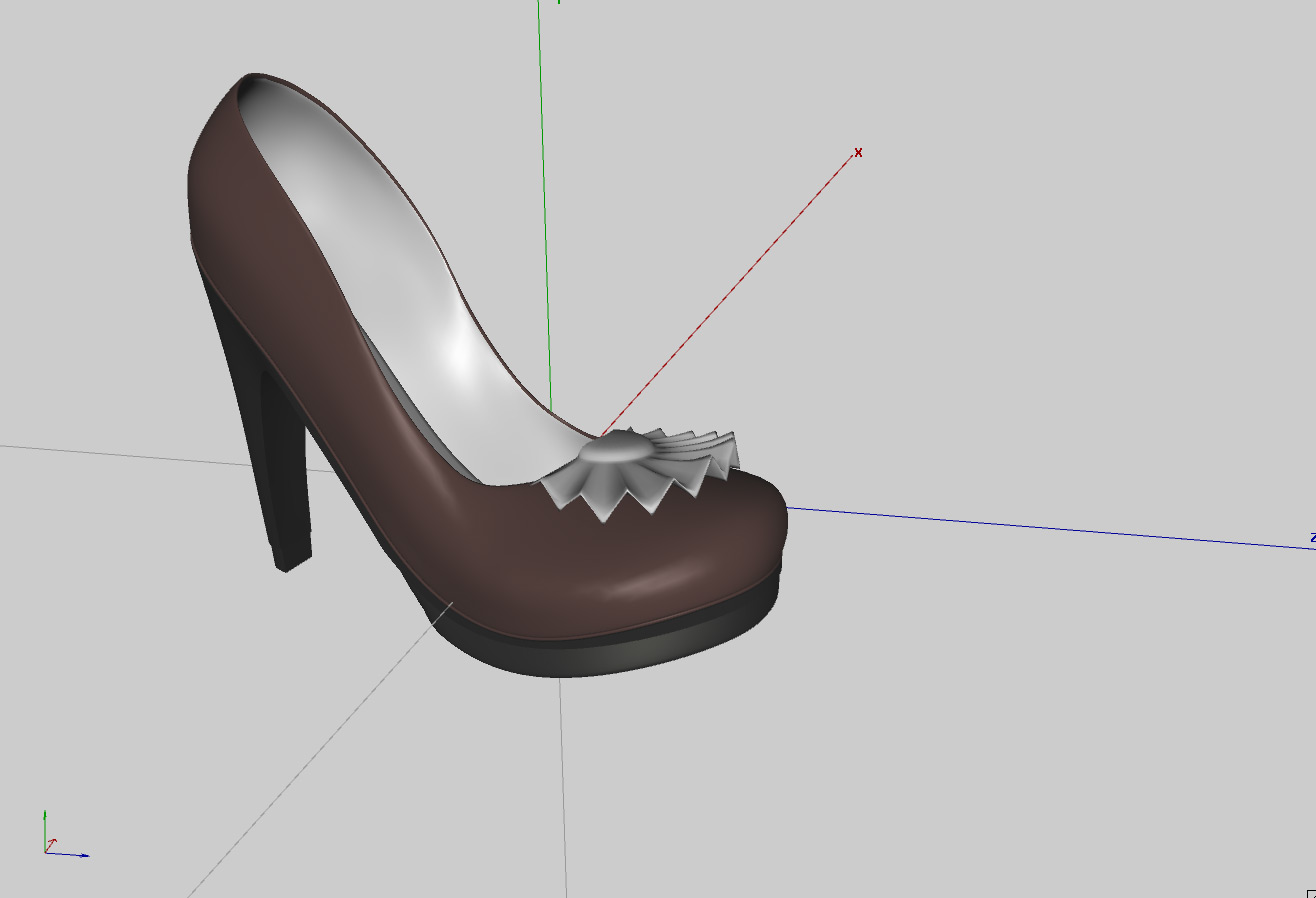
Shrug, if you already have the model done then you might as well try to rig it. There is no question that IT CAN BE DONE, even with that particular shape I can tell you that for sure. The detail ruffle towards the toe may bend a bit more than you'd like but that's about the only problem I see coming at you. Pretty model there, good job :)
By the way, if you are OK with the toe not being able to bend (as in shoes with a truly hard sole, or platforms) this is much easier, the hard part is getting the toe bend to look good.
Quote - Shrug, if you already have the model done then you might as well try to rig it. There is no question that IT CAN BE DONE, even with that particular shapeI can tell you that for sure. The detail ruffle towards the toe may bend a bit more than you'd like but that's about the only problem I see coming at you. Pretty model there, good job :)
Thanks...I was bored...lol.
The ruffle can go if it needs to if it makes things easier on me ;o).
Laurie
Since you have a thick sole with a hard appearance, it'd be reasonable to expect the toe cannot bend, why not make it easy on yourself this first time and don't worry about the toe?
Quote - By the way, if you are OK with the toe not being able to bend (as in shoes with a truly hard sole, or platforms) this is much easier, the hard part is getting the toe bend to look good.
I was planning on this. I've worn high heels and some don't bend all that much...hehe. Really, I just want the darn thing to stick to the foot. I can (and probably will) just make the toes invisible.
Laurie
While there's a really cheapass way to handle this, just consider the shoes to be props and make them children of each foot, I hated this as a user and never bothered with it as a content creator, you can make the donor rig work. Under P8+ and DAZ|Studio it even works perfectly with the Proportions type body part scaling stuff going on in the variations of V4, as well as other applications of scaling.
No idea how to make them children of the foot...lol. I guess I'd better find a good conforming tutorial ;o).
For what it's worth, I did try to parent them to the foot, but everytime I do, they move of course ;o). The only time they don't is when I parent them to Vicky's body. Then of course, they don't move when you bend her leg...lol.
Laurie
Quote - No idea how to make them children of the foot... For what it's worth, I did try to parent them to the foot
We're talking about the same thing, just that terminology of "parenting X to Y" is not really accurate so I don't say it that way.
There are a lot of tutorials out there, here's one that's pretty concise:
http://artzone.daz3d.com/wiki/doku.php/pub/tutorials/poser/poser-rigging07
You're already done up to step 4. Probably you have not grouped the model; for your shoe, imo it's simplest to just put all polys in the right shoe into "rFoot" group, and all polys in the left shoe into "lFoot" group. The tutorial there explains these steps, if you get stuck I'll be around. You don't need to create a group for the toe since it's an end bone with nothing nearby, and anyway you probably don't need it to bend. There is more to do, to make sure the toe WON'T bend, but when you get to that point we'll take it from there.
Do you have a good CR2 editor? While not absolutely necessary, it's immensely harder to do stuff like this with a plain text editor.
I have to tell you, of all the various junk I've bought for Poser, Dimension3D's Poser File Editor is about the only thing I use aside from the modeler and Morphing Clothes, it's saved me thousands of hours of work and associated frustration (not exaggerating). I pretty much never gush over a product, and I still love this utility after a few years of blissful honeymoon:
http://www.renderosity.com/mod/bcs/index.php?ViewProduct=62322&Start=31&vendor=288865
What exactly was the thing you did? I've rigged a bunch of things (e.g. those boots I mentioned earlier) in P8 and not had this kind of thing happen.
I used Vicky's skeleton as a donor rig, deleted everything but the right foot, toe and shin, grouped the stuff, clicked the Pose room tab and Poser quit...lol.
I'm gonna try Poser 7 and see if that makes a difference. Tomorrow...lol.
BTW, is it correct to call the shoe Right Foot? I mean, that's the name of it (Vicky's foot) in the heirarchy editor. Don't think it was that specifically anyway...
Laurie
Yeah oops you don't really want to use the actual figure, you want to use the "V4 DEV" rig. There is a lot of crap in the main figure that you don't want in a conformer, e.g. the magnets and JCM data. The V4 DEV rig should be included in all versions of download of V4, I know for sure it was in the "V4 Complete" package.
Quote - Yeah oops you don't really want to use the actual figure, you want to use the "V4 DEV" rig. There is a lot of crap in the main figure that you don't want in a conformer, e.g. the magnets and JCM data. The V4 DEV rig should be included in all versions of download of V4, I know for sure it was in the "V4 Complete" package.
Welp, that might be it then...lol.
Maybe I should see if I have another pair of shoes for Vicky I can borrow from and make it a little easier...lol.
Laurie
Quote - BTW, is it correct to call the shoe Right Foot? I mean, that's the name of it in the heirarchy editor. Don't think it was that specifically anyway...
All kinds of objects in Poser, including all body parts in a figure, have an Internal Name and an External Name. When you are assigning polygon groups, if the name of the poly group matches the Internal Name of a bone (e.g. rFoot for the right foot) then that bone will bend those polys. The "Name" (or external name) is what is shown in the pulldown menus when you're picking a body part or prop or whatever. This "Name" can be anything and does not have to match the Internal Name, although it is a good idea to have them similar so that your rig makes sense. When you apply a donor rig, the Internal Name and Name for every body part will already be set by the donor.
I meant to ask, why are you rigging one leg at a time? I know some riggers do that but it never made much sense to me, if you only want one shoe in your scene then you can hide the unwanted one.
Quote - Welp, that might be it then...lol. Maybe I should see if I have another pair of shoes for Vicky I can borrow from and make it a little easier...lol.
Even then you're going to have to cut out all the morph data for all body parts. When you get to that step you're going to see why I was suggesting a strong CR2 editor.
Feel free to use my adjusted rig, you have my blessing:
https://sites.google.com/site/fleshforge2/Home/free-stuff/encounter-v4
Your heel is a little taller I think but this should be an OK starting point.
edit: the heel for this rig is a little taller and might work better, plus there is less morph garbage to cut out:
https://sites.google.com/site/fleshforge/Home/free-stuff-1/revelation-of-the-seraphim-v4
If I rig them both at once I have to import them both as one object, correct?
Anyway, I've tried this all sorts of ways. Individually and together.
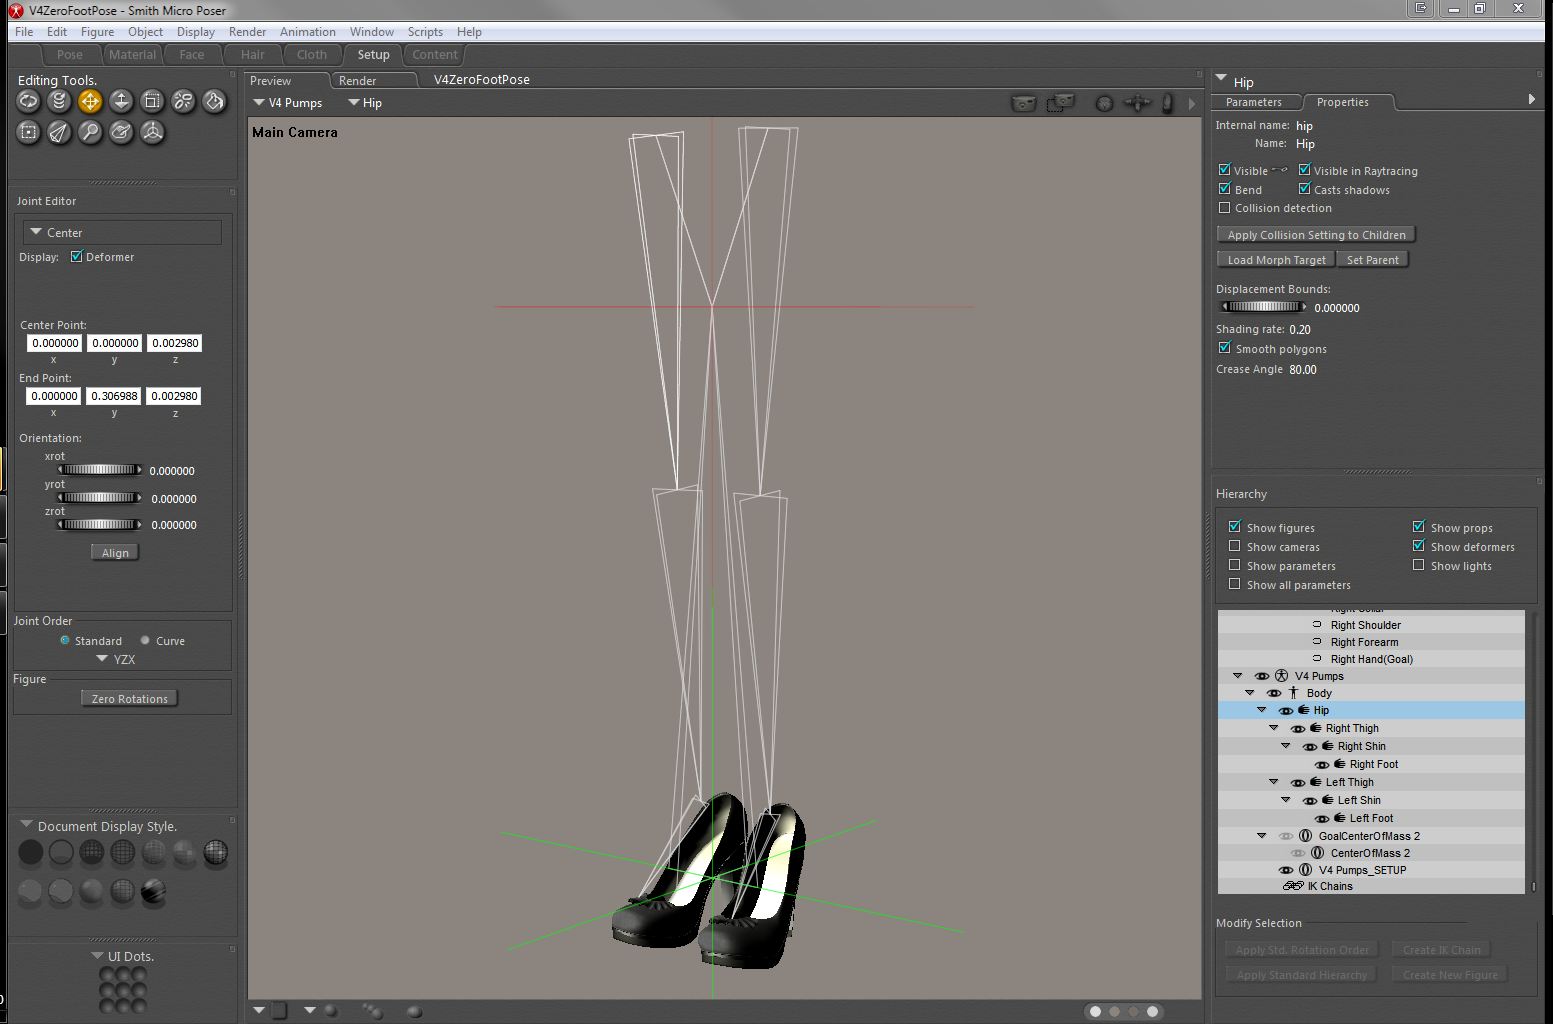
I'm obviously doing something wrong: when I go to the setup room and add the V4 dev and delete all but the r and l foot, r and l toe and r and l shin and exit, the shoes act like a figure...they even conform...but they do not move with the figure. I'm not sure what I'm not doing. It has to be something I'm not doing ;o).
When I leave the setup room and try and go back to the pose room it does say that I have something not grouped to a bone, even if I group all. So, I'm stumped for now ;). I am really stupid when it comes to rigging. As many years as I've been using Poser I've never, ever done this. Never even tried.
Laurie
Quote - If I rig them both at once I have to import them both as one object, correct?
Yes.
Quote - I'm obviously doing something wrong: when I go to the setup room and add the V4 dev and delete all but the r and l foot, r and l toe and r and l shin and exit...
You can't delete stuff higher up in the hierarchy than the bones you're going to use, that's probably your problem. Don't delete the hip and thighs. You need:
BODY
-Hip
--Thighs
---Shins
----Feet
-----(you don't really need the toes for this particular shoe if the toe is not going to bend)
Content Advisory! This message contains profanity
Quote - I am really stupid
And you can cut that shit out right now young lady.
Quote - > Quote - I am really stupid
And you can cut that shit out right now young lady.
LOL...I know. It's just that I get frustrated with my efforts (or lack thereof) sometimes ;o). I realize everyone who does this was at the point I'm at right now. It's just that, right now, I can't understand how any of you got past it...lmao.
I'll try leaving the bones you specified above and see what happens...hehe.
Thanks so much for your continued help - I really appreciate it.
Laurie
Content Advisory! This message contains profanity
Quote - It's just that, right now, I can't understand how any of you got past it...lmao.
Oh you haven't even gotten to the REALLY nasty part, save your bitching for that.
Oh no, this is still the fairly easy part with the tools you have. Can you take the model to the Setup room and take a screenshot of how the bones are laid out and post that?
The hip is borked, you have to redo the rig. Keep in mind that undo usually doesn't work for that stage. Try loading one of mine and looking at it in the setup room (it will complain about morph targets when you switch, ignore that unless it provokes a crash). You may need to start from a new blank scene and re-import the OBJ, depending on what happened.
When you are deleting bones, work from the end bones inward; e.g. delete the finger3 bone, finger 2 bone, finger1 bone for each finger and thumb, and then the hand, and then the forearm, shoulder and collar, for each arm; delete the head, neck; THEN delete the chest, then abdomen. If you delete bones that have children it may cause problems or crashes.
As painful as this seems right now, once you do one and get it working right, you can save it and reuse it on later projects.
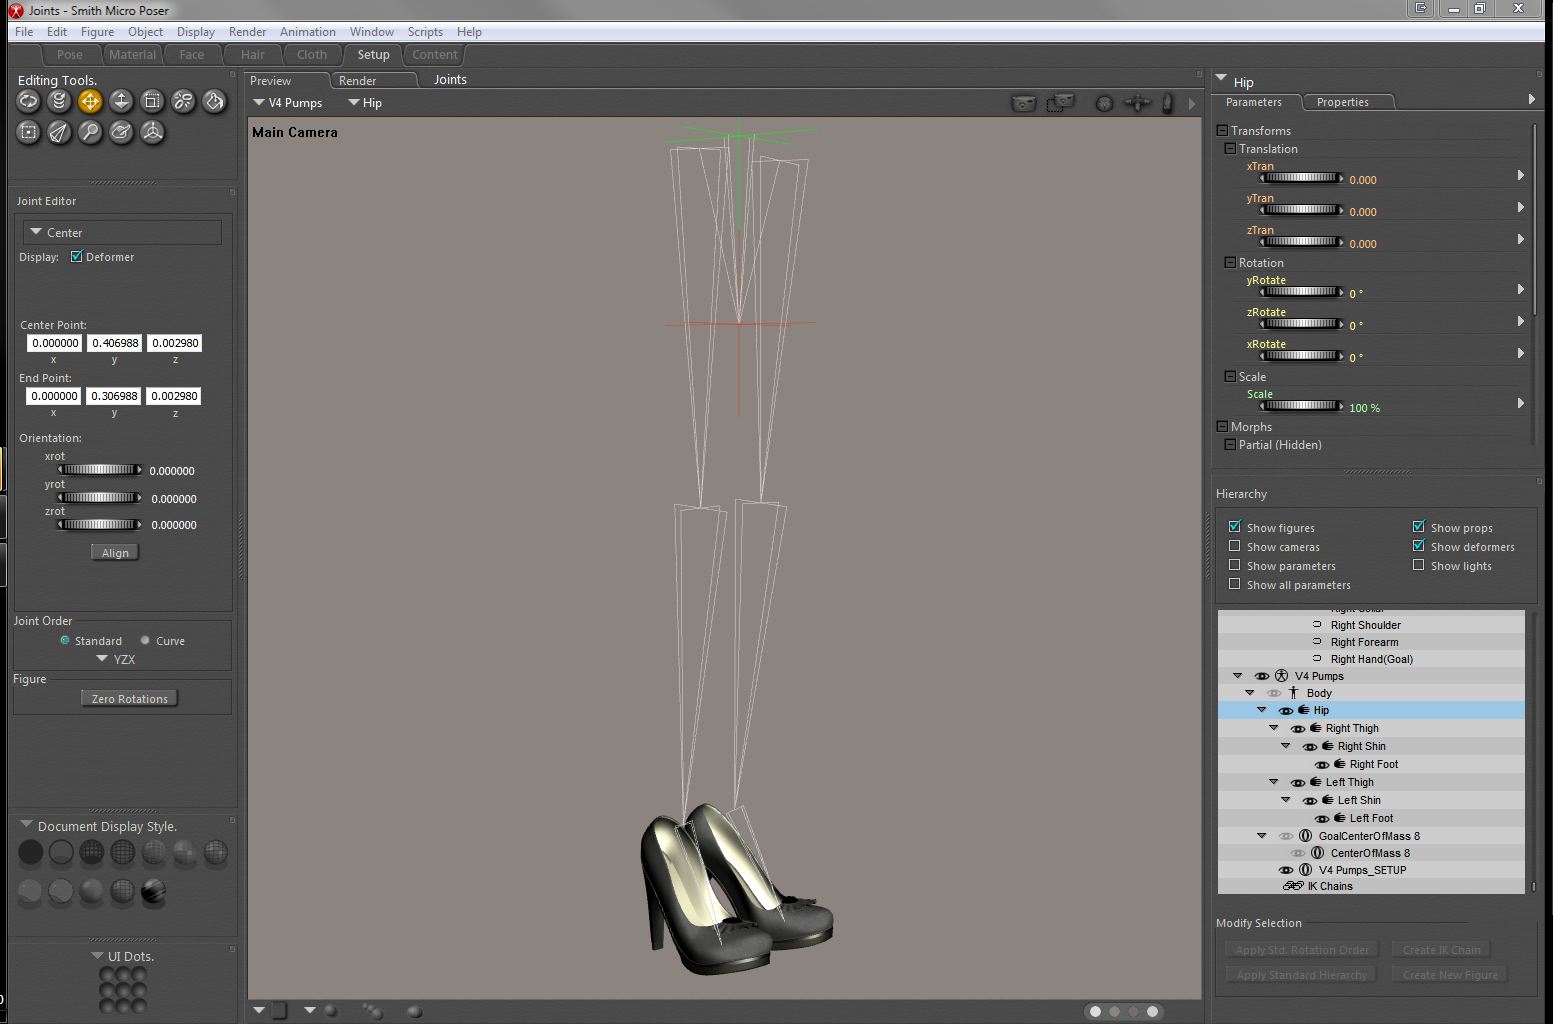
Yes that looks a lot better. What happens if you leave the Setup Room at this point? If you are nagged about polygons that do not belong to a bone's group, you may be tempted to let Poser's Group Editor auto-group it for you in this case, but remember it will screw up at the toes for models that have toes you want to bend.
VERY IMPORTANT: If you have "Use External Binary Morph Targets" enabled, TURN IT OFF NOW.
If Poser lets you out of the Setup Room without complaining, it can save a lot of sanity if you start saving the scene file in increments (meaning, keep multiple copies as you progress with different filenames). This lets you revert to an earlier state that worked when you goof, and trust me you will goof. Undo is not trustworthy for a great many of these operations.
It's also a good time to save what you have to the Poser Library. Again, whenever you reach a big milestone (yay I got the foot to bend correctly, e.g.) you should re-save incrementally (multiple copies with different filenames).
Now we go on to the ADJUSTING JOINT PARAMETERS part of the job :) First, catch up to the info I just gave you and then go watch this video by Phil Cooke (such a great man):
http://www.youtube.com/watch?v=PfcPu83gZNs (part 1 of 2)
http://www.youtube.com/watch?v=434MJDE4gEA&feature=related (part 2 of 2)
edit: please just watch these videos first, and think about what he's teaching you; then come back and we'll talk about what you need to do to make your shoes work, okay? we only need to make a pretty small change (hopefully) but I wanted to let you have exposure to this excellent, thorough tutorial first so you understand what's going on.
I have those videos saved in my youtube faves...lol. I'll definitely watch them a little later :o).
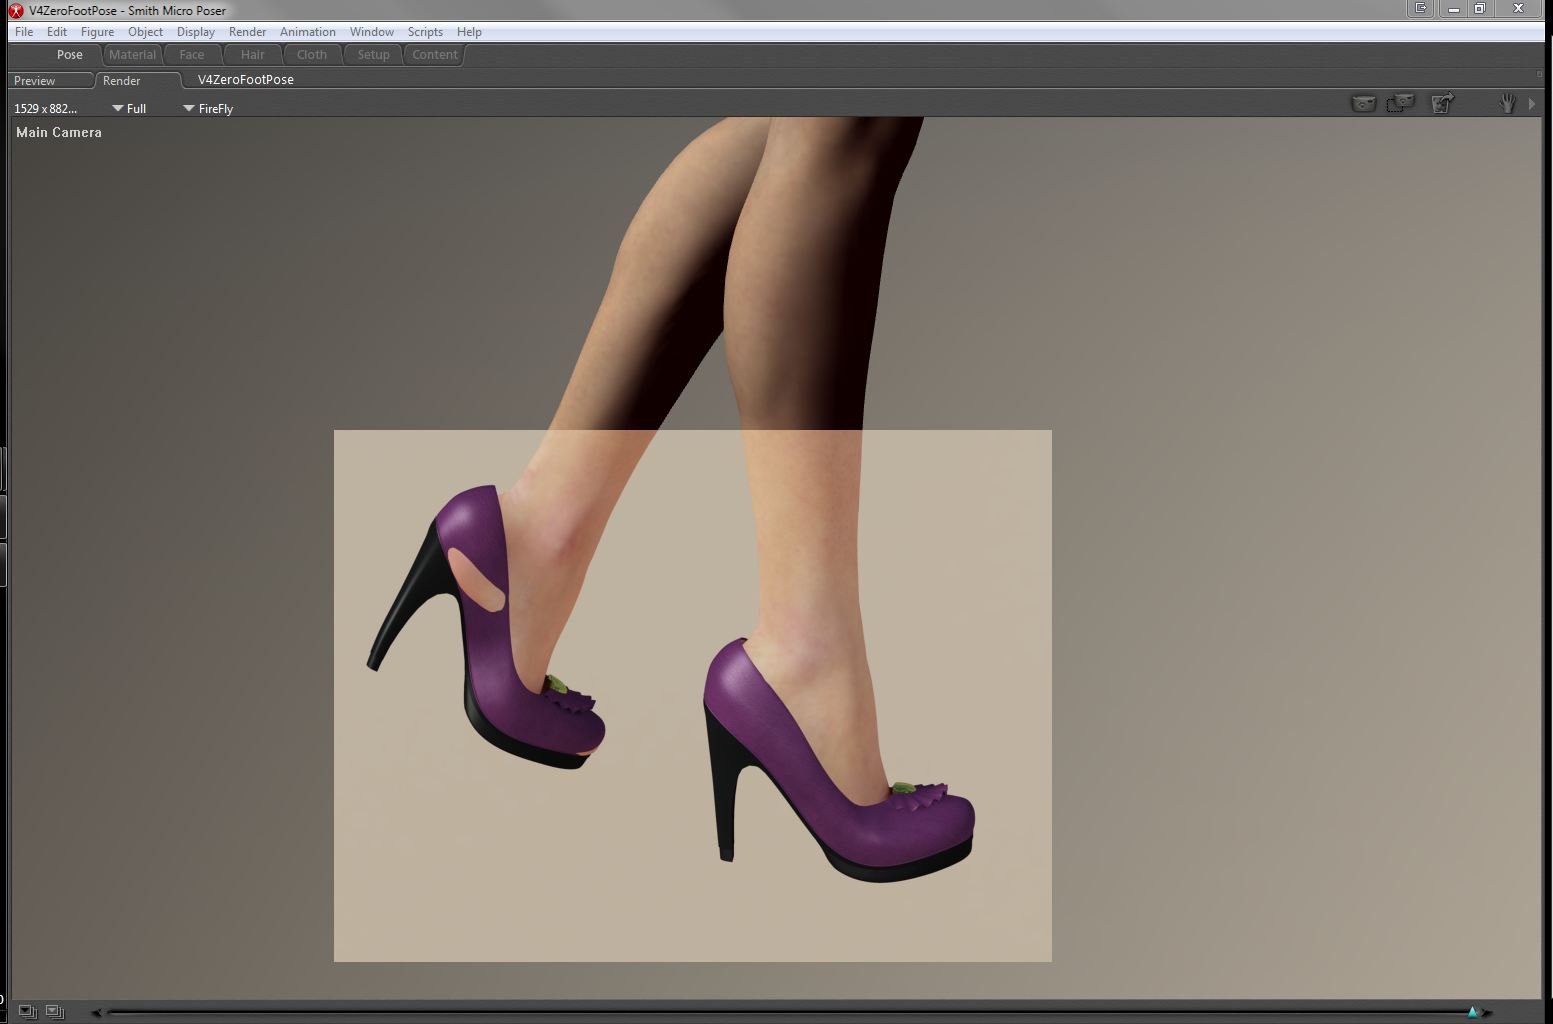
As for the joint parameters, I did manage to get them to conform to the feet pretty well using the joint parameters. They stray a little bit when the figure bends her knees tho. I'm sure I have to tweak something ;o).
Rest assured as well, I have been saving every time I manage to get something right without screwing it up...lol.
And no, I got out of the setup room without it complaining. I did use autogroup, but I grouped the toes back into the foot since I won't be bending those. Hope that was ok.
Laurie
Yes that's fine, we want all the polys for the right shoe in "rFoot" and all the polys for the left shoe in "lFoot". Can you show me a pic of how it bends, what aspect isn't right?
Oh dear. When you did the model and set up your reference character (the mannequin) did you first a) disable IK and then b) zero everything except the foot and toe? and then export that?
You didn't scale any bones or dial up any morphs did you?
Ah, from looking at the tip of the heel I'm fairly sure it's only that you need to expand the inner falloff sphere in joint parameters - how you do this is covered in the second Joint Parameter video by Phil Cooke:
Take a look at that second JP editor movie and look at expanding the green/inner falloff sphere, I think that's what's causing your problem.
Privacy Notice
This site uses cookies to deliver the best experience. Our own cookies make user accounts and other features possible. Third-party cookies are used to display relevant ads and to analyze how Renderosity is used. By using our site, you acknowledge that you have read and understood our Terms of Service, including our Cookie Policy and our Privacy Policy.
What does one do? Do you pose the feet first? Model the shoes around the default pose foot? I'm at a loss. I can model the shoes just fine...it's just that I'm going to use said shoes to practice rigging which I've never done ;o). The shoes I have in mind are pumps (what else?)...lol.
Any and all help would be greatly appreciated :o).
Laurie