Renderosity Forums / 3DS MAX
Welcome to the 3DS MAX Forum
Forum Moderators: wheatpenny
3DS MAX F.A.Q (Last Updated: 2024 Aug 27 11:07 am)
Welcome to the 3DS Max Forum!
Considering 3ds Max? Download the FREE 30-day trial here

Ready to purchase 3ds Max? Go here
Renderosity maintains a zero tolerance policy concerning the trading/use of illegal software.
Refer to the Terms Of Service for the lowdown concerning warez.
POSER/MAX FAQ - This covers MANY of the issues involved when using Max in conjunction with Poser.
Take the time to look over this post before starting a thread in the forum.
Checkout the Renderosity MarketPlace - Your source for digital art content!

Enjoy your stay and keep coming back!

Subject: Quick Tip: Select Similar


Great tip. Keep them coming. Although, as a graphic designer I must comment on your use of bold, italic, CAPS and even CAPS italic. Really? Well, at least you didn't use underline. That would have generated a lot of eye rolling. ; )
<strong>bandolin</strong><br />
[Former 3DS Max forum coordinator]<br />
<br />
<a href="http://www.renderosity.com/homepage.php">Homepage</a> ||
<a href="http://www.renderosity.com/mod/sitemail/">SiteMail</a> ||
<a href="http://excalibur.renderosity.com/mod/gallery/browse.php?user_id=70375">
Gallery</a> || <a href="http://www.renderosity.com/mod/freestuff/index.php?username=bandolin">
Freestuff</a>
<p><em>Caution: just a hobbyist</em></p>I see tons of folks using ALL CAPS when there's something important. Didn't know I shouldn't be doing that. However, I will NEVER USE UNDERLINE. :)
______________________________________
My Store
My Free Models
My Video Tutorials
My CG Animations
Instagram: @luxxeon3d
Facebook: https://www.facebook.com/luxxeon
Its not that you aren't supposed to use it, its just a convention thing you should really only stick to one emphasis type (or maybe two when absolutely necessary).
For printed material I prefer italic however I don't find it stands out enough when reading online so I use bold. In printed material CAPS are never acceptable except for titles and bold is used almost as rarely.
The rules of graphic design are broken online even by experienced designers very often. We are still in the process of defining online conventions as an information age society as a whole. I've read lots of material by internationally recognized art directors and designers on what those conventions should look like, and they are all based on traditional print material with just a few exceptions like font size, kearning and leading.
My opinion is that the conventions will work themselves out through usage for good or bad in the long run. Society as a whole dictates what looks good to them online. Unlike in the past when printed material was strictly controlled by publishers.
<strong>bandolin</strong><br />
[Former 3DS Max forum coordinator]<br />
<br />
<a href="http://www.renderosity.com/homepage.php">Homepage</a> ||
<a href="http://www.renderosity.com/mod/sitemail/">SiteMail</a> ||
<a href="http://excalibur.renderosity.com/mod/gallery/browse.php?user_id=70375">
Gallery</a> || <a href="http://www.renderosity.com/mod/freestuff/index.php?username=bandolin">
Freestuff</a>
<p><em>Caution: just a hobbyist</em></p>
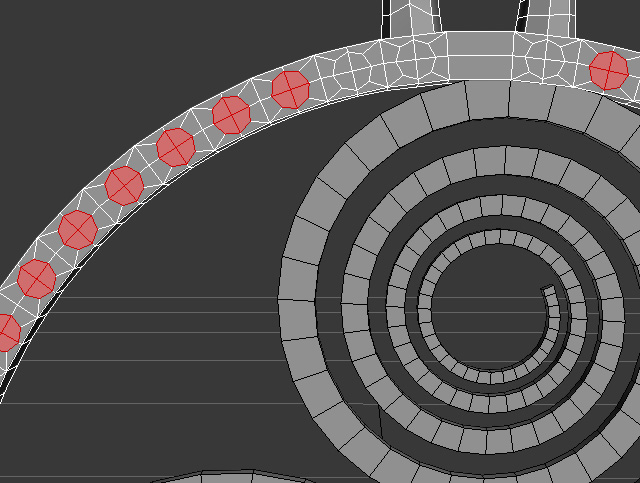
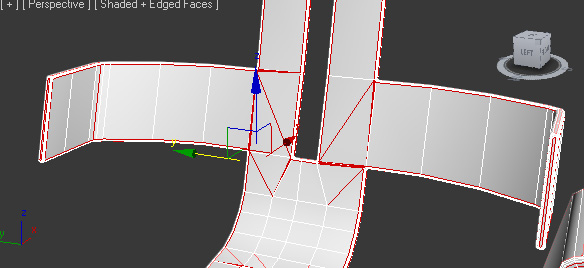
I have a model where I need to select many circular sets of polygons on the surface. Some of these polygons are perfectly round, while many others were not. I needed to select all the polygons that weren't perfectly round, so I could make them so. The difference between the few perfectly round ones, and the not-so-round ones, was very minimal. Just a matter of a slight vertex position difference.
In this image, I have all the polygons I need to select indicated by Green arrows. I do not want to select the ones that are already perfectly round, indicated by the Red arrows.
Since each set of polygons contains 4 quads, selecting them according to number of sides wouldn't be efficient. I could do that, and then just DE-select the few round ones I don't need, but there's a better way.
______________________________________
My Store
My Free Models
My Video Tutorials
My CG Animations
Instagram: @luxxeon3d
Facebook: https://www.facebook.com/luxxeon

______________________________________
My Store
My Free Models
My Video Tutorials
My CG Animations
Instagram: @luxxeon3d
Facebook: https://www.facebook.com/luxxeon
______________________________________
My Store
My Free Models
My Video Tutorials
My CG Animations
Instagram: @luxxeon3d
Facebook: https://www.facebook.com/luxxeon
I ran into a problem with selecting yesterday as well. But found no solution. I wanted to select only the outer edges and not any of the inner edges in order to apply Quad Chamfer and give everything a nice rounded edge look. I ended up spending an hour manually selecting outer edges.
I know in when in polygon mode you can select the outside edges by holding down Alt - Shift, which helped speed up the process but it still required manually selecting polys.
<strong>bandolin</strong><br />
[Former 3DS Max forum coordinator]<br />
<br />
<a href="http://www.renderosity.com/homepage.php">Homepage</a> ||
<a href="http://www.renderosity.com/mod/sitemail/">SiteMail</a> ||
<a href="http://excalibur.renderosity.com/mod/gallery/browse.php?user_id=70375">
Gallery</a> || <a href="http://www.renderosity.com/mod/freestuff/index.php?username=bandolin">
Freestuff</a>
<p><em>Caution: just a hobbyist</em></p>I'd have to see that file for myself to know if there were an even faster solution, without manually selecting them all. Couldn't you Shift-select the outer edge loop, then either grow from there, or use the arrow spinner next to your loop/ring buttons to step through the edge loops to the one you needed to grow from? Select one edge, then hold down shift, and select the next edge in the loop (or ring) to instantly select the entire loop, or as many edges in the loop as possible, until it encounters a teminating ege.
One tip that I find very helpful is, as you go, assign hard edges by setting smooth groups early on in your model. This way, you can use the Hard Edge selection feature to grab all the border edges you assigned as hard edges.
Don't forget it's often easier to select more edges than you need, and then remove the ones you don't require. If you have more edges to select than not, then select them all, and just remove the ones you don't need for faster workflow. Also remember your Fence Selection Region tool. That's often a handy selection tool for getting at stubborn or hard to reach edges.
______________________________________
My Store
My Free Models
My Video Tutorials
My CG Animations
Instagram: @luxxeon3d
Facebook: https://www.facebook.com/luxxeon
I'm sorry, I said Shift-select. What I meant to say is this:
- Select one edge on the border you want to select.
- Hold down ALT on the keyboard to add to your selection.
- While holding down ALT, press and hold down SHIFT, then select the next edge in the loop.
- This will select the entire loop of edges (as if you were in loop mode) until it reaches a terminator edge.
From that point, if you don't have the entire border edge you need, repeat the process by holding down ALT again to add to that selection, and do the same with SHIFT, until you have the entire border selected. SHouldn't have taken more than 10 min by the look of that model?
______________________________________
My Store
My Free Models
My Video Tutorials
My CG Animations
Instagram: @luxxeon3d
Facebook: https://www.facebook.com/luxxeon
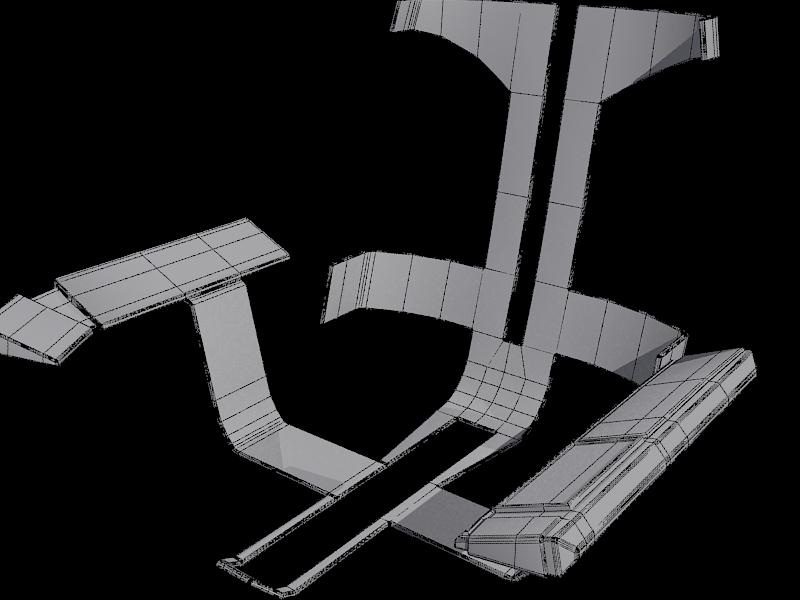
I was using Shift-Select and edge loop copiously. The model began as just a half with a symmetry modifier up until one side had to be alterted, so I collapsed the modifier. Problem with that is any loops now terminate at the half way point.
Not very familiar with the hard edge selection feature you are talking about. I use smoothing groups all the time but didn't realize you could select via smoothing groups.
<strong>bandolin</strong><br />
[Former 3DS Max forum coordinator]<br />
<br />
<a href="http://www.renderosity.com/homepage.php">Homepage</a> ||
<a href="http://www.renderosity.com/mod/sitemail/">SiteMail</a> ||
<a href="http://excalibur.renderosity.com/mod/gallery/browse.php?user_id=70375">
Gallery</a> || <a href="http://www.renderosity.com/mod/freestuff/index.php?username=bandolin">
Freestuff</a>
<p><em>Caution: just a hobbyist</em></p>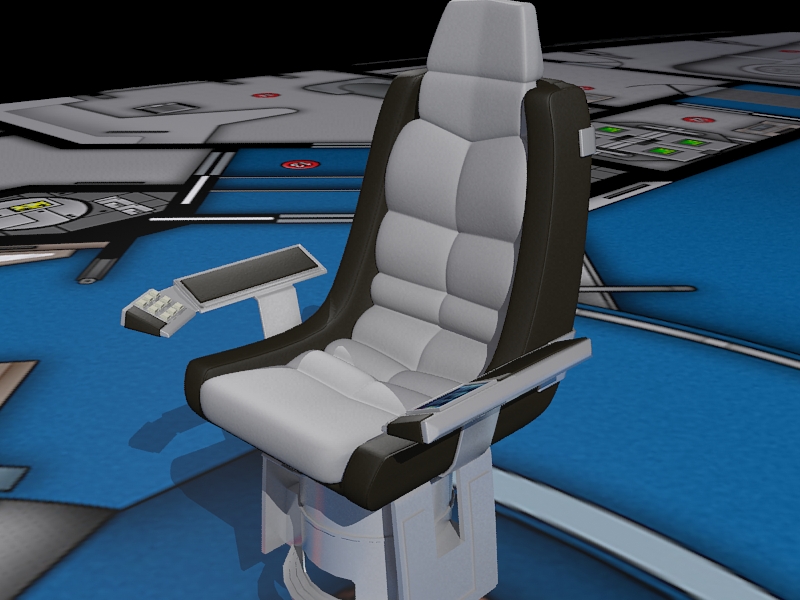
And no, its way more than 10 min to do it that way. At any rate, the model is finished.
<strong>bandolin</strong><br />
[Former 3DS Max forum coordinator]<br />
<br />
<a href="http://www.renderosity.com/homepage.php">Homepage</a> ||
<a href="http://www.renderosity.com/mod/sitemail/">SiteMail</a> ||
<a href="http://excalibur.renderosity.com/mod/gallery/browse.php?user_id=70375">
Gallery</a> || <a href="http://www.renderosity.com/mod/freestuff/index.php?username=bandolin">
Freestuff</a>
<p><em>Caution: just a hobbyist</em></p>Quote - I was using Shift-Select and edge loop copiously. The model began as just a half with a symmetry modifier up until one side had to be alterted, so I collapsed the modifier. Problem with that is any loops now terminate at the half way point.
Not very familiar with the hard edge selection feature you are talking about. I use smoothing groups all the time but didn't realize you could select via smoothing groups.
Hold down alt, then add the next edge to the loop where it terminates, and then go back to shift selecting. I think that's probably the only way for some models, where edge loops terminate often, or redirect in ways you don't really want.
Yeah, you can select via smoothing groups, and there's a feature calle "Hard Edges" undert the Selection tab (left side of the ribbon). Your smoothing groups need to be perfectly set in order for this to work as expected, but if you set SM groups often, then this might be handy for you, since you should know where your hard edges are at all times.
You can select only faces by smoothing group, in the same area of the Selection ribbon, in the Select dropdown. There will be an option, if you're in face mode, to select by Material ID (which was always possible in the command panel rollout), and also By Smooth Group. The "Hard Edges" option appears in that location when in Edge Mode. It's like Selecting all your border edges of the smoothing groups.
______________________________________
My Store
My Free Models
My Video Tutorials
My CG Animations
Instagram: @luxxeon3d
Facebook: https://www.facebook.com/luxxeon
The model looks great! Excellent work!
______________________________________
My Store
My Free Models
My Video Tutorials
My CG Animations
Instagram: @luxxeon3d
Facebook: https://www.facebook.com/luxxeon
<strong>bandolin</strong><br />
[Former 3DS Max forum coordinator]<br />
<br />
<a href="http://www.renderosity.com/homepage.php">Homepage</a> ||
<a href="http://www.renderosity.com/mod/sitemail/">SiteMail</a> ||
<a href="http://excalibur.renderosity.com/mod/gallery/browse.php?user_id=70375">
Gallery</a> || <a href="http://www.renderosity.com/mod/freestuff/index.php?username=bandolin">
Freestuff</a>
<p><em>Caution: just a hobbyist</em></p>I have procedurals for the Octane render engine, but nothing for Mental Ray or default Max. I do have some really nice tileable texture patterns, which I use often in some of my unwrapped models, but most of those are from texture repositories, like CGTextures.com. One thing I'll be doing this year, as my resolution, is taking more photographs and creating my own tileable texture libraries.
Will you be unwrapping this next?
______________________________________
My Store
My Free Models
My Video Tutorials
My CG Animations
Instagram: @luxxeon3d
Facebook: https://www.facebook.com/luxxeon
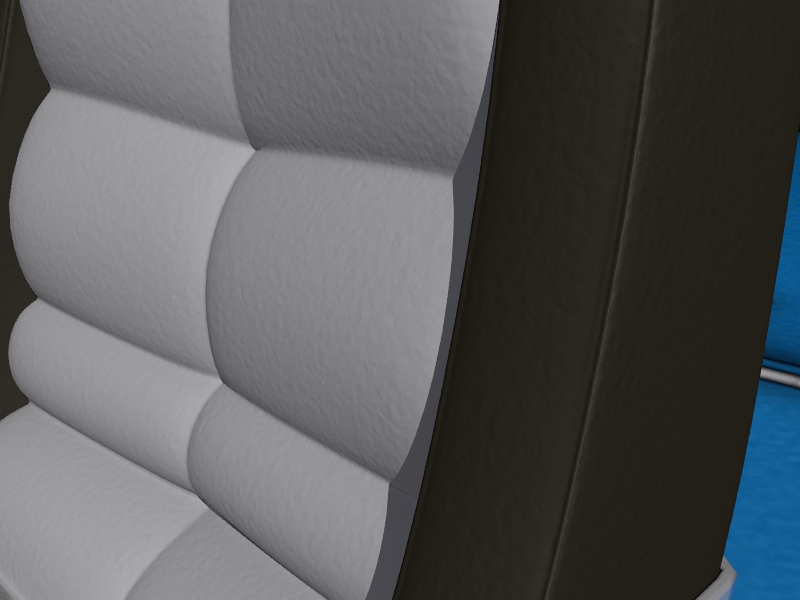
The seams in that chair look absolutely top notch, bandolin. Did you use Quad Chamfer to create those? Love the look of the seams, and the tufted cushioning.
______________________________________
My Store
My Free Models
My Video Tutorials
My CG Animations
Instagram: @luxxeon3d
Facebook: https://www.facebook.com/luxxeon
I'm trying to avoid having to unwrap it. That's why I was looking for a procedural texture. I don't want to have to use a bitmap.
The leather modeling was done using Turbosmooth and control loops after viewing that great video posted by Max. Thanks for the complement.
I used QuadChamfer on the metal brace support and armrests. That's what caused the selection fest I had to go through.
<strong>bandolin</strong><br />
[Former 3DS Max forum coordinator]<br />
<br />
<a href="http://www.renderosity.com/homepage.php">Homepage</a> ||
<a href="http://www.renderosity.com/mod/sitemail/">SiteMail</a> ||
<a href="http://excalibur.renderosity.com/mod/gallery/browse.php?user_id=70375">
Gallery</a> || <a href="http://www.renderosity.com/mod/freestuff/index.php?username=bandolin">
Freestuff</a>
<p><em>Caution: just a hobbyist</em></p>If you have a chance, and wouldn't mind sharing; I'd love to have a look at the object you were having trouble selecting, and try to see if there's a faster way to get the selections you wanted. If you could upload just that part of the model, at the base level it was when you were doing your selections, I'd be happy to look it over and play around with it some.
I'm sure it was a tricky selection, regardless. Just curious if there wasn't something that could have made it easier for you. I'm sure there isn't any automated way, but perhaps some manual route that's faster, so that the next time you're faced with a similar selection issue, it won't be as tedious.
______________________________________
My Store
My Free Models
My Video Tutorials
My CG Animations
Instagram: @luxxeon3d
Facebook: https://www.facebook.com/luxxeon
Attached Link: Chair Brace
Thanks for the offer Lux. But I don't have the base model anymore. Its all chamfered and extruded now. But here it is in its final form.
<strong>bandolin</strong><br />
[Former 3DS Max forum coordinator]<br />
<br />
<a href="http://www.renderosity.com/homepage.php">Homepage</a> ||
<a href="http://www.renderosity.com/mod/sitemail/">SiteMail</a> ||
<a href="http://excalibur.renderosity.com/mod/gallery/browse.php?user_id=70375">
Gallery</a> || <a href="http://www.renderosity.com/mod/freestuff/index.php?username=bandolin">
Freestuff</a>
<p><em>Caution: just a hobbyist</em></p>
Then I decided to try selecting the edges with the Hard button, which selects all hard edges. That may have been the solution to automate this for you, because when I pressed that, it grabbed all the outer edges of your chamfer nicely, around the whole model. I imagine if the chamfer wasn't present, it would have grabbed at least 90% of the edges you wanted, and all you'd have left to do is CTRL-select the remaining edges, or fix the selection, if it wasn't exactly right. Probably saving you a lot of time.
______________________________________
My Store
My Free Models
My Video Tutorials
My CG Animations
Instagram: @luxxeon3d
Facebook: https://www.facebook.com/luxxeon
The better approach is to make sure you quad them up before you do a chamfer or extrusion, because it's far more difficult to quad up after you've done that procedure.
______________________________________
My Store
My Free Models
My Video Tutorials
My CG Animations
Instagram: @luxxeon3d
Facebook: https://www.facebook.com/luxxeon
I tried the hard button just now. Its a pretty cool feature. I'll have to add that to my repetoire.
As for N-gons. Yeah, quite possibly. I'm really not as careful as I should be.
Thanks for having a go at it.
<strong>bandolin</strong><br />
[Former 3DS Max forum coordinator]<br />
<br />
<a href="http://www.renderosity.com/homepage.php">Homepage</a> ||
<a href="http://www.renderosity.com/mod/sitemail/">SiteMail</a> ||
<a href="http://excalibur.renderosity.com/mod/gallery/browse.php?user_id=70375">
Gallery</a> || <a href="http://www.renderosity.com/mod/freestuff/index.php?username=bandolin">
Freestuff</a>
<p><em>Caution: just a hobbyist</em></p>Before going forward with any chamfering, just do a By Numeric selection, at face level, for any polygons with more than 4 sides. If you find any, you can decide how to fix them before continuing. Sometimes it's just a matter of selecting a few verts and collapsing them, or target welding. If the number of sides of any polygon is an even number of vertices, then you can quad it up no problem by cutting edges between the verts.
______________________________________
My Store
My Free Models
My Video Tutorials
My CG Animations
Instagram: @luxxeon3d
Facebook: https://www.facebook.com/luxxeon
Good advice.
<strong>bandolin</strong><br />
[Former 3DS Max forum coordinator]<br />
<br />
<a href="http://www.renderosity.com/homepage.php">Homepage</a> ||
<a href="http://www.renderosity.com/mod/sitemail/">SiteMail</a> ||
<a href="http://excalibur.renderosity.com/mod/gallery/browse.php?user_id=70375">
Gallery</a> || <a href="http://www.renderosity.com/mod/freestuff/index.php?username=bandolin">
Freestuff</a>
<p><em>Caution: just a hobbyist</em></p>
Fine model, Bandolin! The final result looks really slick.
"Before going forward with any chamfering, just do a By Numeric selection, at face level, for any polygons with more than 4 sides. If you find any, you can decide how to fix them before continuing. Sometimes it's just a matter of selecting a few verts and collapsing them, or target welding. If the number of sides of any polygon is an even number of vertices, then you can quad it up no problem by cutting edges between the verts."
Good tip, lux, and alludes to the fact that when modelling, we need to think a couple steps ahead always.
One trick is that whenever you create a spline shape, and extrude it to create polys, the ends get capped with ngons. Most people just leave those in, because they can't figure out a way to quad those end caps, especially if the shape consists of a lot of verices that would be really hard to manually cut edges into.
One solution to this is to make sure, when you're creating a shape using splines, you always consider the fact you can convert that to editable polygon, and use turbosmooth to smooth it out more. So all you really need to achieve with your spline is a relatively smooth shape profile, which can be smoothed further with subD.
Reduce the interpolation of the spline to about 1 or 2 (default is 6). This way, you end up with less vertices around those ngon caps, which will be much easier to quad up once you convert it to an editable poly. Try to find a low interpolation level that provides EVEN number of vertices at the end cap borders when you convert it, and you should be able to cut edges across those end caps very easily to create quads. Then add your support loops, and use turbosmooth or nurms to smooth it out to the desired level of smoothness.
Same technique applies to a lathe or loft. Don't go for the final smoothing result right off the bat, if you are going to cap the ends. It creates way too many vertices, and capping the ends with quads is more difficult. Keep the interpolation low, with the intention of smoothing as the final step. You can always put a turbosmooth in the stack above your lathe or loft object, and preview the result at various levels of interpolation and subD.
If you have a few bucks to spare, and really want to fully automate the process of quad-capping any hole on any mesh (not just end caps, but holes in the sides, or anywhere), then have a look at the awesome Quad Cap modifier. I got this one for myself for Xmas, and it's awesome. Every bit as useful as Quad Chamfer. You'll never see an ngon on any of my objects again I tell ya.
Tools : 3dsmax 2015, Daz Studio 4.6, PoserPro 2012, Blender
v2.74
System: Pentium QuadCore i7, under Win 8, GeForce GTX 780 / 2GB
GPU.
"One trick is that whenever you create a spline shape, and extrude it to create polys, the ends get capped with ngons."
Can you show an example of this. I'm not quite sure I understand what you are explaining.
<strong>bandolin</strong><br />
[Former 3DS Max forum coordinator]<br />
<br />
<a href="http://www.renderosity.com/homepage.php">Homepage</a> ||
<a href="http://www.renderosity.com/mod/sitemail/">SiteMail</a> ||
<a href="http://excalibur.renderosity.com/mod/gallery/browse.php?user_id=70375">
Gallery</a> || <a href="http://www.renderosity.com/mod/freestuff/index.php?username=bandolin">
Freestuff</a>
<p><em>Caution: just a hobbyist</em></p>I believe he's referring to extruding a closed shape, either with extrude, or using Shell modifier.
If you create a circle, for example, and add a shell modifier, with thickness, you create an extruded shape, with caps on the top and bottom. The caps would be Ngons, because closed shapes are just outlines, and have no inner space to get converted to polygons. So Max does the most efficient thing; it caps the ends with ngons (the extrude modifier has the option to cap the start and end of a closed shape). Lowering the interpolation of your shape will result in fewer vertices (and edges) in your extrusion, and make it easier to connect the vertices around the start and end borders.
______________________________________
My Store
My Free Models
My Video Tutorials
My CG Animations
Instagram: @luxxeon3d
Facebook: https://www.facebook.com/luxxeon
When I was a little boy, I was always afraid of trolls and ogres. Now, ngons bring me nightmares. Ugh...
<strong>bandolin</strong><br />
[Former 3DS Max forum coordinator]<br />
<br />
<a href="http://www.renderosity.com/homepage.php">Homepage</a> ||
<a href="http://www.renderosity.com/mod/sitemail/">SiteMail</a> ||
<a href="http://excalibur.renderosity.com/mod/gallery/browse.php?user_id=70375">
Gallery</a> || <a href="http://www.renderosity.com/mod/freestuff/index.php?username=bandolin">
Freestuff</a>
<p><em>Caution: just a hobbyist</em></p>Privacy Notice
This site uses cookies to deliver the best experience. Our own cookies make user accounts and other features possible. Third-party cookies are used to display relevant ads and to analyze how Renderosity is used. By using our site, you acknowledge that you have read and understood our Terms of Service, including our Cookie Policy and our Privacy Policy.
There will be times, when modeling complex shapes and objects, that you find yourself with some really unusually shaped polygons, be them Ngons, Quads, or Tri-edged, and you will want to make selection sets based on specific sub-object characteristics of the mesh. While Max offers a plethora of flexible sub-object selection tools in the Graphite Modeling ribbon; one of the most overlooked, and under-appreciated, may be the "Similar" button.
Time and time again, I watch, or read through, 3dsmax tutorials on Youtube, or in HTML format, and the instructor, while usually very skilled and adept at showing how to achieve certain geometric goals, fails to use the Similar tool when making selections at the sub-object level that would have been far easier to do if they had. I'm not sure if it's just an unwillingness of some old-school Max users to stray from using only the tools available in the Modify comman panel, or if they just don't realize there's an easier way to do the exact same operation, but in far FEWER steps. Whatever the reason is, the Similar function often gets ignored. It's a feature I fell in love with early on in my 3dsmax training, when I was doing a lot of abstract and procedural modeling, and rarely get through a modeling session without utilizing it for something, even now.
Anyway, I'll give you a quick overview of how this tool can be useful when working on an oddly-shaped, or tessellated mesh, and especially when you want to make
specific selections based on correlative topology.
Let's say you have a face on your mesh selected. It doesn't matter how many edges it has, or what shape it is. ANY FACE (you CAN select more than one face at a time too, however, and make similar selections based on them). Now, navigate to the Graphite ribbon at the top of your screen, and find "Similar" in the Modify Selection panel dropdown.
Beneath the Similar button is another arrow. When you click the arrow, you get an additional flyout, with tickboxes for parameter filters. By default, all but one of these parameter filters is already checked. This will give you the greatest possibility of selecting faces that are very similar in all possible characteristics to your initial selection(s), except Normal direction, which is the most limiting parameter, so
would only rarely be useful.
Selecting combinations of these parameter filters will often provide the expected results, but sometimes you may need to "mix and match", or play with combinations, in order to get the selections you need. All in all, however, when you finally understand what each parameter does, and what combinations will provide the necessary selections, you are bound to save yourself a ton of time compared to manually selecting each face, or selecting loops or rings, then removing the unwanted parts.
I know some of you are thinking, well this is nowhere near as predictable as going to the Selection tab of the Graphite panel, and choosing the "By Numeric" option, where you can select polygons based on the number of sides. While this may be true in many cases, there are certainly going to be times where you wish to make selections of polygons that contain different edge characteristics in relationship to each other
overall, but may share a similar face area to the polygon you have already selected. In other words, it's like saying, "I want all the polygons that are LIKE the one I have selected", even if they have a different number of sides. Or, when you want polygons of the SAME number of sides, but only sharing the same shape characteristics of the one you have selected, like in my pictures above! I wanted only the triangles that matched, or were similar to, the one I chose, based on the parameter filters I ticked.
So if this tool isn't already part of your routine workflow, trust me; once you get the hang of using this function, you will find 101 reasons to use it in your routine modeling protocol. I like using it, in particular, when working with Vornoi diagrams, or unusual topology tessellations, where the polygons are uneven, or oddly shaped. I can select one polygon to inset or bevel, for example, and then choose "Similar" to grab all the others that are very much like it, but may not be the same edge count.
Good luck, and even if you're a 20 year veteran to 3D modeling, have some FUN with Max!
______________________________________
My Store
My Free Models
My Video Tutorials
My CG Animations
Instagram: @luxxeon3d
Facebook: https://www.facebook.com/luxxeon