Renderosity Forums / Poser - OFFICIAL
Welcome to the Poser - OFFICIAL Forum
Forum Moderators: RedPhantom Forum Coordinators: Anim8dtoon
Poser - OFFICIAL F.A.Q (Last Updated: 2026 Jun 01 7:15 am)

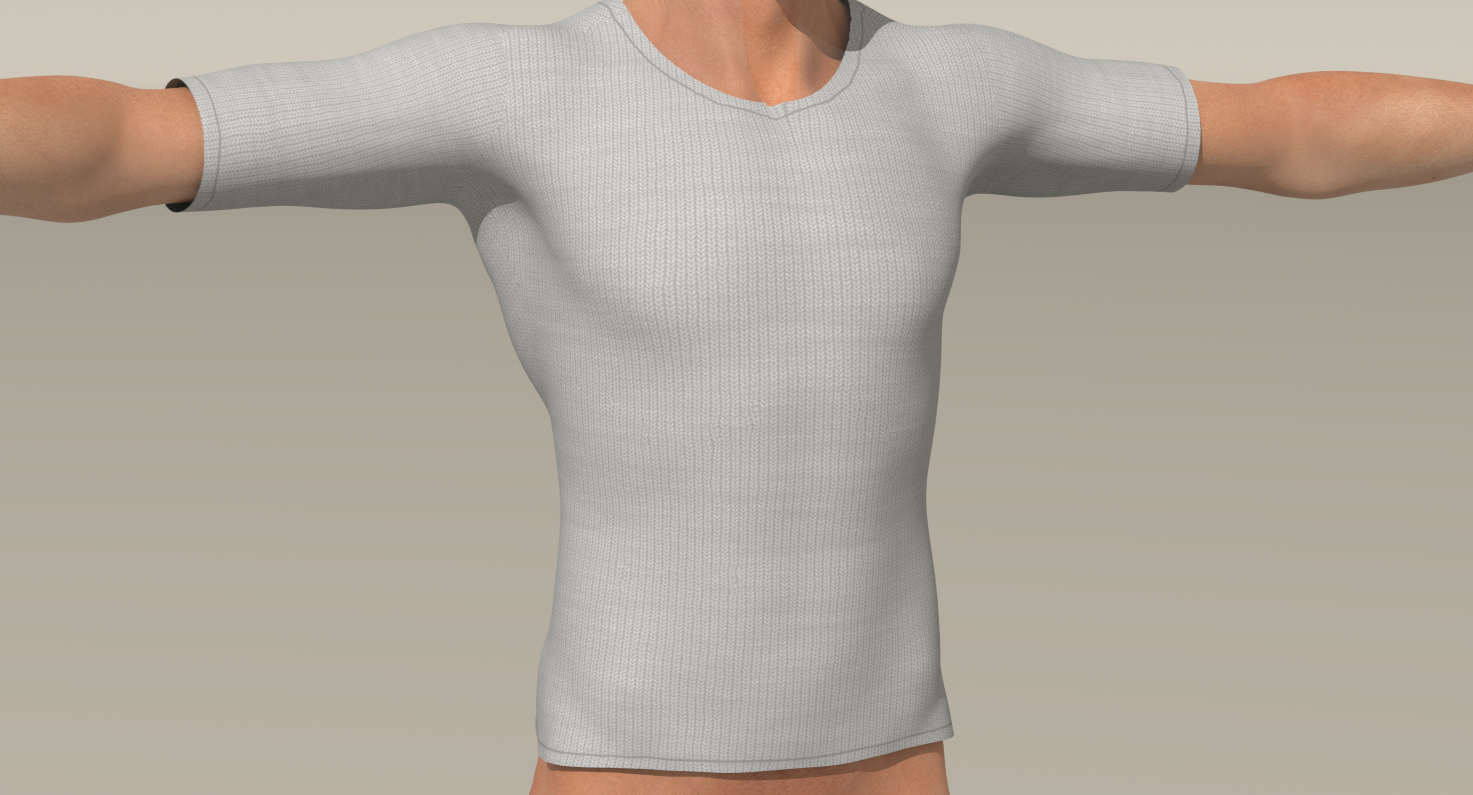
Subject: Fun with texturing :D WIP of L'Homme 1 Pullover


It is conforming. I am too impatient to do dynamic with multiple characters.
Ways to convert. Export wavefront with weld selected and preserve material names, then reimport
loa into blacksmith, do permanate wld and export
I never tried, but prop viewer has a weld option also
I do not know if I will release it or not. It wa intended as a test object to help me improve my texture skills
Bill
People that know everything by definition can not learn anything
Well, under current rules, it will never be in the marketplace
as for a freebie, probably, when I get it to a place that I am ready to work on something else.
At this point I have not even created one mc6 file :D
As I mentioned it and the Medium Dress were created for me to improve my texturing skills and create my own shortcuts
So it will be a tli be some time befoe I release it
Bill
People that know everything by definition can not learn anything
When I tried to make a denim top I realised that denim or leather will not work as a pull over
But since all tops are basicly the same, I found a different solution, which will require more morphs :D

An Adjustment to fix stap floating, and of course if it is a vest, it needs to fit oiver clothes
Still the same mesh, but more fun for me
Bill
People that know everything by definition can not learn anything
LOL, have two more custom character requests with photos mapped to character
Getting so many things gong on that I just jump from one to another
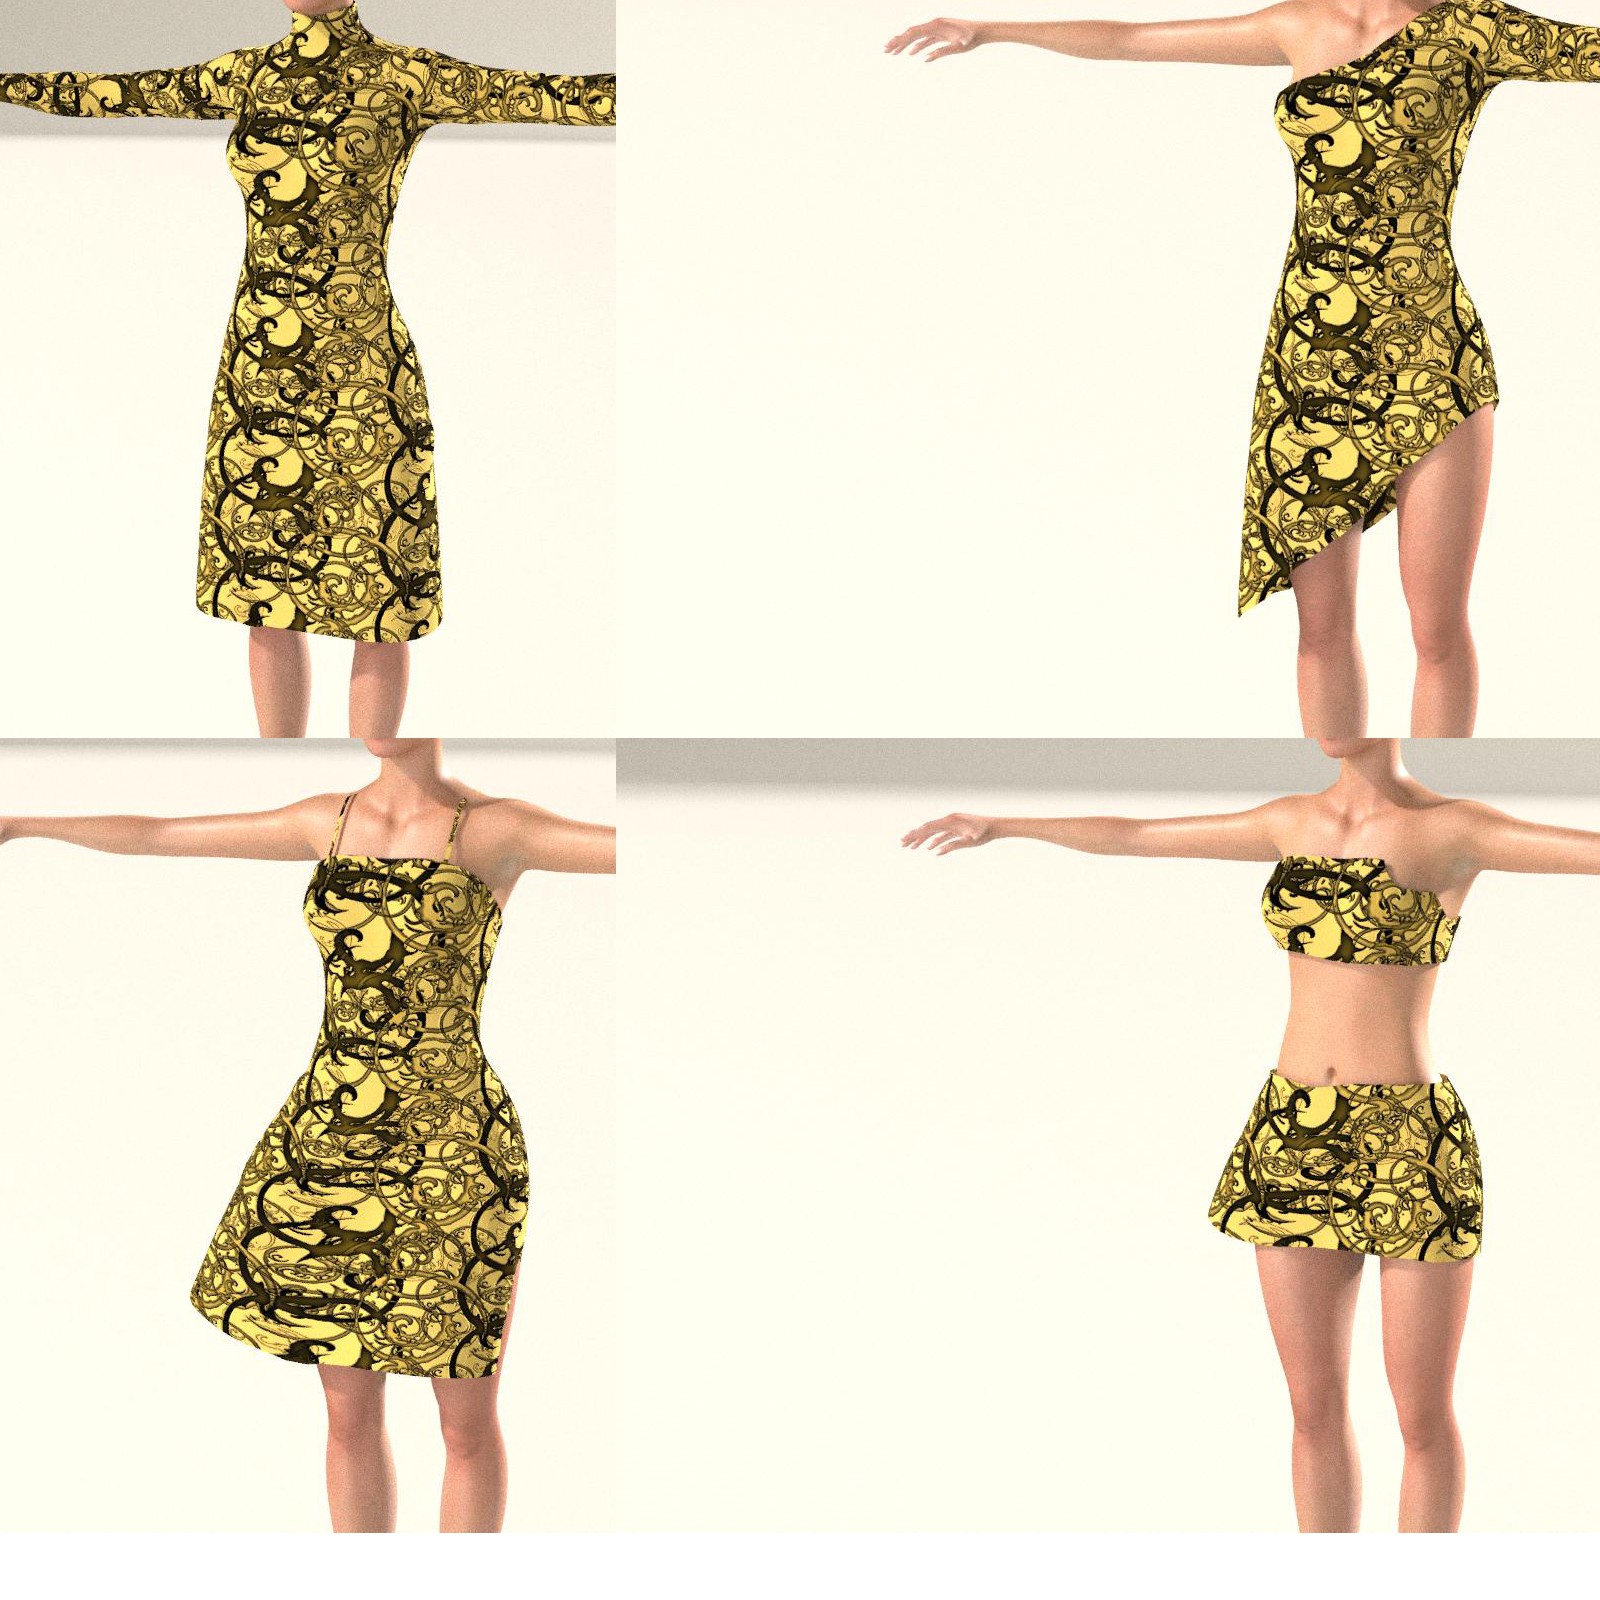
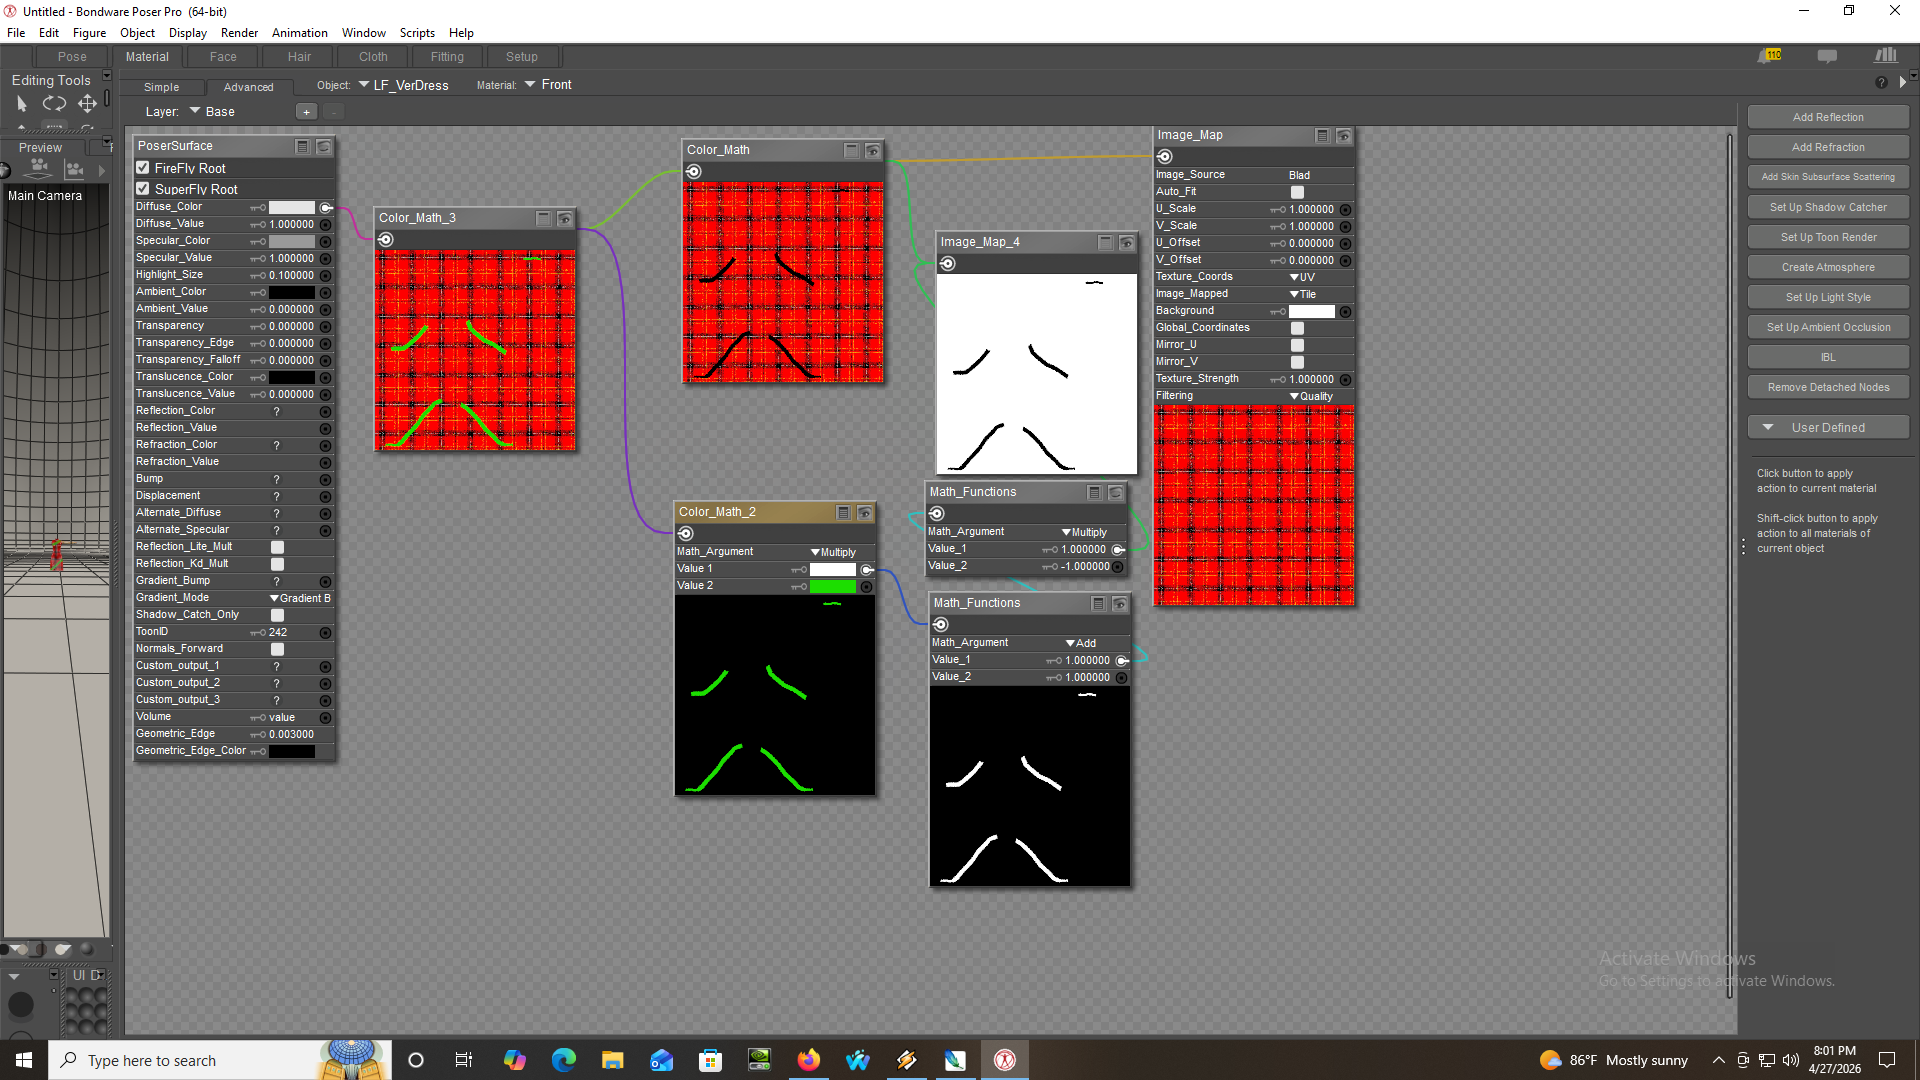
Here is the latest on the dress, with trim color done from color tab, and not material zone
Bill
People that know everything by definition can not learn anything
Since I started this thread as Fun with Textures,have to admit I am having fun :D
I created the dress so I could have one dress that would work for most uses.
When (or if) I release the dress, I have it set up so you only need to load the basic color map, the trans map (if you want something different, the trim mask, and the color of the trim. adding a bump map is easy
I will include at least three basic patterns If I release
because of the low comment to view ratio, I thought it needed to be simple

Bump maps are easy, and spec maps need to be multipiied by the trans map
Fill
People that know everything by definition can not learn anything
It is easy. I set it up so with any given patern, you only have to change the diffuse and maybe the trim
Of course setting up the paterns takes a little time, but I am doing this so I can have just about any stype off of the basic mesh. No longer testing poke through etc each time I do a different dress.
Of course you can also with trans maps use the basic dress as a top or skirt
Bill
People that know everything by definition can not learn anything
I notice you use blacksmith.
I've recently installed it because it's offered for free but couldn't figure it out.
I'm watching some videos on https://www.youtube.com/@blacksmith3D and it looks pretty cool!
I have been using blacksmith since 2017, version 3.3. I ave usd every version since then.
There is so much in it, that it will take you a while to learn it. Just about everything I do goes through BS during development.
Take your time, learn one process at a time. there are still a few things I have not tried in it.
If you ever have problems, drop me a site mail and I will try to help you
Bill
People that know everything by definition can not learn anything

LOL, I am using an antique version of Photshop (CS2). I switched from charaters to clothing to learn texturing.
I use it mostly to get the base texture. After that it is mostly Blacksmith for details. I try to avoid superfly specific procedures, not because I have a slow systeem, but because but there are things sperfly does not do well at. perhaps because the data passed to it is not correct.
if you have the archer, try rendering in firefly and superfly ands ee the difference.
Also teradom mats do not translate correctly.
Texturinhg is more abou5 understanding the material room than what tools you use to generate the texture. Any of the items I showed above would pretty much look the same if I flood filled the texture map. The trans maps are created in BS and the trim maskes are done with the olderversion of Photoshop with the path tool and strking the path with black. after that it is mostly math= color math
Details are done using the V/shift V processing. BS also supports most of PS layers options.
If you have specific questions, just ask I have been retired for 20+years and have lots of time. (I am also partialy blind, so misspellings rule)
Bill
People that know everything by definition can not learn anything
 te the two textures and the result by using the material room
willyb53 posted at 8:34 AM Sun, 26 April 2026 - #4505816
I have been using blacksmith since 2017, version 3.3. I ave usd every version since then.
There is so much in it, that it will take you a while to learn it. Just about everything I do goes through BS during development.
Take your time, learn one process at a time. there are still a few things I have not tried in it.
If you ever have problems, drop me a site mail and I will try to help you
Bill
Cool thanks!
I'm still learning Poser and figuring out a work flow.... as in using a base character and deforming and painting basic clothes and face, going from a high detailed model to a "baked" Poser model and bringing back into Poser for animation.
I guess BS can do detail "baking"
Real-time displacement/bump map painting and rendering. Paint directly on the displacement and/or bump maps and see the result in real time. What you see is what you get, since there is no need to bake your maps. Every brush stroke is immediately applied to the maps.
So I will have to try it out.
And the texture painting (low and high res) looks very useful and fun to me.
If I can export a base Poser model and in BS create a high detailed baked model and then bring it back into Poser for animating then that's perfect for me!

Rhia474 posted at 12:13 PM Sun, 26 April 2026 - #4505820
I'd absolutely adore if someone made a modern texturing tutorial. The one I have from this site (purchased) uses older versions of Photoshop and they are useless after a while because of so many changes.
i doubt that this will prove as useful to others as it does for myself as i use an outdated version of Poser, but for modern texturing, i wholly agree much of it lies within the set-up for your shaders...
and i'm talking about clothing, as skin is still an obvious hands on deal, aside from base skin tiles...
but apart from that, which i spend far too much time doing, i also spend a lot of time either adding and/or editing material zones to give me extremely detailed areas of an item. there are limitations within this option, but it does allow for some extreme customization within a garment. and then i busy myself creating seamless tiles for myself, which includes diffuse and certain bump maps, so what i create can be reused/repurposed on the fly with anything i choose to use said textures. and of course, those cute little Image Map nodes allow for even more detailing through sizing and flipping and such...
for example, with the pull over shirt that started this thread, and in looking at it as best i can, i'd create minimally 4 zones: shirt, neckline, waistband, wrist/cuffs. if i wanted to get even more creative, i might further cut it up into: tank, cap sleeves, short sleeves, sleeves/forearms, and as a 'vest' was created, i might zone that in as well. this way i don't need to bother creating transmaps as i can simply blackout a zone i want hidden via shaders/nodes. i mean just because you have a zone, doesn't mean you need to use it, but it does allow for quick versatility...
as i said, for super fine details, such as lace edging, or t-shirt decals, or other things like this, you do still need to actually manually lay it out on a map. but for basic over-arcing texturing, i essentially do all my work upfront through zoning, and usually never need to spend time laying things out on an actual map because tiling via all my potential zones is my super special friend... heh
forgot to say...
creating tiling transmaps, too, for lacey textures non-edge related...
and
with the shirt, if i wanted to be super obnoxious about it, and yes, i've done this many times on stuff i own, i could zone out the arm areas i mentioned to Left and Right, so that way i don't need to be beholdened to any symmetry if i don't want to be...
thus CapSleeveL, CapSleeveR, ShortSleeveL, ShortSleeveR, etc...
OK, different strokes for different folks :D
I tend to avoid poser material zones. There are limitations because of the dependese on the mesh geometry. Diagnle zones are almost impossible.
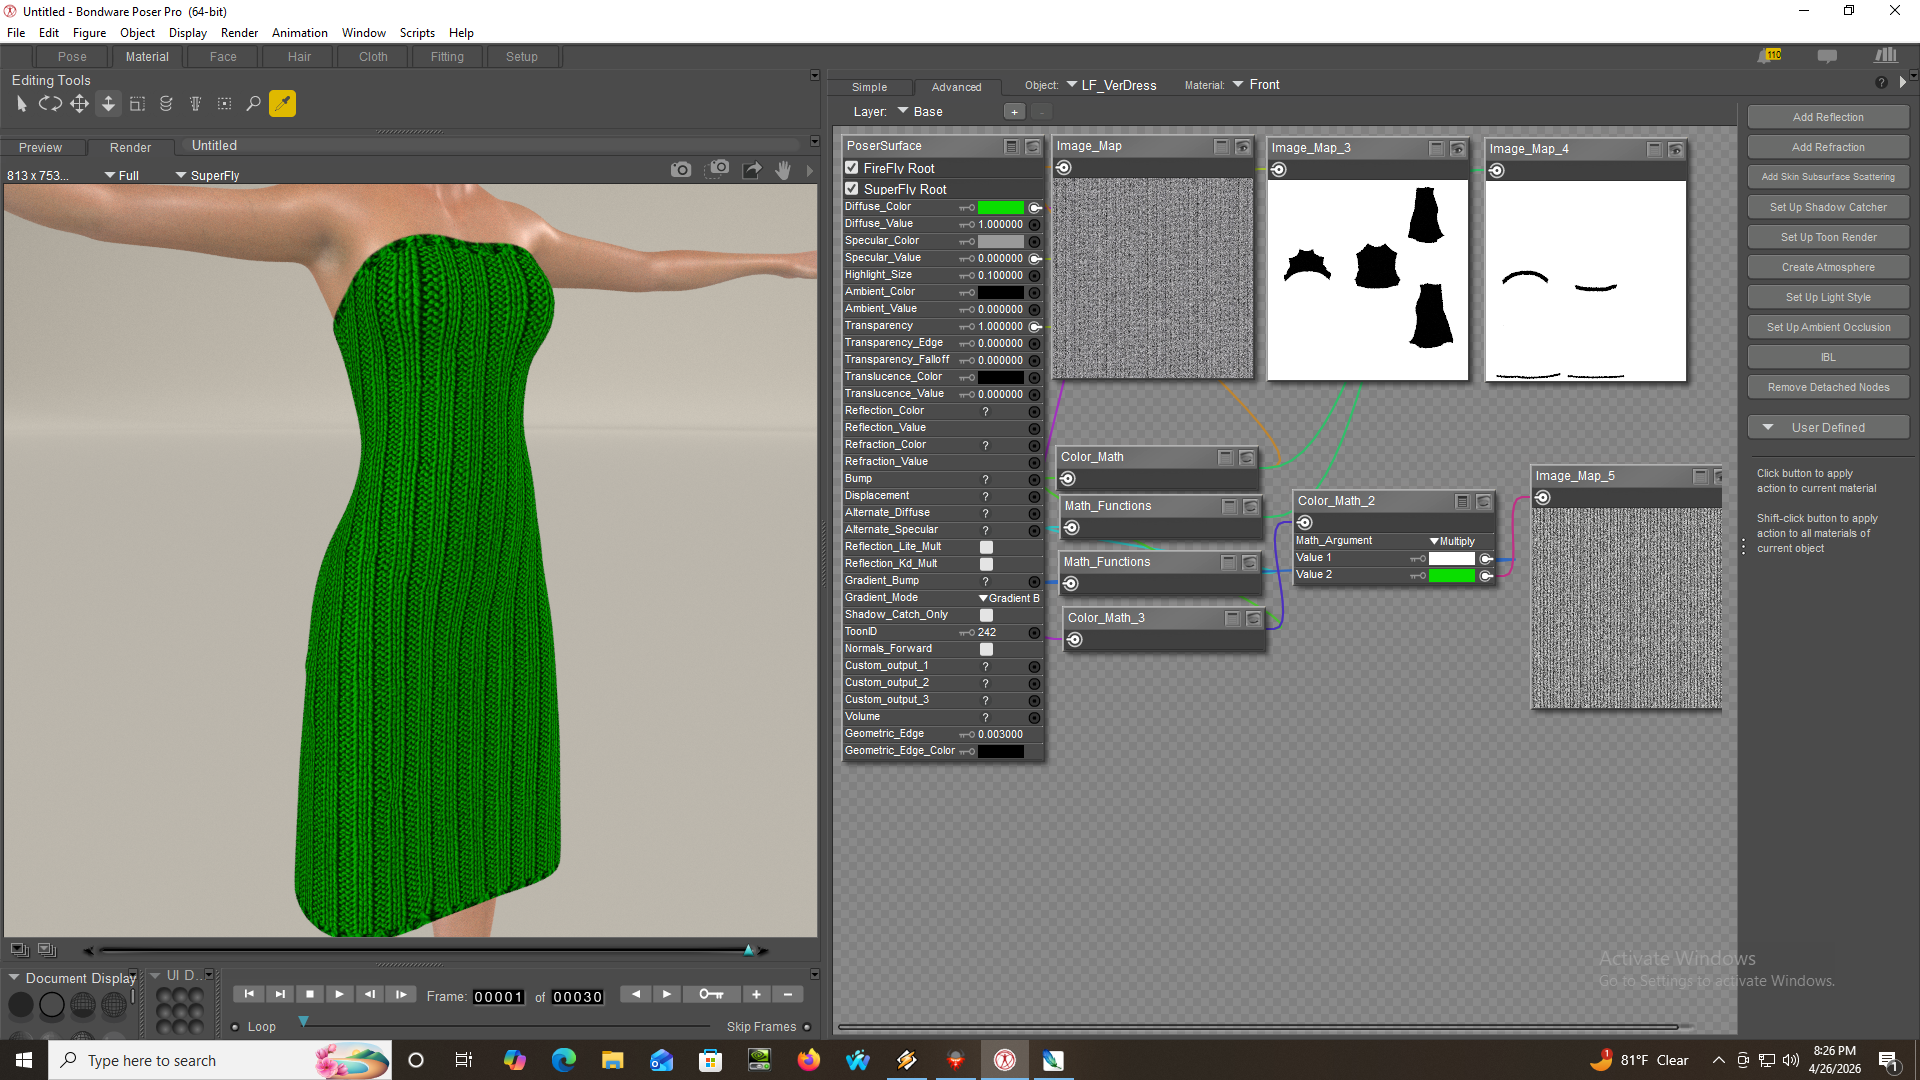
That being said, if you look at the images of the dress, you can see that I create the effect of a material zone with a mask.I then use the mask as a layer in photshop to create the same effect, except it can be a circle, diagnol or just about anything else, but it is not dependedn on the mesh geometry.
This allows me to either do the work in PS or with math operations in poser.
for example the trim on the dress could not be done with a material zone as it is diagnol and would stair stp.
It is a different way to obtain the same result, with the added bnifit of being done without having to modify the base texture.
Like I said, different strokes
Bill
People that know everything by definition can not learn anything
i don't use it for zoning unless i find i have a model that needs its normals to be corrected, and for actual grouping a rig, but Poser has a way to create material zones via the Grouping Tool...
what i actually use, because it's super easy and cheap, is the free version of Hexagon you can find over in the Daz store...
when you import an OBJ into Hex, you'll be able to see the zones that have already been assigned. you can then further assign zones as you'll essentially be seeing the model in its wireframe mode, allowing you to precisely select whatever polygon[s] you see fit.
it'll take a bit of time, but i can create a few screenshots and such to show you what tool to select, etc., though Hex has relatively easy-to-understand documentation. i mean, if i can figure it out, i'm pretty sure my cat could if she read English at all... heh...
there are other tools i use in Hex, most likely improperly, because of faffing about & experimenting and finding what works for me/my needs/wants, and my habits are most likely questionable, and would not be recommended by any professional modeler, but hey, i'm just doing things solely for my own use and honestly don't really care about "proper"...
and again, i will reiterate, that since i am zoning what are polygons, there are limitations because there might be ways that a mesh has been constructed that is not as conducive to zoning as other meshes might be [and i should say that it is this that started some funky thinking in my head and probably bad workarounds because i didn't want to take "no" for a full flat out answer]. basically, you're somewhat enslaved to the design of the mesh...
willyb53 posted at 4:01 PM Mon, 27 April 2026 - #4505854
you can create diagonal zones in Hex, fyi... i've done it many times, but again, i'm prolly not being "proper" about it...OK, different strokes for different folks :D
I tend to avoid poser material zones. There are limitations because of the dependese on the mesh geometry. Diagnle zones are almost impossible.
That being said, if you look at the images of the dress, you can see that I create the effect of a material zone with a mask.I then use the mask as a layer in photshop to create the same effect, except it can be a circle, diagnol or just about anything else, but it is not dependedn on the mesh geometry.
This allows me to either do the work in PS or with math operations in poser.
for example the trim on the dress could not be done with a material zone as it is diagnol and would stair stp.
It is a different way to obtain the same result, with the added bnifit of being done without having to modify the base texture.
Like I said, different strokes
Bill
@Rhia - Bill's methods are probably better - but if you're interested, sitemail me...
peace out
Yes you can. But you can not do it on an existing mesh. I can creat a mask on any mesh without doing any changes to it. If I release the dress, still not certain, you can add mat zones yourself, but you will still be locked in to the underlying mesh. What I do is independent of the mesh and could be applied to just about any Item I have
Bill
People that know everything by definition can not learn anything
i have created many diagonals on meshes that were purchased here in the MP... though it does alter the mesh/OBJ permanently, and can sometimes create the need to re-rig a CR2 depending upon the disruptions of groups, which is why i usually combine all pre-existing groups into one prior to zoning, as re-rigging is a very simple task - usually... heh
i do think your technique is one that has been tried and tested many times over and is probably more sound overall...
i was simply trying to say there is more than one way to approach texturing anything, that's all...
and i will also say i apologise if you felt/feel as if i was somewhat hijacking your thread, as that was far from my intent... truly :))
i think you'e doing an awesome job here, btw... :D
Do not worry about stepping on me, I am glad that there is a discussion, Texturing is what this thread is about
Most threads now days seem to be a couple o posts and the hundreds of views with no discussion
even the tips thread has very few posts
What I call a mask you could call a pseudo material zone, and it can be used the same way
Here is an example of curved mask on ends
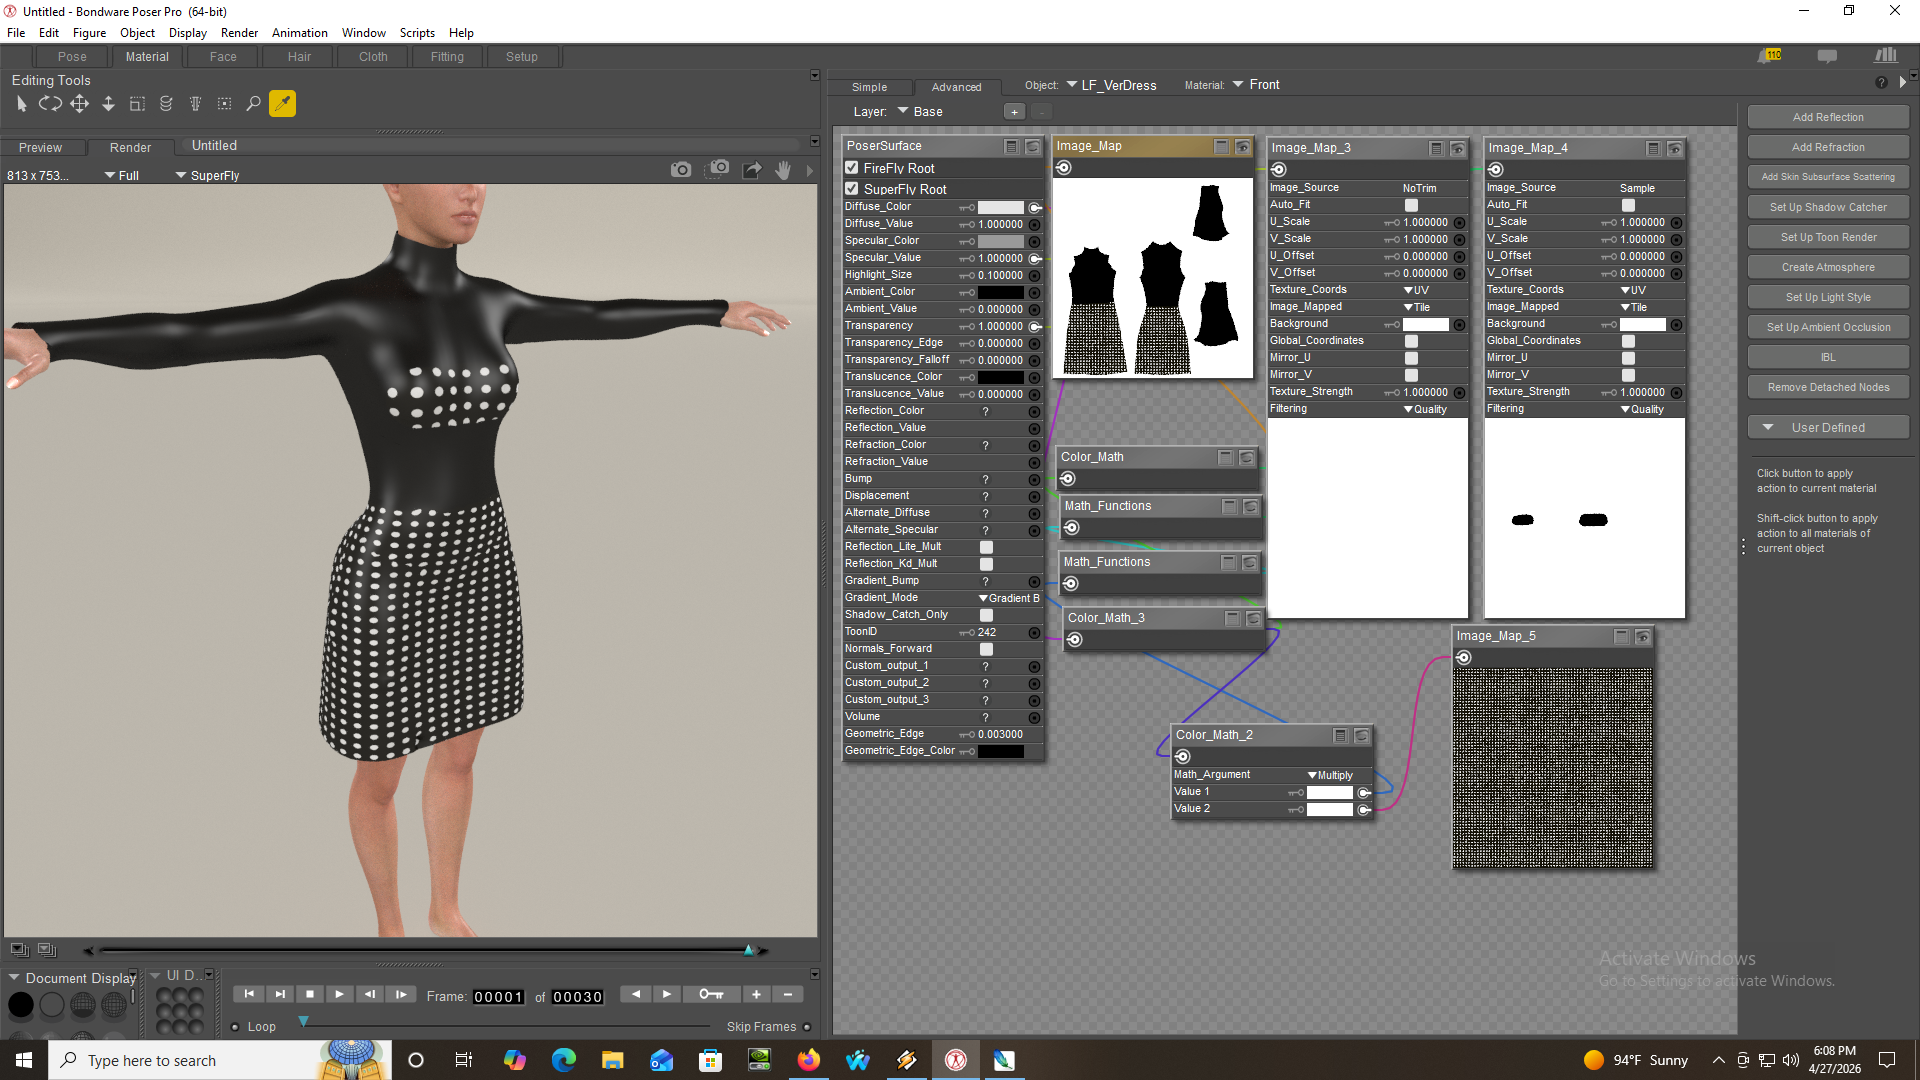
Mask ( or material) is on right
Notice base texture has the top with no dots,
Bill
People that know everything by definition can not learn anything
OK Bill so what IS a mask? And how do you create it?
Giana: you are always so very helpful, many thanks. I do have Haxagon...
Y'all have to understand: I am reasonably sure many people, not just me have no idea how to do any on this, so very small steps, explanations and from the beginning definitions would go a long way. Probably why there aren't tutorials about this sort of thing around at all.
Blacksmith of course
Load The item, when lkoaded clear the difuse, then paint with black where you want the mask
or
Photoshop if you want something special, use the path tool, stroke it with black
Save
now the tricky part and I hope I can explain right:
In poser:
Color math multiply with main texture, you will use this later: Colormultply will give you the original with the black mask (white is 1 black is zero)
turn the mask in to a negative: math functions multiply with mas as input and multply by -1
run the result into math fuctions add and add 1 to the result of the previous step, you now have the white mask on a black background
Run that output into color math multply
if you want to add a texture plug it into second input
or just change the second color tab
Then to put it all together:
Color Add the result of the first operation with the result of the last operation and plug into diffuse channel
I hope that akes sense :D
Bill
People that know everything by definition can not learn anything
Rhia474 posted at 7:04 PM Mon, 27 April 2026 - #4505862
The definition of a mask is an image that simply shows which parts of something to use. Usually it's going to be black and white. Transparency maps are basically a type of mask; the image shows which parts should show up (not transparent) and which should not (transparent) and then there may be some in-between parts.OK Bill so what IS a mask? And how do you create it?
Giana: you are always so very helpful, many thanks. I do have Haxagon...
Y'all have to understand: I am reasonably sure many people, not just me have no idea how to do any on this, so very small steps, explanations and from the beginning definitions would go a long way. Probably why there aren't tutorials about this sort of thing around at all.
You can use masks in Poser by using math functions like Multiply: white has a value of 1, so anything you multiply by 1 stays the same, while black has a value of 0, so anything you multiply by black becomes black. Or plug them into Cycles "fac" inputs.
But you can also use masks in Photoshop and other graphics programs. Depending on the software you might add them as a mask layer which filters which parts will be affected by some other thing.
In physical terms, a mask is basically a stencil. It's a piece of paper with some well-placed cutouts. It's great for adding color selectively, e.g., with spray paint.
1Well, I am open to any questions, either in this forum of by site mil. But it will have to be one step at a time. I have done a cuple of short tutorials (one in my freestuff), but they tend to be specific. Texturing is a broad subject, and I have just started to learn it past ther basic level. If I can help anyone I will try,.
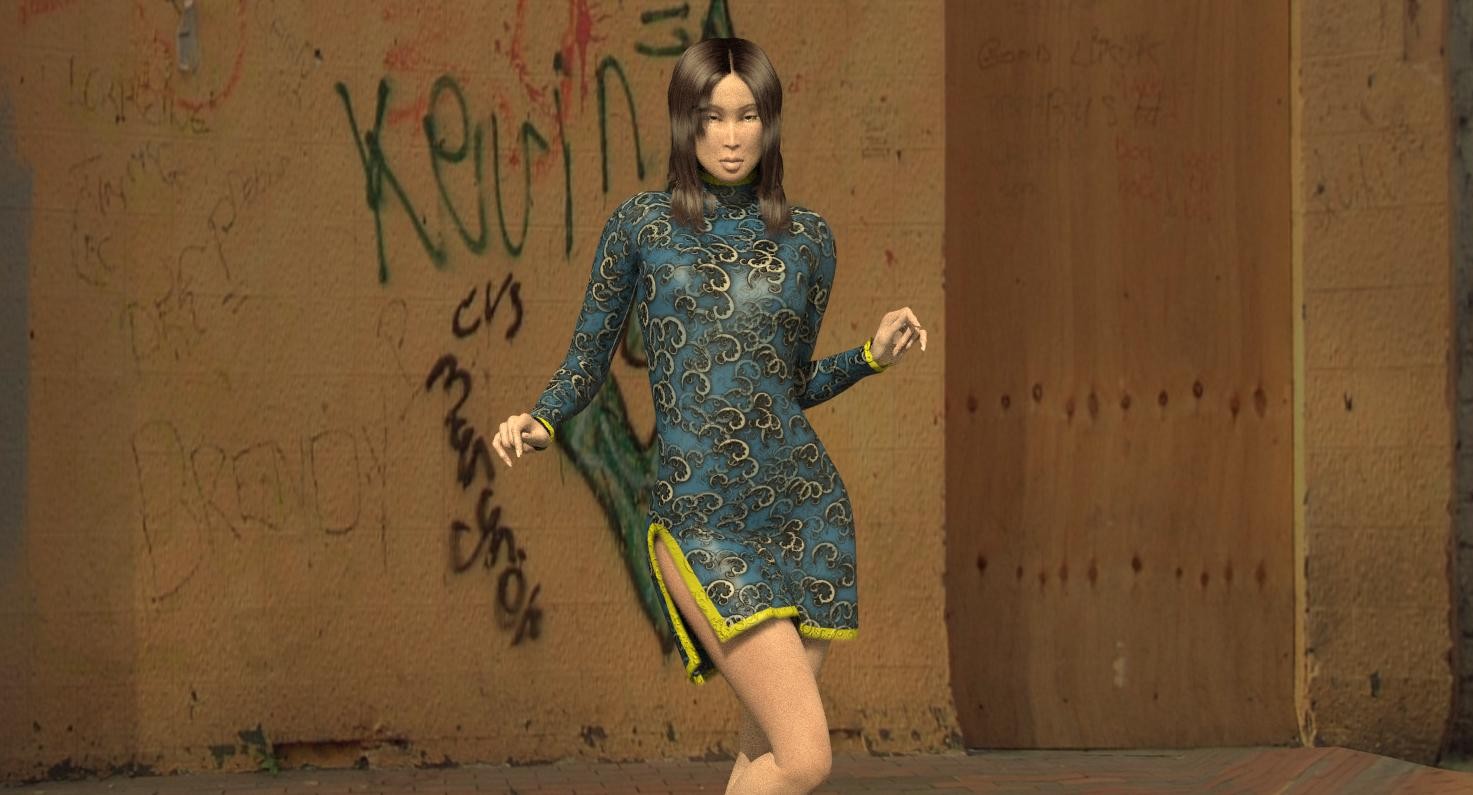
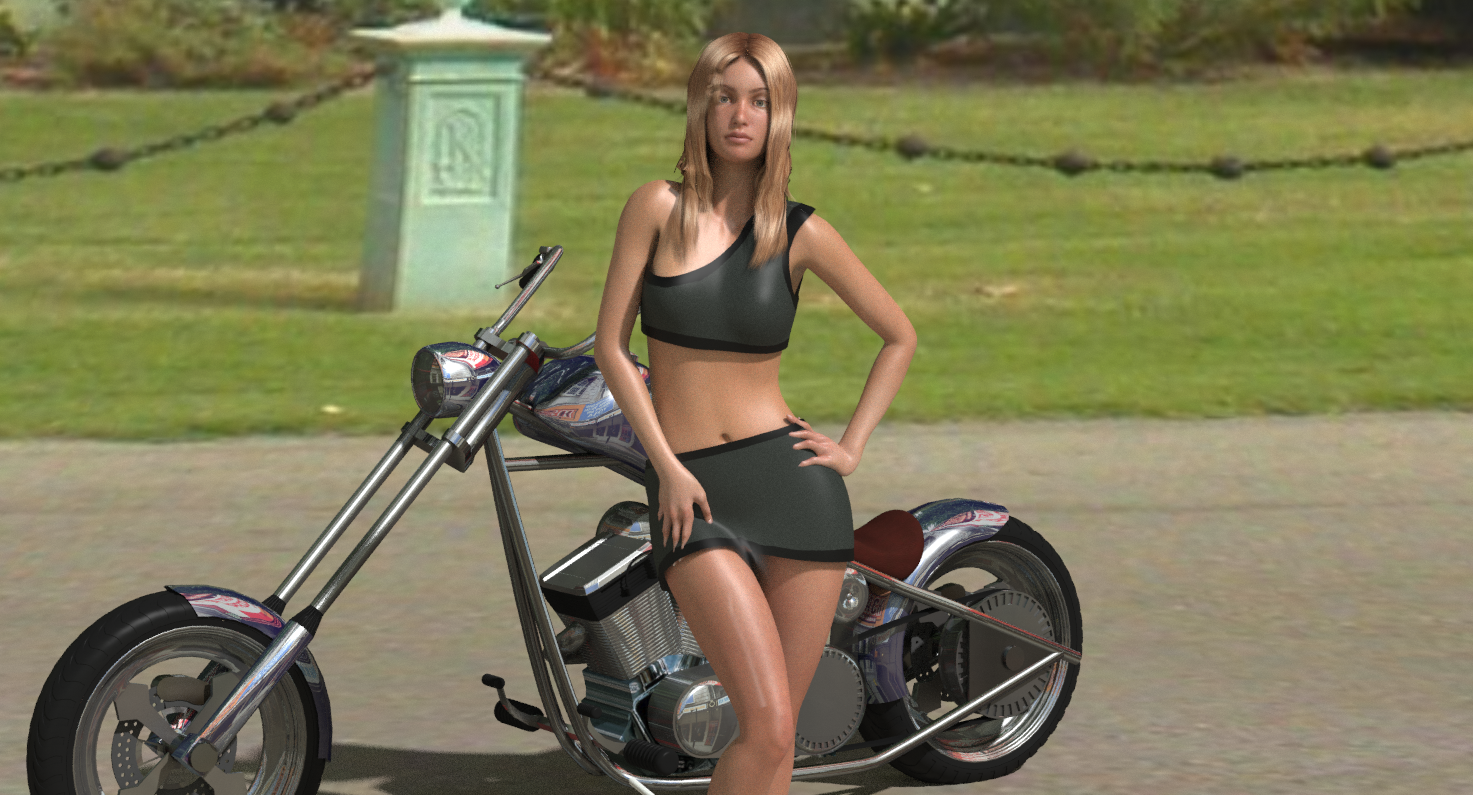
For now, my latest render of the long sleeve knee length dress :D
Billk
People that know everything by definition can not learn anything
This will be the last update on the dress and pullover. I started this project to see if I could do an MFD concept to a pullover shit and a dress.
Every itime I started a new dress or shirt, I had to redo things I had done on previous items and I was looking for a way to cut dvlopment.
Now I no longer have to worry about a new mesh or rigging, and spend my time on texturing.
Next maybe pants, or something else D:
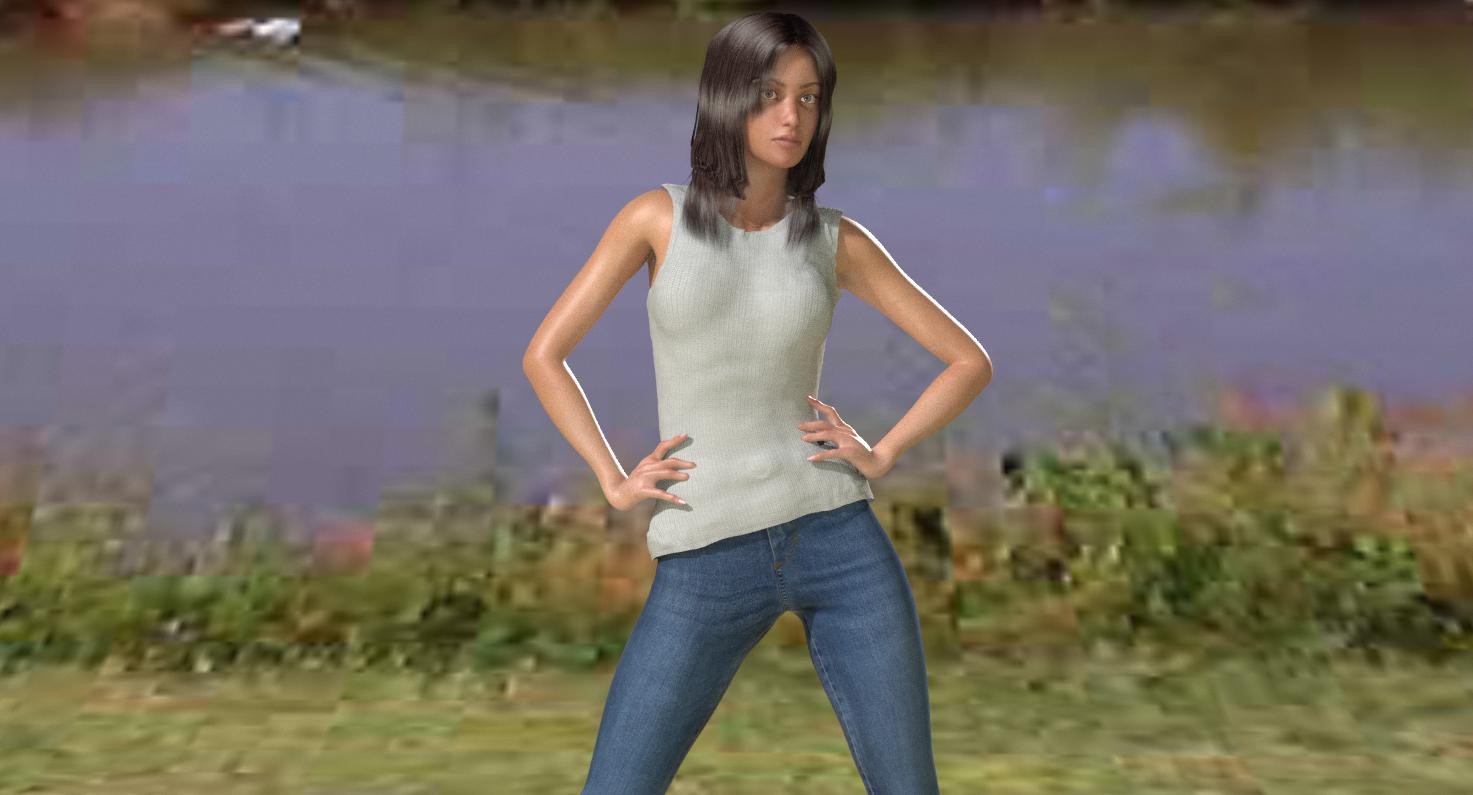
Last render of pullover, now sleveles, and, of course, I also converted it to fit LaFemme
Of course it uses same textures, and will probably have some of its own
Bill
People that know everything by definition can not learn anything
Privacy Notice
This site uses cookies to deliver the best experience. Our own cookies make user accounts and other features possible. Third-party cookies are used to display relevant ads and to analyze how Renderosity is used. By using our site, you acknowledge that you have read and understood our Terms of Service, including our Cookie Policy and our Privacy Policy.
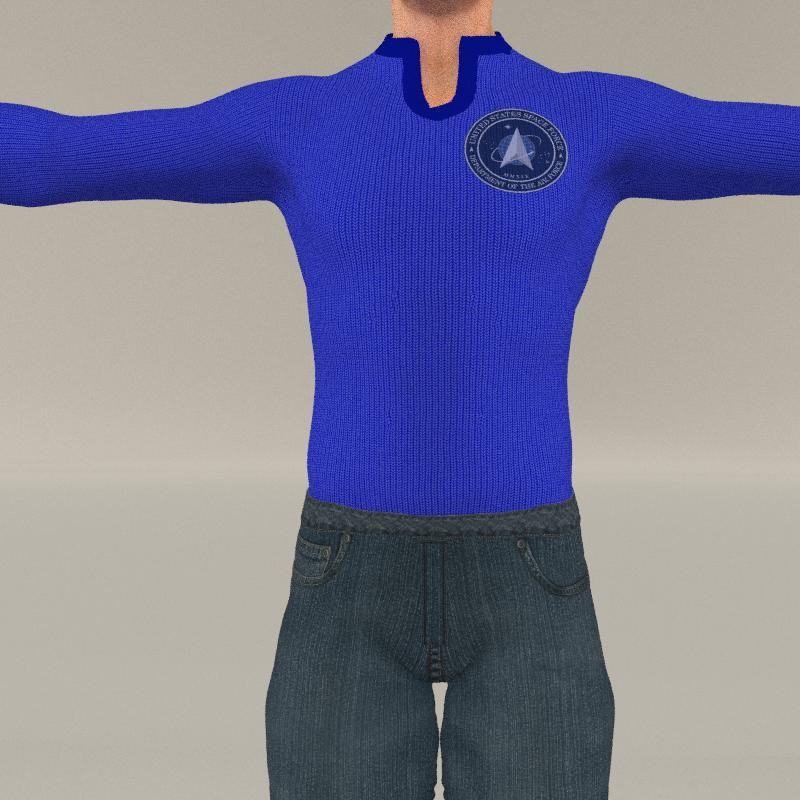
L'Homme 1 content: Pullover, L'Homme 1
M4 Content: M4 Dedium Res Texture, M4 GQ_Evant Hair, M4 Classic Casual Pants
Pose: Poser 5 distribution Pose (unfortunatly LH2 does not take them well)
WIP is sweater texture for my (not released LH1 Pullover which includes both over Pants and tucked in morphs
Comments welcom
I also have one that would look good as a star trek top :D
Bill
People that know everything by definition can not learn anything