
Renderosity Forums / Carrara
Welcome to the Carrara Forum
Forum Coordinators: Kalypso, Anim8dtoon
Carrara F.A.Q (Last Updated: 2026 Jun 30 12:55 pm)
Visit the Carrara Gallery here.

Subject: New to 3D and Carrara - First "real" model help


Hi Prinny,
Welcome to Carrara!
Yep, 3D means you are in charge of your whole universe and responsible for everything.
The easiest thing to do for checking reflections and shaders is to click on Scene in the properties palette. This will reveal a new panel that shows options for Background and Back Drop. For Background, choose the default bi-gradient. For back drop, you can choose a gray or black color - really whatever you want.
Shaders are one of Carrara's most powerful features. They can be as simple or complex as you want or need. They also can appear dramatically different depending on lighting in your scene also. The best starting point is to apply some of the stock shaders and then open them up to see how they're built. Once you get an idea of what you'd like, post back with a that info and it will be much easier to give you good direction. Otherwise, the subject is huge!
Mark
Quote - Hi Prinny,
Welcome to Carrara!
Yep, 3D means you are in charge of your whole universe and responsible for everything.
The easiest thing to do for checking reflections and shaders is to click on Scene in the properties palette. This will reveal a new panel that shows options for Background and Back Drop. For Background, choose the default bi-gradient. For back drop, you can choose a gray or black color - really whatever you want.
Shaders are one of Carrara's most powerful features. They can be as simple or complex as you want or need. They also can appear dramatically different depending on lighting in your scene also. The best starting point is to apply some of the stock shaders and then open them up to see how they're built. Once you get an idea of what you'd like, post back with a that info and it will be much easier to give you good direction. Otherwise, the subject is huge!
Mark
Thanks Mark. It seems like Carrara's shaders are as involved if not more so than its modelling room. Silly me. I thought the hard part was over :P
I will take your suggestion and go with the Bi-gradient. Let me see what it does for me. I'll post up my results w/shaders once I experiment with that option.

Quote - I'd like to start building shaders from the ground up. I've read up a bit from the manual but that shader room is awfully intimidating. I'm not even sure what the right starting point is. I won't try to do anything fancy but I'd like to know what the typical workflow for building shaders is. For instance, I've found it hard to gauge the effects of bumpmaps on some color/texture mixtures.
Don't fear about the texture room. It's not so hard ;)
---------------------------------------
Holyforest,
Hundreds of shaders for
Carrara


Looks alright to me so far. As for the subject of modeling and smoothing behavior, I always point newbies to guerillacg.org. They have the best way of explaining it.
Also don't be afraid to try HDRI as a background setting if you don't mind a bit of extra render time. Carrara has some included, although the filepath to those is a bit cryptic (I can never remember offhand), not to mention there's likely a couple you can download off the internet for free if you don't mind googling. Still the bi-gradient is always the best for showing reflections when you need it fast.
Now if you want to learn a bit about shaders and lighting in Carrara, you might also want to check out this fruit bowl tutorial. It's a multi-part video, so it takes a while to watch - but it's worth it!
Your friendly neighborhood Wings3D nut.
Also feel free to browse my freebies at ShareCG.
There might be something worth downloading.
Thanks for the suggestions everyone. Been very helpful. Took me a while to respond because I came down with a sinus infection over the weekend. Kinda deterred my progress. Anways, here's where I'm at with shading so far:

I made some tweaks to the geometry. While I did follow the reference image, some of its flaws really started coming out when shaded. I removed the top piece and made a small spike that is part of the head. I also lowered the handle and made the shaft bigger in turn. I also gave the handle some curvature for ergonomics.
Now that the mace is shaded, I think part of the reason it still looks very fake is because there is no detail. I'd like to add inscriptions, pattern designs, etc on the bronze areas but I'm having a really hard time making it work. I did some swirls in illustrator to use as a displacement map but the displacement effect looks really really bad on precise shapes. Works well for noise though. I also took the Carrara manual's recommendation of adding a subtle noise to base colors in order to remove the overly-clean look of flat colors.
Recommendations will be appreciated.
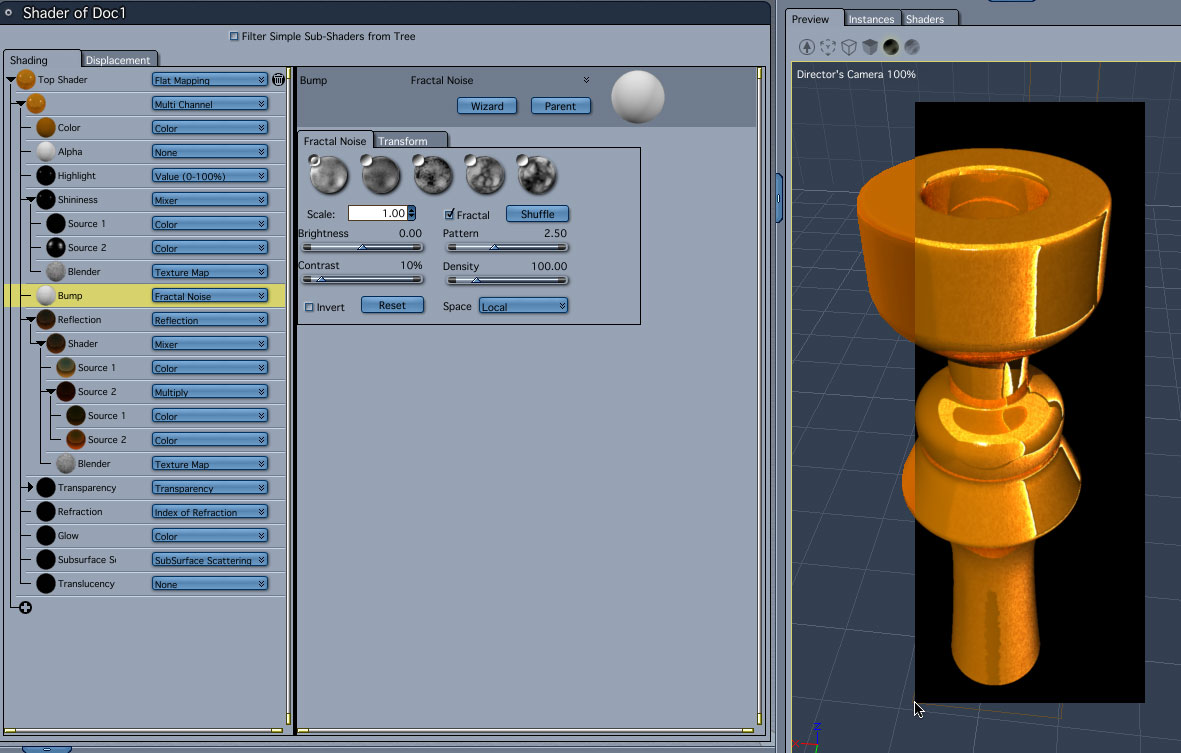
I wouldn't be in a hurry to use displacement for detail - it is more suitable to larger detail.
For shiny objects, the best way to add some believability is to grunge up the reflection channel with some mixer operations. (Click on the attached image to expand and review) I also use a very mild bump to add some organic irregularities.
Post back with any questions.
Mark
Forgot to mention that you can add the scroll work with the layer tool in the shader/texture room. I'd create a separate shader and use the scroll work as an alpha map. I used the same method on this image awhile back.
Quote - Forgot to mention that you can add the scroll work with the layer tool in the shader/texture room. I'd create a separate shader and use the scroll work as an alpha map. I used the same method on this image awhile back.
Awesome! Thanks Mark. This is the kind of info I've been looking for. I'll get right on it.
Something tells me there are a lot of hidden gems in the shader room. Everytime I demistify something, it opens up a bunch of new complex possibilities.

Privacy Notice
This site uses cookies to deliver the best experience. Our own cookies make user accounts and other features possible. Third-party cookies are used to display relevant ads and to analyze how Renderosity is used. By using our site, you acknowledge that you have read and understood our Terms of Service, including our Cookie Policy and our Privacy Policy.
Hi everyone,
(intro on top, if you want to get to the meat, skip the next two paragraphs)
I'm new to Carrara and 3D modeling in general. For years I've wanted to be able to model stuff in 3D and finally decided to stop wishing and do something about it. After a lot of research I splurged on the Carrara/Hexagon bundle and have spent the past 3 weeks reading, researching and practicing like mad.
It's been pretty fun but strangely exhausting. I was not making a whole lot of progress because I'd make my shapes and then the smooth operations would do crazy things to them. I'd end up with a mess or shapes that were far different then what I intended. It wasn't until I read an article from 1998 that I realized exactly HOW smoothing works and I've been able to get considerably more predictable results ever since.
After a lot of experimenting, I decided to start on a real project. Being a fantasy nut, I wanted to make some medieval weapons. I found a reference image of a mace I liked and got to work. After a few do-overs, I finally have a shape I'm happy with. Here it is using some 3 point lighting:
(I've read about 3 point lighting and understand the gist but I don't know the intricacies yet)
I started trying to shade this guy and used the built in shaders as a starting point. Problem is that most of them are reflective, which I want, but the image looks really ugly. After doing more research, I found out its because the only thing reflected back on the mace is the black surrounding. In order for reflective materials to look good, they need something to reflect (a "duh" moment for me there).
My first question is, what would more experienced modellers do here? Would you actually build out a scene around the object or is there a quicker and dirty way to do it?
My second and more important question is: I'd like to start building shaders from the ground up. I've read up a bit from the manual but that shader room is awfully intimidating. I'm not even sure what the right starting point is. I won't try to do anything fancy but I'd like to know what the typical workflow for building shaders is. For instance, I've found it hard to gauge the effects of bumpmaps on some color/texture mixtures. Is it common to do color and bumb separate and then combine them? Its stuff like that which I'm interested in learning. Any pointers will be appreciated.
Thanks