Renderosity Forums / Cinema 4D
Welcome to the Cinema 4D Forum
Forum Moderators: CHMedia Forum Coordinators: Kalypso
Cinema 4D F.A.Q (Last Updated: 2024 Aug 27 11:07 am)

| C4D Gallery | Speed Modeling Sessions | C4D Freestuff |

Subject: Cutting object in half along specific edge/axis? Symmetry


You can't just cut it down the middle then?
Measure
your mind's height
by the shade it casts.
Robert Browning (Paracelsus)
http://franontheedge.blogspot.com/
Yes, you can also use the knife set to plane and set its axis to match the direction you wish to cut. That will place a nice loop of new straigh edges around the object. I uncheck N-gons before using the knife tool.
In fact, there are many ways to cut polygon objects in Cinema without having to use other software. As always I suggest that getting used to how Cinema's tools work on simple objects pays long term rewards.
Right... this just isn't going to work.
never mind and thanks for trying.
Measure
your mind's height
by the shade it casts.
Robert Browning (Paracelsus)
http://franontheedge.blogspot.com/

As you already have the center edge in place (already cut, so to say) just switch to Front view, select the Rectangular Selection tool (make sure to uncheck Only Select Visible in the AM), select the points making up half the body and delete them. Then select the points running around the center of your model (in effect the points making up the red line in your attached image) and make sure they are all on X:0, create a Symmetry object and drop your mesh in that.
/Anders
Gallery | Store | dogday-design.se
I couldn't see how to do the deleting bit without risking a mistake and without it taking forever to do...
I'll go away and try that now on the old model, which I have hidden in the scene file.
In the meantime I went and cut the model up in wings - sorry about that but I only have until 10 am tomorrow to complete this.
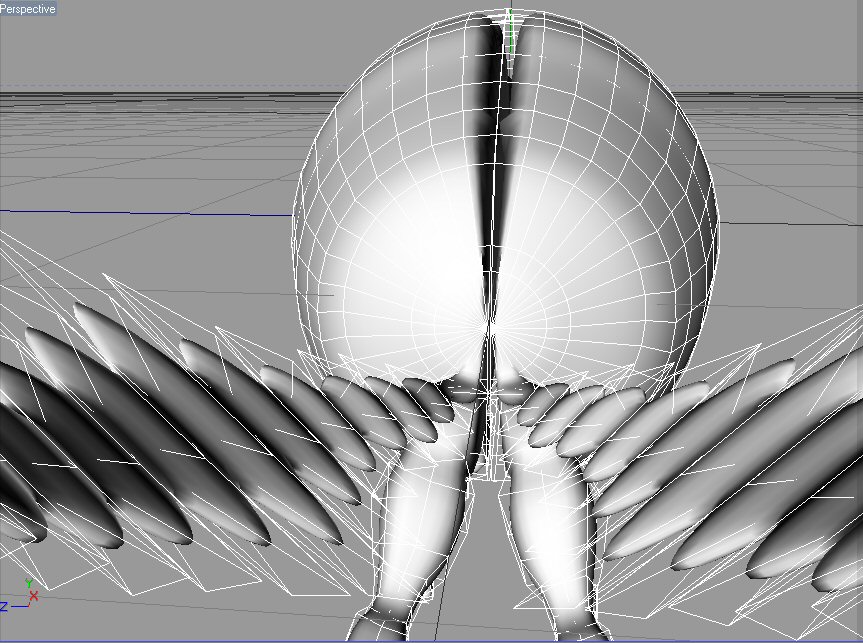
So... bringing it back into C4D I now have this: (see pic)
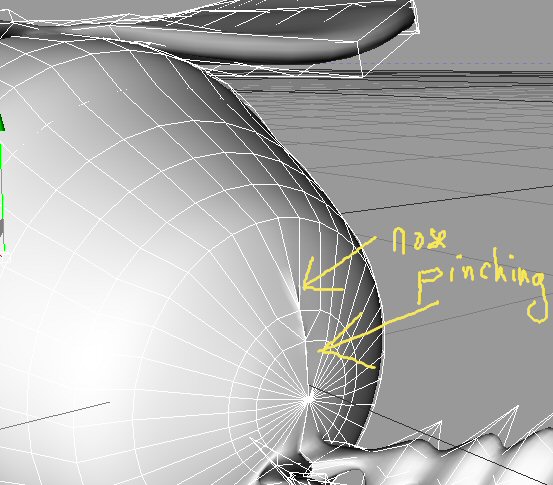
Which happens when I turn on the hypernurbs (P.S. Nice to find out that you can have a symmetry object - and hypernurbs.) that nasty split effect is where the model what cut in half, now I know there's some way to stop this happening, but I can't recall how you do that.
In Wings it would just mean you have to harden the edge running around the centre of the moth - but I can't remember how to do it in C4D - can someone remind me?
Measure
your mind's height
by the shade it casts.
Robert Browning (Paracelsus)
http://franontheedge.blogspot.com/

Lika this:
HN
-Symmetry
--Polygon Object
C makes it easy to shoot yourself in the
foot. C++ makes it harder, but when you do, you blow your whole leg
off.
-- Bjarne
Stroustrup
Contact Me | Kuroyume's DevelopmentZone
P.S. HOW do you make sure those points are on the X:0?
Measure
your mind's height
by the shade it casts.
Robert Browning (Paracelsus)
http://franontheedge.blogspot.com/
Also it looks like you have polygons running down the middle of the mesh. That means that when you drop it in a Symmetry you'll end up with a double set of polys occupying the same space but you will not notice this until you activate the HN. Solution: delete the polygons so the body is more or less hollow.
/Anders
Gallery | Store | dogday-design.se
Yes, I know - that's what I meant by - "Nice to know that works".
But I've been staring at the screen blankly - hunting through the menus desperately and hoping it'll come back to me how the heck you line up this central face on the XY axis!!
Measure
your mind's height
by the shade it casts.
Robert Browning (Paracelsus)
http://franontheedge.blogspot.com/
Okay, Cartesius's hint finally led me to it...
(I had to take it back to Wings to straighten that face up on the XY axis though - still can't figure out how to do it in C4D)
And then Cartesius's message made me try deleting that face - there's always undo - turned on the hypernurbs - and wow, but it worked!
I'd still like to know how to do it in C4D - quickly. Moving hundred's of points - one by one - inch by inch - just wastes time.
Measure
your mind's height
by the shade it casts.
Robert Browning (Paracelsus)
http://franontheedge.blogspot.com/
Huh? You know that phrase (Set Point Value) rings a distant bell... but I don't remember why, or how you use that.
Measure
your mind's height
by the shade it casts.
Robert Browning (Paracelsus)
http://franontheedge.blogspot.com/
Do you think I must extrude the wings out of the body? Or can I make the wings separately and then glue them to the body somehow?
I'm talking about the Moth's wings, not Wings3D the program.
Or could I made one wing, and attach that to the body half, while it's inside the symmetry object, thus giving me two wings?
Would that have to therefore be stuck onto the body? How?
Or must it be extruded from the body only?
Measure
your mind's height
by the shade it casts.
Robert Browning (Paracelsus)
http://franontheedge.blogspot.com/
Ah, I misinterpreted that as sarcasm. :)
With respect to Becco's method, you would have been better off using the knife tool with plane option. This guarantees the planarity of the edge for symmetry and HN. Though you may need to fix the object location to assure that it is against one of the world system coordinate planes since the Symmetry object works along them (this also can be changed by adjusting the Symmetry object's Coords before childing the Polygon object).
C makes it easy to shoot yourself in the
foot. C++ makes it harder, but when you do, you blow your whole leg
off.
-- Bjarne
Stroustrup
Contact Me | Kuroyume's DevelopmentZone
You select all the points you want lined up and go to menu Structure > Set Point Value, that will give you some options on what axis you want to align to.
I think you can model the wings either way, either as separate objects or straight from the body. You can group separate meshes under a Null object, drop that Null in a Symmetry and the Symmetry in a HN.
/Anders
Gallery | Store | dogday-design.se
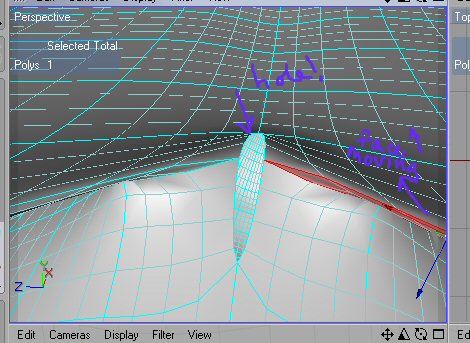
Help??? - this has happened along that join line., isn't there some way of stopping this from happening?
Measure
your mind's height
by the shade it casts.
Robert Browning (Paracelsus)
http://franontheedge.blogspot.com/
Kuroyume
I never meant sarcasm, usually I mean desperation, - but on hypernurbs and symmetry, I really meant that I was glad - I had tried using hypernurbs and symmetry a couple of days ago, and it didn't work then you see.
Cartesius,
"You can group separate meshes under a Null object, drop that Null in a Symmetry and the Symmetry in a HN."
Ooooh! Nice to know, thanks.
Is my torn mesh because I didn't do "set point value"?
Measure
your mind's height
by the shade it casts.
Robert Browning (Paracelsus)
http://franontheedge.blogspot.com/
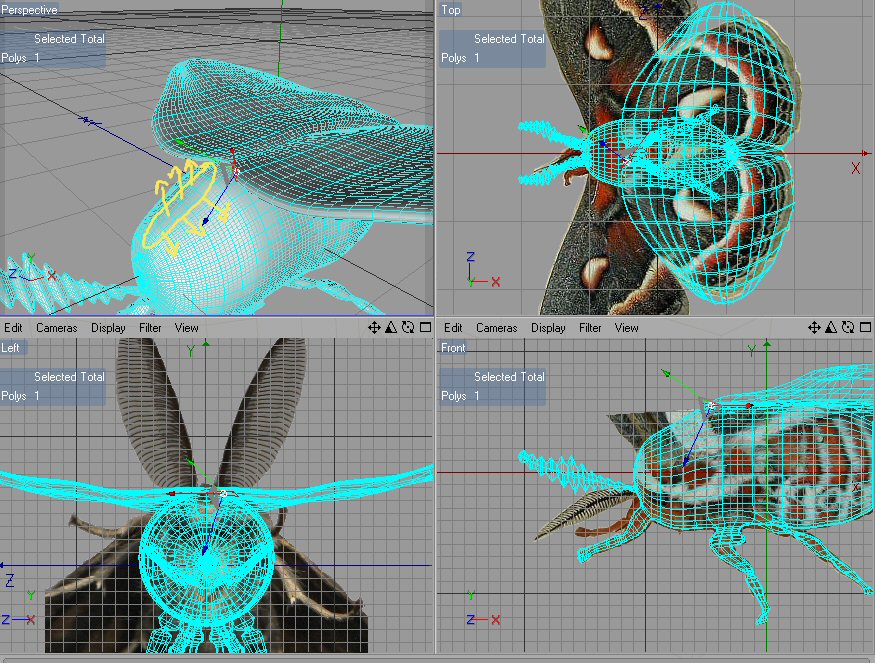
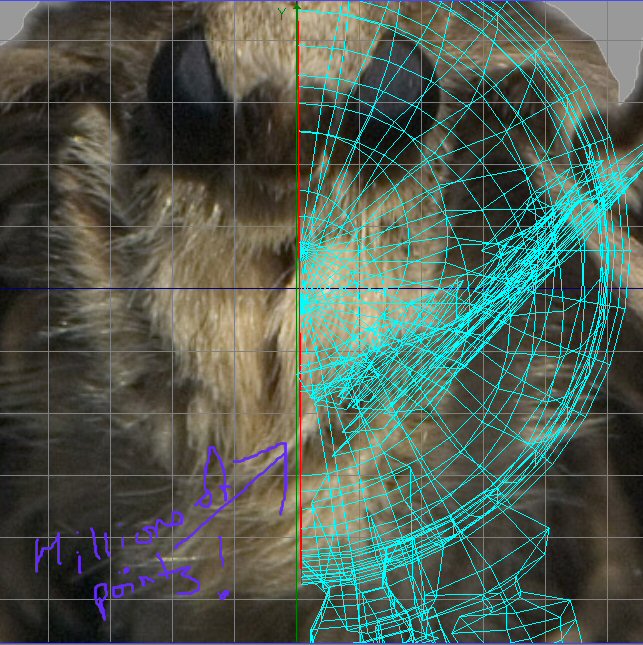
Need to extrude from the yellow marked area. see pic.
Measure
your mind's height
by the shade it casts.
Robert Browning (Paracelsus)
http://franontheedge.blogspot.com/
I am practicing, I'm also in a hurry, as I just have 11 hours left - this is all practice for me.
weld value
...
weld value
...weld value... um... looking for it now.
Measure
your mind's height
by the shade it casts.
Robert Browning (Paracelsus)
http://franontheedge.blogspot.com/
Measure
your mind's height
by the shade it casts.
Robert Browning (Paracelsus)
http://franontheedge.blogspot.com/
The increased tolerance will affect all points and you'll get tearing. Instead leave the Symmetry tolerance at default value, select the points "surrounding" the hole and set their X-value (or Z, depending on the models rotation) to 0. All points along the symmetry cut has to be on 0.
/Anders
Gallery | Store | dogday-design.se
Exactly why the planar knife is so useful. If you aren't exact in your cut so as the plane is 0 on an axis, you can simply check any one of the resulting points for the X,Y,orZ value and translate the model by that much to guarantee that all of the points are 0 on the axis before applying symmetry.
But, as Anders suggests, select all of the points (in Point mode) that are supposed to be 0 on the axis and Structure->Set Point Value to 0 on that axis.
C makes it easy to shoot yourself in the
foot. C++ makes it harder, but when you do, you blow your whole leg
off.
-- Bjarne
Stroustrup
Contact Me | Kuroyume's DevelopmentZone
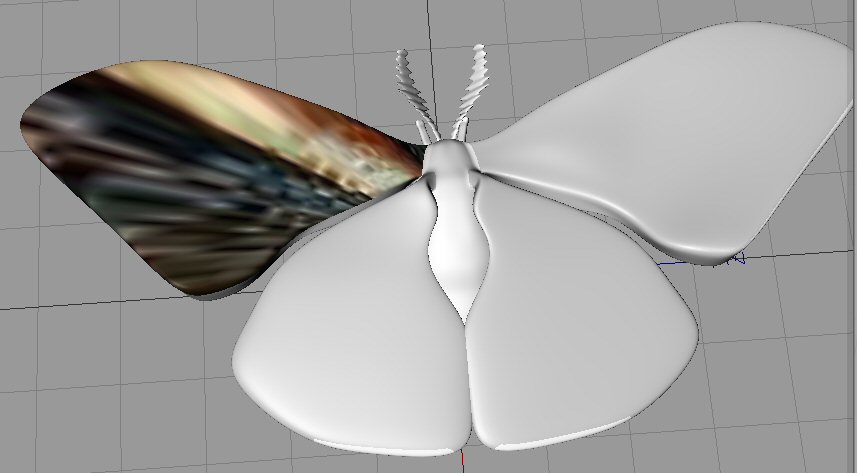
I've moved on a bit now, I'm at this stage:
Now because I went the "extrude from the body" route I now have the wings being part of the whole model.
I've selected the top surface of the top right wing, and I've isolated that part of the Moth Photo, and put it on a material.
I can drag that mat onto the faces/polys I've selected, but it's distorted when it arrives there... is there anything I can do to fix this?
I have BodyPaint, but I can't paint anywhere near as good as the photo, so that's why I wanted to use that if possible.
Is it possible???
Measure
your mind's height
by the shade it casts.
Robert Browning (Paracelsus)
http://franontheedge.blogspot.com/
Wait until you are finished modeling (esp. with Symmetry) and save a separate version to file for safe keeping (with Symmetry). Then convert the entire model (at least below the HN) to Polygon object (Current State to Object) and, for starters, do a Planar UV mapping from the top (X-Z plane) in BodyPaint of the wings. This will get you the wings easily mapped. The body would best be done as a Cylindrical mapping to start. Then use images instead of painting directly. While direct painting is a nice feature, you won't get those complicated results in a single night. :)
C makes it easy to shoot yourself in the
foot. C++ makes it harder, but when you do, you blow your whole leg
off.
-- Bjarne
Stroustrup
Contact Me | Kuroyume's DevelopmentZone
Well I've only got 6 hours left... I'm trying to UVMap it in Wings - too much to do it in C4D.
Measure
your mind's height
by the shade it casts.
Robert Browning (Paracelsus)
http://franontheedge.blogspot.com/
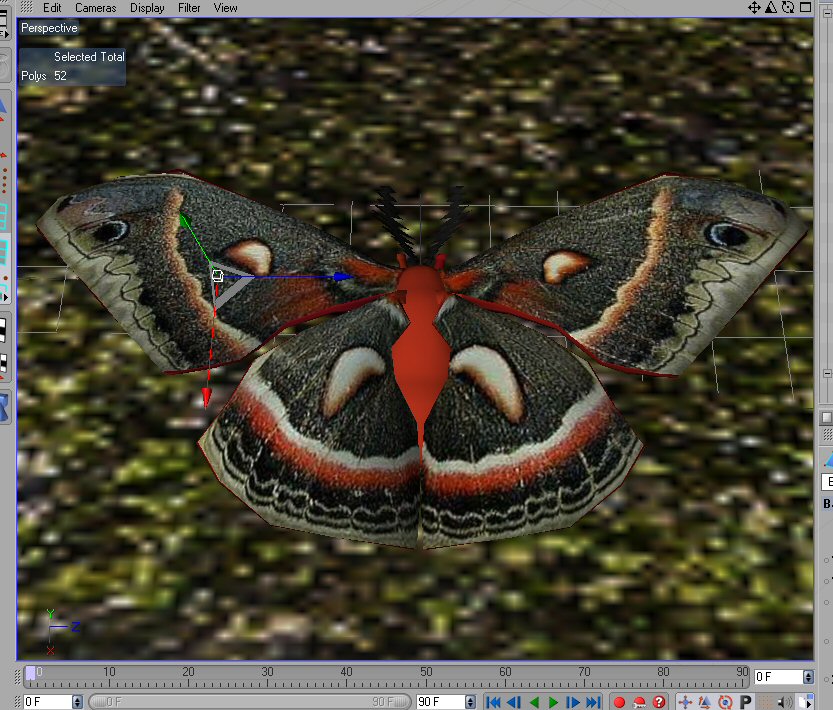
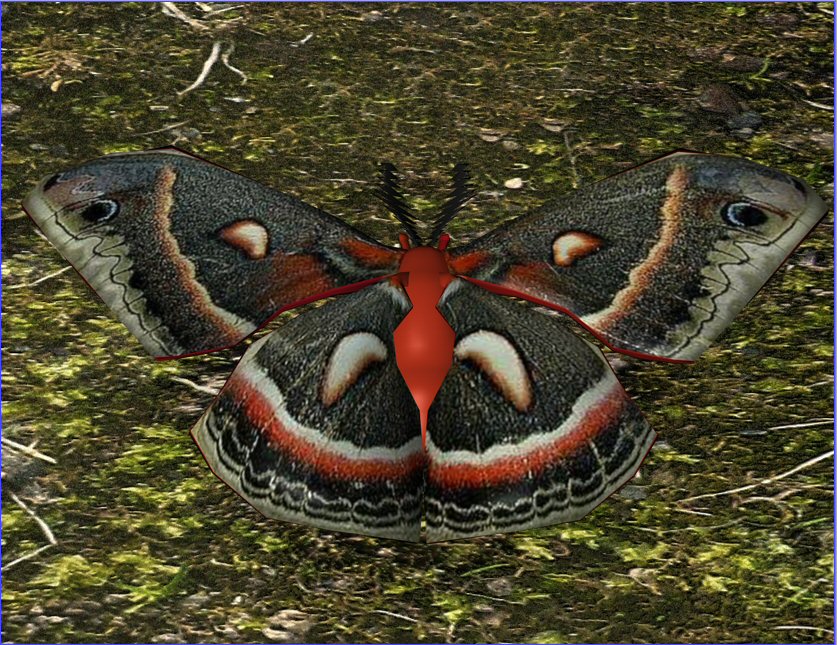
It looks okay before I render:
Measure
your mind's height
by the shade it casts.
Robert Browning (Paracelsus)
http://franontheedge.blogspot.com/
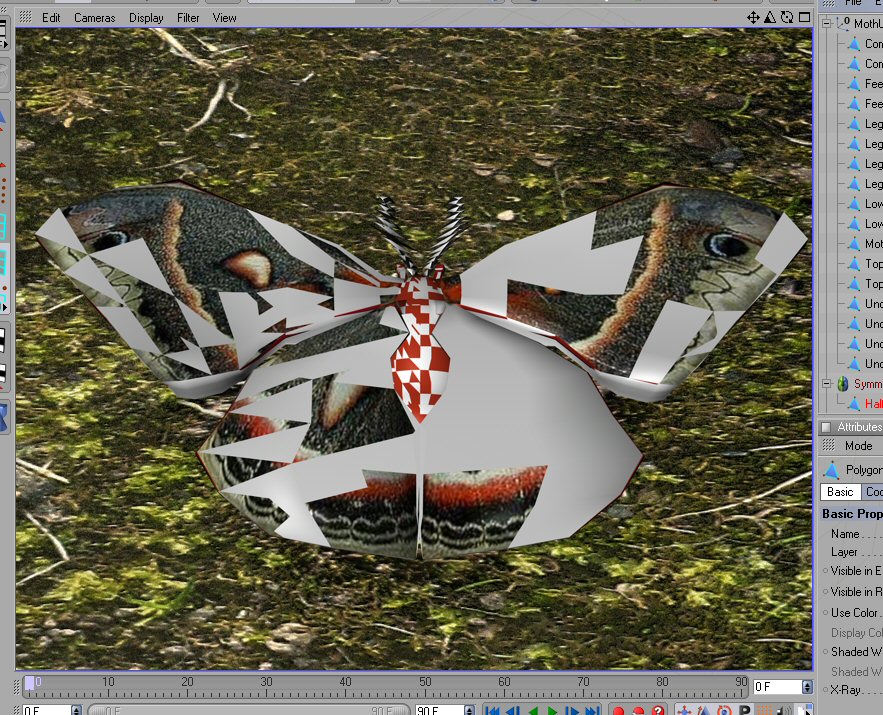
I don't know what's wrong and I can't thi nk straight anymore, so good night all - or good morning - but I'm going to have to give up on this.
Measure
your mind's height
by the shade it casts.
Robert Browning (Paracelsus)
http://franontheedge.blogspot.com/
Use Bodypaint for the UV mapping. Those wings look straightforward to map - essentially there is an upper and lower surface so use polygon selection tags and interactive mapping the way 'bazze' clearly describes in his nice UV Mapping & Texturing tutorial: http://www.colacola.se/wip_p47.htm
PRACTICE with Bodypaint and you will soon find it is not the complex software that some make it out to be be.
It turned out that the problem was very simple indeed - I was just so tired I couldn't see it.
All it was, is that the old unUVmapped version of the model was turned off in the editor view, but not in the renderer. And that's what was intruding on the UVMapped version, causing all that nastiness.
Duh!!!!
I fully intend to really get to grips with BodyPaint.
I feel that this 24 hours to make an animation - although good practice in speed working, is in fact detrimental to your health - cos I feel like bluuuuugh!
But this residency is still ongoing next week, so I hope to submit something next time.
I'm going to keep going with this scene, rig the moth (if I can, it'll be only the 2nd thing I've attempted to rig, and I'm still working on the first one), then animate the moth, with his little placard...,
but now I have to go see my aunt - she's storing a good deal of my stuff over the summer, and I'm taking her and my cousin out for a ride on a steam train. She doesn't have facilities for me to take my PC so I'll 'see' you guys on Monday,
All the best and thanks very much for the help, it's very much appreciated - if I hadn't been too tired to see straight, I might have made it.
It's a pity you can't 'paint' from a photo, in BodyPaint - like cloning areas from a photo to your design, in PhotoShop...
I'm off to look at that tutorial now, thanks for the link.
Measure
your mind's height
by the shade it casts.
Robert Browning (Paracelsus)
http://franontheedge.blogspot.com/
Hey - been looking at that aircraft modeling tut of Bazze's - and he even had the same problem as me with holes caused by the hypernurbs on a symmetry object - luckily he also had the solution that I couldn't remember - select polys - optimize - which theglenster provided.
Now that I see it again, I realise it's the same one - I just knew it was a simple thing.
But... I wonder why you have to do that? I mean - what's the advantage to unoptimised polys???
Measure
your mind's height
by the shade it casts.
Robert Browning (Paracelsus)
http://franontheedge.blogspot.com/
It's a pity you can't 'paint' from a photo, in BodyPaint - like cloning areas from a photo to your design, in PhotoShop...
You can use the Clone Tool in BP or just use Projection Mapping to project your photo onto the model.
/Anders
Gallery | Store | dogday-design.se
Cartesius,
"You can use the Clone Tool in BP or just use Projection Mapping to project your photo onto the model."
You can? That's great to know, thanks.
Measure
your mind's height
by the shade it casts.
Robert Browning (Paracelsus)
http://franontheedge.blogspot.com/
Privacy Notice
This site uses cookies to deliver the best experience. Our own cookies make user accounts and other features possible. Third-party cookies are used to display relevant ads and to analyze how Renderosity is used. By using our site, you acknowledge that you have read and understood our Terms of Service, including our Cookie Policy and our Privacy Policy.

Hi,I have this model, and to shorten the time/and effort needed I need to half it and then mirror it along the X axis - is there a simple way to do this in C4D (- other than exporting it to Wings3D and doing it there?)
I also need to know how to apply a symmetry object, along the same axis that I want to half this model along.
And yes, I have read that part of the manual, but I'm just not getting it.
Measure your mind's height
by the shade it casts.
Robert Browning (Paracelsus)
Fran's Freestuff
http://franontheedge.blogspot.com/
http://www.FranOnTheEdge.com