
Renderosity Forums / Poser - OFFICIAL
Welcome to the Poser - OFFICIAL Forum
Forum Moderators: RedPhantom Forum Coordinators: Anim8dtoon
Poser - OFFICIAL F.A.Q (Last Updated: 2026 May 31 2:18 pm)

Subject: Will HIGH-END programs and Daz figures ever be made?


You got me on that one. Body handle or morph. To me, it would be the one that gave the best control. For others, it's simple one dial use and then they would complain it's not easy enough. LOL.
Morph, you could do the PBM and have the side of chest move in slightly also and give that soft body look. Depending on the amount of tissue there.
Body handles, you can do what you want, where you want but how many are to many.
Like I said, you got me on that one.

That's an idea with the PBM cause I'm needing the chest to move in anyway.
How many are too many.............I am worried about that, the more body handles I add the longer the drop down list for body parts gets. Perhaps have it organized into groups, like folders?


Quote - How does the guy look when you twist the spine or bend him to the side ?
About the same as other figure with a slight improvement in the twist. I don't have a computer right now which will run poser or I would post some pics but as soon as UPS gets me my stuff and I get my new computer up and running I can show some more bends.
Quote - I like the fact the the thighs don't collapse in those bends. At least not from what I can see.> **Quote -
Thanks, that's part of what this secondary hip joint does, plus the way the body part groups are aranged. it alows me to use a much larger area for the falloff, plus part of the leg-hip bend is shared by the second hip instead of the whole bend in one step.**
I'm pretty sure it can, it may have to be a python script. I will have to ask svdl about it.
It could be done with a cr2 hack too, maybe even could have it set to show or hide groups, so you could shorten the list. What I'm thinking is if the body handles I want in a certain group all had the same identifier in the cr2 you could hide or show that group and so on with each group.
For instance If you wanted to group all the left arm parts including the body handles in one group, if each part in the left arm started with something like LFTRM and then the name of the part or body handle then all those parts that started out that way could be set to show or hide in the drop down list.
A question.........
An idea to have different texture maps for the same model. Why couldn't you have a script or some thing to swap .uvs files like UVMapper does? That way you could have different UV maps for the same geometry. Could it be automated so that when you load a particular product it automatically loads the correct .uvs file for the geometry?
*A question.........
An idea to have different texture maps for the same model. Why couldn't you have a script or some thing to swap .uvs files like UVMapper does? That way you could have different UV maps for the same geometry. Could it be automated so that when you load a particular product it automatically loads the correct .uvs file for the geometry?
Excellent idea. I wonder if a geom swap could do it. Personally, I'd like to be able to swap rigs in Poser, too.
Body handles are more versatile than morphs. I'd guess you'd need at least 3 or 4 different morphs to approach the possibilities of a single body handle.
Morphs almost always use more resources than body handles, as in they're using more memory. On the other hand, they're easier to calculate.
Same goes for magnets, by the way.
Grouping bones is not possible, there's no hierarchy in the dropdown. But you could use ERC on the translate/rotate/scale parameters of a body handle (or even a set of body handles), and you can organise those ERC master channels into parameter groups (nested if necessary), just like any other parameter.
It might be useful to remove the body handles from the menu. It might even be possible to change whether the body handle is selectable/appears in dropdown lists using pose files. Haven't tested that one out yet. Anyway, even if a bone is hidden from the menu, it's still selectable in the Hierarchy editor.
The pen is mightier than the sword. But if you literally want to have some impact, use a typewriter
I like body handles too because they are so versatile and if they do not use more resources than a morph then I will try to use them instead of morphs whenever I can.
I was just looking for some way to organise the drop down menu for body parts and make the list shorter with groups selectible when needed.
Well right now I am scouring the net for drivers for XP X64. I have found a good step by step tutorial on how to dump Vista and install XP X64 on my Dell computer, seems everyone is doing it. :)
cheers.

Actually, it's quite simple.
Step 1: backup everything you might want to keep. External harddisks or a networked computer are great for this.
Step 2: Download the mainboard and network XP64 drivers for your system. Usually available from your mainboard manufactuerers' site. Burn the drivers to CD.
Step 3: You'll probably have to use textmode drivers for your harddisk(s) during setup. If you have a floppy drive, make those floppies from the drivers you downloaded from the mainboard manufacturer's site.
If not, you'll have to make a slipstreamed XP64 installation CD. Download nLite (I don't have the link handy, but it's easy enough to find using Google), install it on your Vista machine, and build a new ISO image that includes the textmode drivers. nLite is very user friendly (as good as self-explanatory, actually), so that won't be a problem.
Burn the ISO to a CD, and use that CD to boot from.
Step 4: Insert the XP64 install CD (either the original or the slipstreamed version you made in step 3), reboot the PC. Use the F6 key if you have a floppy with a textmode driver, skip the F6 key if you're using a slipstreamed CD.
The rest is as good as self-explanatory.
The pen is mightier than the sword. But if you literally want to have some impact, use a typewriter
This tute is actually for XP Pro but not X64, but the process is the same you just have to get the right drivers for your chipset. And Svdl is right it's even easier to slipstream it all. I found a post at Dell forums about slipstreaming.

Had a thought " a rare event I know" about skull caps.
If ya model the hair line in to the main mesh.
- ya could name that part of the mesh "skull cap hair line "
then have the hair not collide with "skull cap hair line " part of the mesh.
- just not have a mesh there. then insert deferent skull caps to fill in the hole.
============================================================
The
Artist that will fight for decades to conquer their media.
Even if you never know their name ,your know their Art.
Dark Sphere Mage Vengeance
Quote - Had a thought " a rare event I know" about skull caps.
If ya model the hair line in to the main mesh.
- ya could name that part of the mesh "skull cap hair line "
then have the hair not collide with "skull cap hair line " part of the mesh.
- just not have a mesh there. then insert deferent skull caps to fill in the hole.
Sounds interesting, do you mean like geometry switching? I have been toying with an idea for something like that for the male genitals. Have you ever noticed that the lighting does not create the right shading when the genitals are a conforming figure? You always see a difference I think because poser treats them as separate figures. so what if the genitals were actually part of the figure and deleted or hidden when you choose no gens? Of course with the female gens you dont have to worry about it.

Quote - Has anybody invited EPICI over to comment on this thread? This modeler's new low-poly SoldierLwR figures seem to be consistent with the subject matter that has developed in this thread. LMK
Here I am : )
Here you can find a WIP of the creation of SoldierLwR 01and 02.
It is in italian language, but images are clear.. I hope! ; )
www.epiciworld.com/forum/viewtopic.php
Here you can see some render made with soldierLwR_02
www.renderosity.com/mod/gallery/member.php
I am using my soldier meshs (with custom morphs and textures) on a movie production ( 90 min), as 3d clones of the real actors.
This is the fisrt clone
www.epiciworld.com/forum/viewtopic.php
I am 3dCG supervisor.
This is a WIP of the movie production ARANEA.
www.epiciworld.com/forum/viewtopic.php
Poser can be a powerfull tool. ; )
Enjoy.
EPICI
EPICI: Looks like excellent work from what I could see. for some reason I could not pull up most of the movie trailor
Tashar59: Yes that's what I want to do except without switching any geometry basically just deleting the gens, and under the gens is the rest of my hip which is there all along.
Quote - EPICI: Looks like excellent work from what I could see. for some reason I could not pull up most of the movie trailor
Thank you.
Try with this links (unofficial)
vids.myspace.com/index.cfm
www.myspace.com/aranea_the_film
it.youtube.com/user/loretube75
Enjoy
EPICI
Yes that's what I want to do except without switching any geometry basically just deleting the gens, and under the gens is the rest of my hip which is there all along.
OK but, wouldn't you be back to the same lighting problem as the figure? You would still have the extra geom over the hip which causes the lighting problem. So I'm thinking that geometry switching of 2 hips, one with, one without, would solve that. Just guessing here.
I'm really not experienced enough with Poser to say much about any thing concerning Poser.
And currently only have Poser 5 and could never get descent showdowns on any thing with 5.
Think is was ODF talking about skull caps.
I was just sharing a thought about skull caps.
don't know if I will be able to use skull caps.
hair on there head ,eye brows,beards,eye lashes,pubs.etc all those skull caps every where just don't know.
think it would be best to just put the hair on the main mesh and not use skull caps.
This is me thinking the Max,C4D way.I know these thoughts don't always work with Poser.
Diamond my female her gens are not flush enough to where part of her gens would poke threw her panties.
Could always make a flush morph,easy enough.
or just use 2 meshes one with one with out gens.
But for a dude not so sure about a flush morph.
would probably have two meshes one with one with out gens.
============================================================
The
Artist that will fight for decades to conquer their media.
Even if you never know their name ,your know their Art.
Dark Sphere Mage Vengeance
Quote - Yes that's what I want to do except without switching any geometry basically just deleting the gens, and under the gens is the rest of my hip which is there all along.
OK but, wouldn't you be back to the same lighting problem as the figure? You would still have the extra geom over the hip which causes the lighting problem. So I'm thinking that geometry switching of 2 hips, one with, one without, would solve that. Just guessing here.
Not if it's actually welded to the figure and is not a separate figure but just another body part. The lighting and shadow problem from what I can tell is because the conforming gens are actually a separate figure. And yes the hip switch would work but on my models the hip part is very large, almost half the figure.
Quote - I think you have to use skull caps if you want to save the dynamic hair as a prop in poser.
I know they use skull caps props so they can have 1 Judy and 2+, 2 or more hair styles.
But the hair works better if the hair is directly connected to the main mesh.
So instead of 1 Judy with 2+ deferent hair styles.
I'll have 2+ Diamonds with deferent hair styles with the hair directly on the mesh.
.
============================================================
The
Artist that will fight for decades to conquer their media.
Even if you never know their name ,your know their Art.
Dark Sphere Mage Vengeance
Instead of having a high polycount face she will have a high poly count skull,LOL,The insanity of 3D.
Ears polycount kind ah high also,but Diamond pitched a fit,she said she would not be seen with blocky ears.
============================================================
The
Artist that will fight for decades to conquer their media.
Even if you never know their name ,your know their Art.
Dark Sphere Mage Vengeance
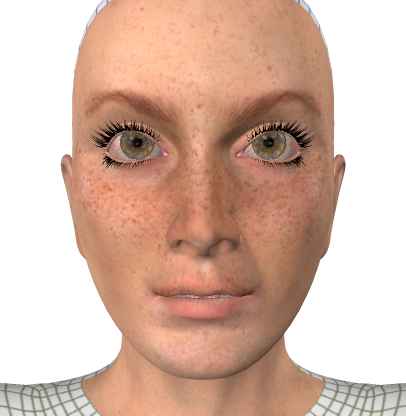
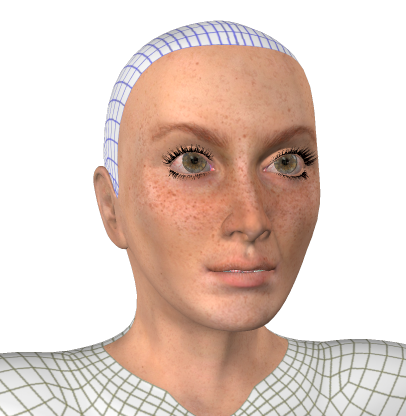


The texturing looks great. I particularly like the freckles.
I think the eyes look wrong for three reasons: they are open really wide, the irises are much too big and they look straight ahead. I'm not sure where I got it from, but Antonia's eyes are actually turned approximately 5 degrees outward. It sounds strange, but it turns out to look better.
-- I'm not mad at you, just Westphalian.
Patorak: Ah, that explains it. I probably didn't read Unicornst's post properly, just caught something about not being happy with the eyes.
Unicornst: I think they look great, and I particularly like the reflections. Unfortunately, I'm not sure how to preserve those while achieving more intense iris colors. Maybe make the irises really dark?
-- I'm not mad at you, just Westphalian.
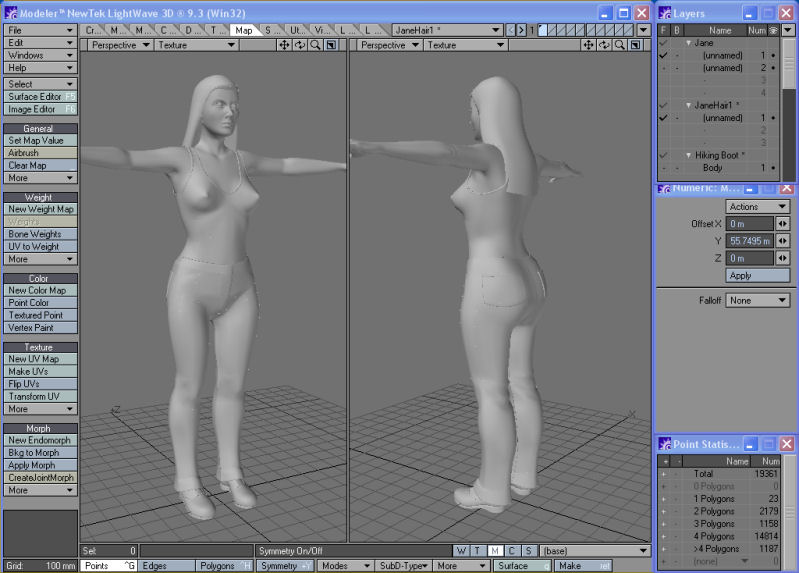
**The clothing is looking really good.
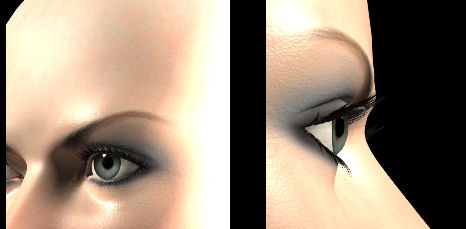
About the eyes....there's a bit of blue cloudyness around the outside edges that I can't seem to eliminate. That's the part that is bugging me. The reflections, I've discovered, can be controlled by the diffuse on the aqueous (which is similar to the eye surface in V4, but much more reflective) by turning the diffuse up all the way or lowering it. I'll post an image later with it turned up and you'll see that the reflections go way up. The one I've already posted has the diffuse at 0.50. On looking at the image again, I think it's actually turned a bit too low. It was very late last night (4AM) when I made the post and I got things turned around.
As for the iris, that can also be adjusted with the texture map, but I have to experiment with it a bit more. Plus, like Patorak said, there'll be morphs to adjust it as well. Right now, Jane is just a "prop" until I get sent the rigged figure with morphs, so I can't move anything on her.
I'll get more as soon as I wake up more. grin But I do thank you all for your comments on it looking good so far. It's very encouraging.
**

Privacy Notice
This site uses cookies to deliver the best experience. Our own cookies make user accounts and other features possible. Third-party cookies are used to display relevant ads and to analyze how Renderosity is used. By using our site, you acknowledge that you have read and understood our Terms of Service, including our Cookie Policy and our Privacy Policy.
Yes you could fix it with a body handle, but I'm not sure a morph might be easier, i don't know really will have to judge ease of use against resource use. What do you think? I like to stay away from morphs but do body handles use more or less resource? I also like body handles because they are so adjustable.
.
A HOMELAND FOR POSER FINALLY