Renderosity Forums / Poser - OFFICIAL
Welcome to the Poser - OFFICIAL Forum
Forum Moderators: RedPhantom Forum Coordinators: Anim8dtoon
Poser - OFFICIAL F.A.Q (Last Updated: 2026 May 20 8:52 am)

Subject: Goal: RWBY-like animation movie with Poser. Let's share knowledge!

May I add ... (unfortunately not addressing your specific issue) that you needn't use such a large image map on your figures. If you want to make an animation, your textures need to be lower size and resolution. The higher the resolution the more machine resources you are using that are not necessary. Animators out there ... Help this wonderfully ambitious artist out. (Not to mention very skilled)>
Boni
"Be Hero to Yourself" -- Peter Tork

About the only thing I can suggest is that you need to extend your painting of the maps beyond the borders of your UV outline. It looks like that is what is happening in the cloth on her chest. The lines were not painted out and don't connect. Seams are a problem in Poser.
As far as the textures on your figure, take out the specular. Right now she looks like a plastic doll. If that's what you were going for, then disregard.
As far as the second line below her eyebrow, I am only guessing and hope someone else can give you a real answer, but it looks like Poser is trying to compensate for what is probably a really thinly painted line. Everything else on your figure looks about the same.
That's a really nice anime sculpt. May I ask? Why not just rig and animate her in Blender? You obviously know your way around the program.
If I had a nickle for ever time a woman told me to get lost, I could buy Manhattan.

I am on the same page as rokket.
In addition Boni with her advice is spot on when setting up for animation regardless of the software used, since an object that is moving does not give the viewer much time to nitpick about your map resolution and if you consider a full scene then careful planning can make all the difference. I usually create 3 versions of my main assets/characters. One shameful looks good at a couple of hundred yards type, one low poly for mid shots and one high poly for close ups even strip out things like engines from cars two sides of a house and any unseen prop parts that are not needed for the final result. Build the set high and save out various versions, In other words every corner that can be cut while retaining the best possible result in order to improve system resources is vital and will save you a lot of headaches. More than once in my lifetime I have set up the holy grail of animated sets only to find I could not open it again due to file size and there is no warning given in a lot of software. Looking at how you have set up your character in blender and the style I think you will be more than happy with the result @ 1024 far or 2048 near max as this should be plenty and only use 4096 if the scene requires a close up of a pimple even then it could be an overkill. That would be my advice, BTW great looking character look forward to seeing the end result.
- Johnny G
"Try animation to get things moving"
lpr001@renderosity.com
Boni posted at 11:13PM Mon, 25 April 2016 - #4266858
May I add ... (unfortunately not addressing your specific issue) that you needn't use such a large image map on your figures. If you want to make an animation, your textures need to be lower size and resolution. The higher the resolution the more machine resources you are using that are not necessary. Animators out there ... Help this wonderfully ambitious artist out. (Not to mention very skilled)>
Hi, Boni! Thank you so much for replying! So, what resolution do u recommend?
rokket posted at 11:17PM Mon, 25 April 2016 - #4266882
About the only thing I can suggest is that you need to extend your painting of the maps beyond the borders of your UV outline. It looks like that is what is happening in the cloth on her chest. The lines were not painted out and don't connect. Seams are a problem in Poser.
As far as the textures on your figure, take out the specular. Right now she looks like a plastic doll. If that's what you were going for, then disregard.
As far as the second line below her eyebrow, I am only guessing and hope someone else can give you a real answer, but it looks like Poser is trying to compensate for what is probably a really thinly painted line. Everything else on your figure looks about the same.
That's a really nice anime sculpt. May I ask? Why not just rig and animate her in Blender? You obviously know your way around the program.
Hi, Rokket! Thank you for replying! as for the cloth, the middle spot where it does not connect is not where I mark the seam on blender. I marked the seam on the back (which is also not connected in the middle in Poser, but looks all right in blender)
as for the line above the eyes, it looks like it's blurry and pixelated, as if it's in low resolution or something. It happened to the whole body textures. If I zoom in to the cheeks where I drew a blush like shape, It's kind of blurry too. It does not look exactly the same as I paint it.
To tell the truth, I have no experience in animation in blender at all. The reason why I choose Poser is because of the library system, which will make the workflow faster (this is what I learnt from observing Monty Oum's way of doing his movies)
LPR001 posted at 11:29PM Mon, 25 April 2016 - #4266884
I am on the same page as rokket.
In addition Boni with her advice is spot on when setting up for animation regardless of the software used, since an object that is moving does not give the viewer much time to nitpick about your map resolution and if you consider a full scene then careful planning can make all the difference. I usually create 3 versions of my main assets/characters. One shameful looks good at a couple of hundred yards type, one low poly for mid shots and one high poly for close ups even strip out things like engines from cars two sides of a house and any unseen prop parts that are not needed for the final result. Build the set high and save out various versions, In other words every corner that can be cut while retaining the best possible result in order to improve system resources is vital and will save you a lot of headaches. More than once in my lifetime I have set up the holy grail of animated sets only to find I could not open it again due to file size and there is no warning given in a lot of software. Looking at how you have set up your character in blender and the style I think you will be more than happy with the result @ 1024 far or 2048 near max as this should be plenty and only use 4096 if the scene requires a close up of a pimple even then it could be an overkill. That would be my advice, BTW great looking character look forward to seeing the end result.
Thank you for replying! So, my role model is Monty Oum (Creator of RWBY, dead fantasy, etc) and I want to do the way he did it because he's amazing!
He use poser to animate all his movies, but he never render any of it. everything is in playblast (even RWBY show)
So, does the texture resolution does affect my model even if I'm not planning to render it?
In the screenshot I provided, the texture is in 4096x4096 pixel, but somehow it does not look detailed at all. Do u have any idea about this issue?

hello wahkakaka
some .jpgs of your mesh topology n your UVmap. might tell us something.
a polycount would be helpful. and how may SubD's there are in Poser.
if your loading her in Poser with a polycount under 20,000
rase the polycount in Blender above 20,000 n apply permanently. . n load her in Poser with a polycount over 20,000 see if that fixs it.if not
try poly count over 60 ,000.
if polycount not it
there's materials nodes for tweaking in the material room
for animation real time render engines can be time savers like
============================================================
The
Artist that will fight for decades to conquer their media.
Even if you never know their name ,your know their Art.
Dark Sphere Mage Vengeance
I see the the texture aliasing in the preview. If you are rendering with the Preview Renderer choose Anti Alias Document and render. It should clear up the jaggies. You shouldn't have aliasing going on in a Firefly render.
W10 Pro, HP Envy X360 Laptop, Intel Core i7-10510U, NVIDIA GeForce MX250, Intel UHD, 16 GB DDR4-2400 SDRAM, 1 TB PCIe NVMe M.2 SSD
Mudbox 2022, Adobe PS CC, Poser Pro 11.3, Blender 2.9, Wings3D 2.2.5
My Freestuff and Gallery at ShareCG
Please familiarise yourself with these particular facets of the Poser render interface, as this will probably be relevant to the kind of animation you're planning on doing.
https://youtu.be/RH8468ZUGM0
W10 Pro, HP Envy X360 Laptop, Intel Core i7-10510U, NVIDIA GeForce MX250, Intel UHD, 16 GB DDR4-2400 SDRAM, 1 TB PCIe NVMe M.2 SSD
Mudbox 2022, Adobe PS CC, Poser Pro 11.3, Blender 2.9, Wings3D 2.2.5
My Freestuff and Gallery at ShareCG
LOL that might help considerably although can't see it for the top at all and even the eye should be more in keeping with the arms a jagged edge on a black line. I just hope it works
As for textures in external render situations It depends if the textures are to be converted in the external render engine or re textured using new shaders. A Substance Designer material will completely replace the original where a conversion will adapt the original. Choose your prefered rendering option and look at the what is available. With characters a lot of the time I am relying on getting it right in the software and using the auto conversion otherwise a skin change may see the eyebrows, makeup etc vanish. Not so bad for clothing and props since usually it can be done with a dropper or select and no big deal and never hard to find something suitable as a replacement.
If you are going to go in high on the texture maps in the 2048/4096 arena then you might want to do your animations in layers use something like Reallusion PopVideo3 which will supply the alphas and can cut up to HD4K and use Natron(Open source node based editor) or Blackmagic's Fusion for compositing . I have a fairly hefty computer here realtime animation and use LOD on all the trees, shared resources etc and still find a 1.5 to 2 mil poly 2000 frame animation with 2 - 4 Daz character(4096) and some 2048's for background traffic can become a bit of a slug once the set is in place.
- Johnny G
"Try animation to get things moving"
lpr001@renderosity.com
Well, as you can see. My original suggestion of lower resolution is incorrect ... probably because I do not animate and was referring to outdated information. Go with these guys ... they really know what they are talking about and jump into the deep end. Obviously you have a knack for it!
Boni
"Be Hero to Yourself" -- Peter Tork
Thank you everyone! and thank you EldritchCellar 's solution, it solved my jaggies issues
So here's what I do in case anybody who have the same problem reading this thread:
For the jaggies line above the eyes, I go to render setting > preview tab > increase the texture resolution on the lower right to match the texture resolution that I have will do the trick
and as for the weird disappearing texture in the middle of the cloth, I made a mistake in blender where I apply Solidify modifier and apply mirror modifier without deleting faces in the middle first. So after I delete those faces, problem solved.
I might lower my texture resolution as suggested by u guys too.
I think I'll post more questions in this thread in the future though, since this part is just the beginning. LOL
Thanks again everyone!
Might want to subscribe to Smith Micro Graphics
at you tube there's a lot of home grown tutorials also.
and think there videos at the Poser site. n google always helpful for a fast answer.
different render engines use different shaders n all n make the same textures look a bit different.
might want to check out how gamers make small file size games also. there very good at cheating n making next to nothing look like a forest.
============================================================
The
Artist that will fight for decades to conquer their media.
Even if you never know their name ,your know their Art.
Dark Sphere Mage Vengeance
a more serious problem arise.
Even after I managed to fix those issues earlier, I keep having issues with my skin and upper cloth textures. After importing from blender and set the light to "diffuse IBL", the skin and cloth textures is all white (like the photo I provide in this comment)
So, yesterday I accidentally apply my skin texture to the Light in material settings, which looks like it fix the problem at the moment, and then I realized the environment too is influenced by this. the color become slightly red-ish. (pic #3 in this original thread is the result of this) So, this is not the solution that I want.
And just now, I noticed the hair, pants, eyes, eyebrows, eyelid textures works all right. The only misbehaving textures is the skin and upper cloth. So I wonder if the cause of my issues, is because texture map is messed up (originaly, the inside mouth is connected to the body. But afterI texture the whole thing, I made some changes by separating the inside mouth into a new object. The same thing happen to the cloth. So this means the texture map is different wit the actual poly count)
So I wanted to try to confirm this by importing to poser with different model from scratch. After I import it to Poser, I go to Render Settings > preview tab > increase the texture display like I used to do over and over again to remove my jaggies issues, which works just fine until now, BSOD (Blue Screen of Death) happened.
After my PC restart by itself, I tried to do it again. And everytime when I click "save changes" in render settings > preview tab > increase the texture display, BSOD occurs.
And everytime I do those settings, even with the save data that use to worked just fine, the BSOD keep happening
Might be an OpenGL issue. There's alot of different things that might be going wrong here. Try SreeD setting/uncheck Hardware Shading to see if it remedies the BSOD.
W10 Pro, HP Envy X360 Laptop, Intel Core i7-10510U, NVIDIA GeForce MX250, Intel UHD, 16 GB DDR4-2400 SDRAM, 1 TB PCIe NVMe M.2 SSD
Mudbox 2022, Adobe PS CC, Poser Pro 11.3, Blender 2.9, Wings3D 2.2.5
My Freestuff and Gallery at ShareCG
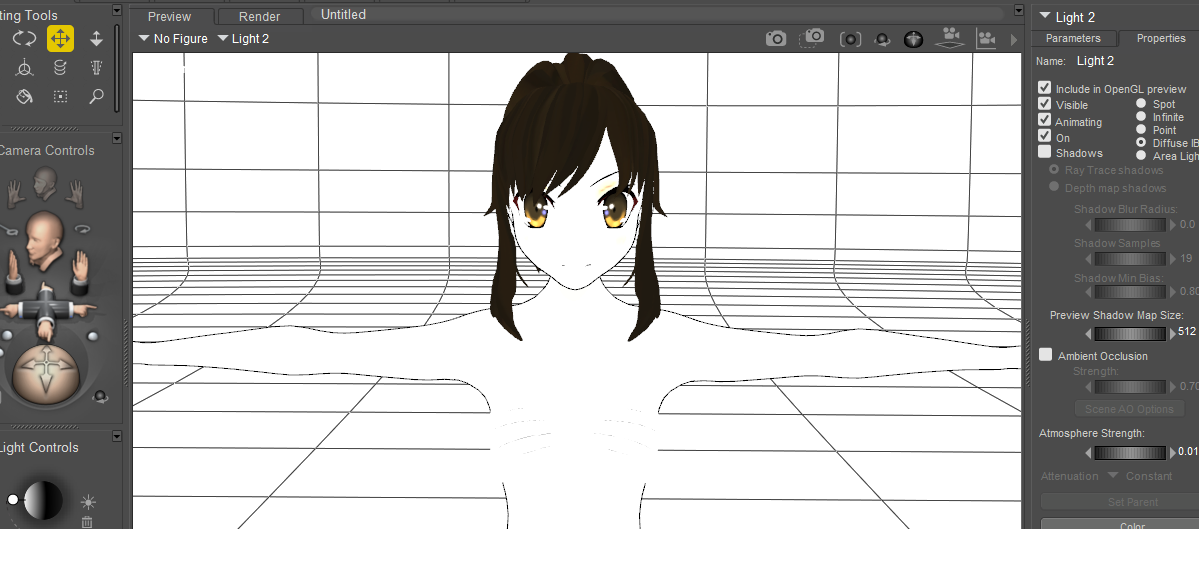
Also be aware that, if utilizing OpenGL Preview, each light has an 'Include in OpenGL Preview' checkbox in its Parameters-Properties tab.
W10 Pro, HP Envy X360 Laptop, Intel Core i7-10510U, NVIDIA GeForce MX250, Intel UHD, 16 GB DDR4-2400 SDRAM, 1 TB PCIe NVMe M.2 SSD
Mudbox 2022, Adobe PS CC, Poser Pro 11.3, Blender 2.9, Wings3D 2.2.5
My Freestuff and Gallery at ShareCG
Thanks rokket & EldritchCellar for replying!
UPDATE: As for the weird white textures, I think I found a solution. In material tab, set the diffuse color & specular color to Black, and then plug in the "Alternate_diffuse" This fix the issues in my case And the interesting thing is, even if I set my light to any other type beside "diffuse IBL", my character looks remain the same 2D-ish style. I can even turn on shadows to have my character shadows on the ground without affecting my character.
Aaaaand as for the BSOD issues, I ran a full antivirus scan earlier and fixed some registry issues. And when I tried to do the texture display settings again, the BSOD didn't happen. Hope that antivirus scan fix this problem for good. If it happen again, I'll try EldritchCellar 's suggestion
Privacy Notice
This site uses cookies to deliver the best experience. Our own cookies make user accounts and other features possible. Third-party cookies are used to display relevant ads and to analyze how Renderosity is used. By using our site, you acknowledge that you have read and understood our Terms of Service, including our Cookie Policy and our Privacy Policy.
Hi, I just bought Poser 2 days ago, so I'm very new to this.
To start off, my GOAL is to achieve result like in RWBY show.
So without further ado, here's a problem that I experiencing right now, and seeking wisdom from people around renderosity forum to share knowledge.
I create my assets in blender, UV map it with 4096x4096 pixel resolution, paint it in photoshop then import it to blender with obj. file
So, here's a description of the image:
pic no 1 : screenshot from my blender's "texture view", this is the result that I'm aiming for
pic no 2 : screenshot after I export the blender file to poser. the texture is all jaggy and weird at first, so I reload texture in render -> reload texture panel and this is the result after that.
pic no. 3 : screenshot after I delete all light except for one, then in Light Properties I check "Diffuse IBL" and un-check "shadow" Then I press Ctrl+Y which toggle a render settings, and in "Firefly" tab I uncheck "cast shadows" and then save settings
Problem :
in Pic #2 and Pic #3, you can see there's weird texture happening in the middle of the cloth area And above the eyes, I draw a line. However in Pic #2 and #3, the line is blurry and jaggy unlike in the pic #1 which is sharp looking.
Anywhere I did wrong? maybe in the blender export settings / poser material settings? I played around but can't find any solution yet.