
Renderosity Forums / Poser - OFFICIAL
Welcome to the Poser - OFFICIAL Forum
Forum Moderators: RedPhantom Forum Coordinators: Anim8dtoon
Poser - OFFICIAL F.A.Q (Last Updated: 2026 Jul 29 6:49 am)

Subject: Turning a 3D object into a displacement map. Extreme "duuuh" content.


This may help:-
For earlier versions of Poser:
- Remove all texture maps.
- Remove all transparency maps
- Set all diffuse materials to white.
- Set all specular colours to black.
- Turn on depth cueing
- Use single infinite light pointing directly at the face.
- Adjust camera to give frontal view.
- Render -- Antialias document.
- File -- export image.
- In graphics application invert image.
See http://www.philc.net/tutorial8.php for more details.
In Poser Pro 2010 you have some extra render settings one of which is "Z Depth" which will get you what you want in one hit.
Your approach is however a valid solution.


The way I do it is simpler.
As above, turn off diffuse and specular, and turn off lights.
Set Ambient color to middle gray.
Plug a "P" node into Ambient Value.
Adjust the "P" node so the relevant dimension is the only nonzero one. For instance, if the model is laying flat on the floor, the Y value should be about 0.1 and the X and Z should be 0.
It takes a bit of fiddling, but this starting point is usually pretty close.
My python page
My ShareCG freebies

Why the repeated instructions to turn off diffuse and specular, as well as turning off the lights? Without lights, diffuse and specular are off. It's like telling someone to turn off a car engine, and then also remove all the gas.
Once the lights are off, everything that is diffuse or specular is black anyway. It's the ambient things (self lit) that you must chase down and turn off after shutting the lights out.
Meanwhile,
I am curious about all the faffing you guys describe - has nobody ever said how to do this without touching lights or your prop/figure shaders at all? Nobody can think of any Poser rendering effect that might be useful, combined with a little bit of shader cleverness?
I'll give you some hints:
There is a component in the rendering engine that decides the final pixel color of everything in your scene.
For things beyond a certain distance, it forces the color to be any value you want, and completely ignores the lights and shaders in your scene.
The component I'm talking about is usually used for its built-in z-depth-dependent behavior.
If we used it exactly as it was intended to be used, it will not do what we want, but we can abuse it quite trivially to do exactly what we want.
I have posted numerous times that for its primary intended purpose, it is incorrectly implemented, but that we can trick it into ignoring its own flawed math and use any math we want.
It's been around since Poser 5.
Renderosity forum reply notifications are wonky. If I read a follow-up in a thread, but I don't myself reply, then notifications no longer happen AT ALL on that thread. So if I seem to be ignoring a question, that's why. (Updated September 23, 2019)

One could have heard a pin drop. Looking around at my brighter mates and realise none of us have any idea. Really looking forward to the next bit!!
Monterey/Mint21.x/Win10 - Blender3.x - PP11.3(cm) - Musescore3.6.2
Wir sind gewohnt, daß die Menschen verhöhnen was sie nicht verstehen
[it is clear that humans have contempt for that which they do not understand]


Quote - Why the repeated instructions to turn off diffuse and specular, as well as turning off the lights? Without lights, diffuse and specular are off. It's like telling someone to turn off a car engine, and then also remove all the gas.
Belt and braces, mate. :)
Anyhow, please tell us the method you describe. Miss N is much more on the ball than the rest of us, it seems.
Coppula eam se non posit acceptera jocularum.

If I remember correctly, the easiest way would be...
- turn of all lights
- activate "DepthCue_On" (Atmosphere material)
- set DepthCue_Color to white
- set DepthCue_Start and _End distance
- render
The hardest part is figuring out Start and End distance.
Usually I use the cameras "focus_distance" to figure out my start value.
Yesterday's the past, tomorrow's the future, but today is a gift. That's why it's called the present.
msg24_7 is correct, with the proviso that glowing materials must be disabled.
There is no need to remove textures, change material colors, change diffuse or specular values, nor to use a P node in the materials.
There is also a way to do this without turning off lights or even un-glowing materials. A way to do it with NO changes to any prop/figure materials and NO changes to lights. A way to do it with ZERO preparation, other than the DepthCue Atmosphere material.
It involves use of the P node in the DepthCue Atmosphere material. Can you figure it out?
Renderosity forum reply notifications are wonky. If I read a follow-up in a thread, but I don't myself reply, then notifications no longer happen AT ALL on that thread. So if I seem to be ignoring a question, that's why. (Updated September 23, 2019)
For much more detail and an extensive discussion and solution to the low-precision problem, see:
http://www.runtimedna.com/forum/showthread.php?26700-Depth-Map
Note: The puzzle I'm asking where no prep is needed (not even to turn off the lights) is not included in that thread. It has never been published as far as I know. I thought of it recently and when I did, I was surprised that it has never been described, since it is so obvious once you see it.
Renderosity forum reply notifications are wonky. If I read a follow-up in a thread, but I don't myself reply, then notifications no longer happen AT ALL on that thread. So if I seem to be ignoring a question, that's why. (Updated September 23, 2019)
Quote - at z=0 (if the obj is bisected by the (x,y)=(0,0) plane), depthcuecolor=0 and at z=farthest distance of obj in front of (x,y)=(0,0) plane, depthcuecolor=1?
Whut?
Brain no workee.
Coppula eam se non posit acceptera jocularum.
Quote - at z=0 (if the obj is bisected by the (x,y)=(0,0) plane), depthcuecolor=0 and at z=farthest distance of obj in front of (x,y)=(0,0) plane, depthcuecolor=1?
Correct! If you set the depth_cue start and end both to 0, then it always draws whatever is the depthcue color. Then you modulate that color to be anything you want - and you get a render of that.
In this case, a P node, z-coordinate only. There are several ways to do this, but the simplest is to set the P node x and y parameters to 0, and the Z value to .3. Then you plug the P node into a math node. The math node will be receiving the Z coordinate expressed in inches.
From there (the math node) you can offset the Z value so it doesn't have to start at 0 - it can start at -5 or 20 or whatever. This would be done by subtracting the Z coordinate of the farthest point. Let's call that F. F could be 0, or -1, or -50, or 20, or 100. Doesn't matter.
P.Z - F
So it will be black (0) when P.Z = F.
Next we need to scale this so it goes to white (1) when the value is at the closest z value to the camera. Let's call this value C.
(P.Z - F) / (C - F)
In other words, first subtract the farthest point, then divide by the distance between closest and farthest.
Plug that into DepthCue_Color, which should be set to white in the color chip.
If you want closest = black, instead of white, then you want the complement of that, i.e. 1 - that, which is:
1 - (P.Z - F) / (C - F)
= (C - F - P.Z + F) / (C - F)
= (C - P.Z) / (C - F)
Renderosity forum reply notifications are wonky. If I read a follow-up in a thread, but I don't myself reply, then notifications no longer happen AT ALL on that thread. So if I seem to be ignoring a question, that's why. (Updated September 23, 2019)

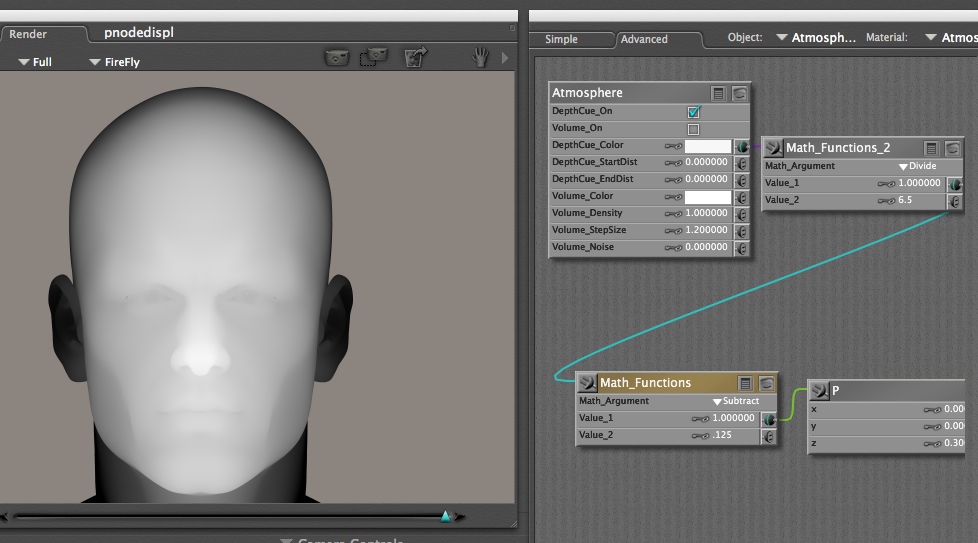
p.s.: to use this as displ map in poser, convert to 16-bit tiff. black (0) = 0displ, grey (0.5) = 0.5, white (1) = 1displ.

Privacy Notice
This site uses cookies to deliver the best experience. Our own cookies make user accounts and other features possible. Third-party cookies are used to display relevant ads and to analyze how Renderosity is used. By using our site, you acknowledge that you have read and understood our Terms of Service, including our Cookie Policy and our Privacy Policy.
I can't believe it took me so long to figure this out but there you go.
Ages back, I asked if anyone had a shader which would allow me to render a 3D object in such a way that the render would be useful as a displacement map. Imagine Victoria's face displaced out of a flat plane, for example.
Anyhow, several helpful people replied but all the ideas involved a lot of messing around and the results were less than ideal.
Fast forward to a couple of days ago...
I suddenly remembered Poser is an animation package, too. Armed with this knowledge, I did the following:
Loaded Victoria 3 and made all body parts except for head invisible.
Made Diffuse and Specular black, made Ambient white with a value of 1.00 on all head parts, except for eyelashes and eyebrows, which were made transparent. I also animated the Ambient colour to cycle down to almost black (15, 15, 15).
Loaded the One Sided Square, placed it in front of V3's head and scaled it up so the whole head was covered. Set the square's Diffuse and Specular to black.
Deleted all lights.
Created 128 animation frames and moved the One Sided Square negative Z so that by the last frame, half of V3's head was showing.
Render as separate images.
The result was 128 frames, each one showing a little more of V3's head whilst becoming progressively darker.
Loaded the output into Photoshop and compiled all the layers into one document.
Deleted the black areas from each frame and flattened all the layers.
I now have a reasonable displacement map of V3's head. I'll post a pic of the rendered result later.
I still can't believe it took me so long to figure it out, though.
Coppula eam se non posit acceptera jocularum.
My Store
My Gallery