-
Marketplace
- Free Stuff
-
Galleries
-
Community
Forums General
- News
- Deals
- Poser
- Contact
Renderosity Forums / Carrara
Welcome to the Carrara Forum
Forum Coordinators: Kalypso, Anim8dtoon
Carrara F.A.Q (Last Updated: 2026 Jun 21 11:17 pm)
Visit the Carrara Gallery here.

Subject: Miniature super condensed tutorial (UFO)

Report Post
really well done Kixum!
all great ideas you have used, interesting your lateral thinking brain :)
will be interesting to see how long before your image turns up on google images as a look alike image !
the whole scene turned out very well,
with the exhaust you could get something close but not similar using a light cone inverted with shadows , could be worthwhile exploring next time ?
thanks for the tutorial !
-
- Renderosity Page
- Renderosity Communities
- Blender 3D
- iClone
- Poser Users
- Poser Software
- Become an Affiliate
- Memorials
-
About
- About Us
- Contact Us
- Team
- Policies
- Terms of Service
- Copyright Policy
- Refund Policy
- Licenses
- Standard License
- Extended License
Privacy Notice
This site uses cookies to deliver the best experience. Our own cookies make user accounts and other features possible. Third-party cookies are used to display relevant ads and to analyze how Renderosity is used. By using our site, you acknowledge that you have read and understood our Terms of Service, including our Cookie Policy and our Privacy Policy.
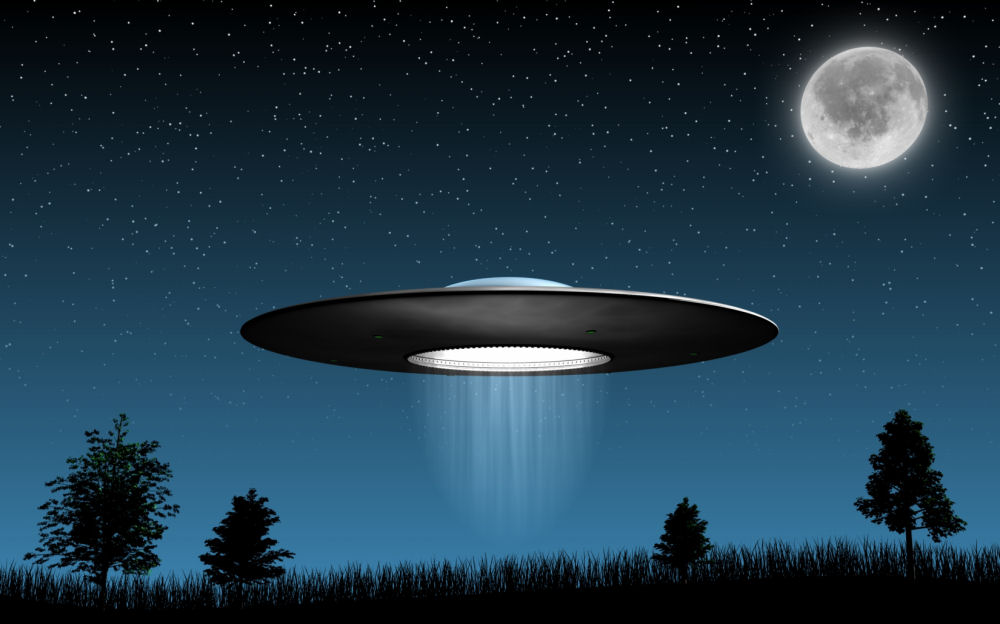
I want to note here that this image I'm posting in this thread looks icky because I had to resize it and set the jpg compression to 20%. It dorked the stars quite a bit but I think you can still get the concept of what was made.If you do a google search on "ufo", the original version of this image will show up pretty high on the list. I found this image a few days ago and I thought it would be an interesting image to reproduce in Carrara.
I want to make it clear that I am reproducing this image and I would very happily give credit to the original maker but I can't find who is the original artist. This image has proliferated itself a lot on the net and it's all over the place. Kudos to whomever made it in the first place as I find it to be a great image! If anybody knows the original artist, please post it here to give proper credit!
To make this image from scratch took me about 2.5 hours. Here's a brief explanation of how I did it.
Environment:
I put a bi-gradient in the background with the top set to 50% gray and the remaining three channels set to black. The horizon was set to 89 degrees (to the right). This provided a nice color to reflect in the upper dome of the UFO.
GI lighting was not used in this image to maintain the dark outlines of the grass and trees.
Starfield:
The starfield was made in a separate scene although I could have put the whole thing into one file if I needed.
The starfield was made by first rendering a sphere glowing white with an aura. This simple single glowing "star" was textured onto a plane using the rendered "star" image in the glow channel. The transparency was set to 100% and all light interactions were turned off in the master shader channel. Then, I did a surface replication on a sphere with 50,000 of these "stars", set the variation in size to 500%, scaled the source star to taste and rendered a single starfield image. This starfield was then put into the backdrop.
Atmosphere:
I put in a single plane with color gradients in the transparency and glow channels. The transparency is zero at the bottom and remains zero up to about 15% off the bottom edge. From there, it the transparency gradiates to fully transparent at the top. The glow is set to the blue/green color you see at the bottom to nothing at the top. There is no color, highlight, or any other feature to this plane.
This glowy/transparent plane was set behind everything with the central hotpoint directly aligned with the center of the scene (using the production frame as a guide). I then used the "point at" behavior on the plane to point at the camera rendering the image. I then used the universal manipulator to stretch the X and Y size of the plane to fit the production frame perfectly. This then provided a perfectly aligned "gel" which rendered the glowing atmosphere blocking out the stars and providing a nice horizon.
This could have also been done using a skydome but the plane solution was a little easier to design the gradients and set it up.
Moon:
The moon is a spere with a simple map of the moon in the color and glow channel. I mixed the glow with some additional white to punch it up a bit. The Aura was turned on for the halo around the moon. I then rotated it so that the correct side of the moon was facing the camera (not so perfect but good enough).
Grass:
I modeled two different blades of grass in the spline modeler. Each one had a unique bend and twist which I thought looked natural. I then took each blade and converted them to vertex objects and rotated them to be oriented upwards (the spline modeler had them oriented flat). This then gave the blades a natural orientation for replication.
A very simple curved surface was created in the spline modeler for the ground and then the blades were replicated using a surface replicator with variations in size and rotation applied. 7000 blades were replicated.
Trees:
Four trees were picked out of the stock trees which come with Carrara which I liked. They were put into the scene, placed, and scaled to represent the original image.
UFO:
The UFO consists of a single spline object for the main body. A primitive sphere squashed is used for the top dome with a glass shader I cooked up applied.
There are three very thin small rings (built in the spline modeler) installed into the bottom with 240 primitive cubes aligned in two rings (3 degrees apart) along the "exhaust port". The cubes were setup by first replicating six cubes with their hotpoints aligned to the center of the saucer, those six were grouped, the hot point set to the center again, then duplicated to create 1/4th of the ring, then regrouped again, hot point re-aligned again, and duplicated three more times rotating 90 degrees to complete the ring (took three minutes to get 120 blocks all setup).
For the shader of the saucer, the color and higlight are basically two different shades of gray mixed with turbulence.
I built a simple hollow tube and used the saucer shader on it, then put a primitive cylinder inside with a green glow. These were grouped. I put one on the bottom where I liked it, grouped it again to reset the orientation, set the hotpoint to the center of the saucer, and replicated five more at 60 degrees apart to get the underside green lights.
UFO Lighting:
One light was put into the exhaust port with a short range. A second spotlight was placed underneath the saucer to light the underside (necessary with no GI applied).
UFO Exhaust:
The exhaust is a strange and complicated object. First, a primitive cylinder was put into the scene, it was converted to a vertex model, and everything but one end was deleted (I generated a single circular plane). Then, this plane was texture 100% transparent, no highligh and only the glow channel was used.
A mixer was applied which mixed black with white using an elevation mixer. This created the top half having no glow but the bottom half having a glow. The bottom half was then changed. It is a mixture of a value of 50% mixed with a value of 0% using Turbulence stretched 1000% in the Y direction.
Then, this whole thing was again mixed with black using Veloute's 2D radial gradient for a falloff to zero at the edge.
This plane was then squashed in the X direction and placed in the exhaust port facing the camera. The exhaust was probably the messiest part of the whole thing!
The final image is one single render. Came out nice!
-Kix