Renderosity Forums / Poser - OFFICIAL
Welcome to the Poser - OFFICIAL Forum
Forum Moderators: RedPhantom Forum Coordinators: Anim8dtoon
Poser - OFFICIAL F.A.Q (Last Updated: 2026 May 16 5:18 am)

Subject: Question for the Render Guru's here


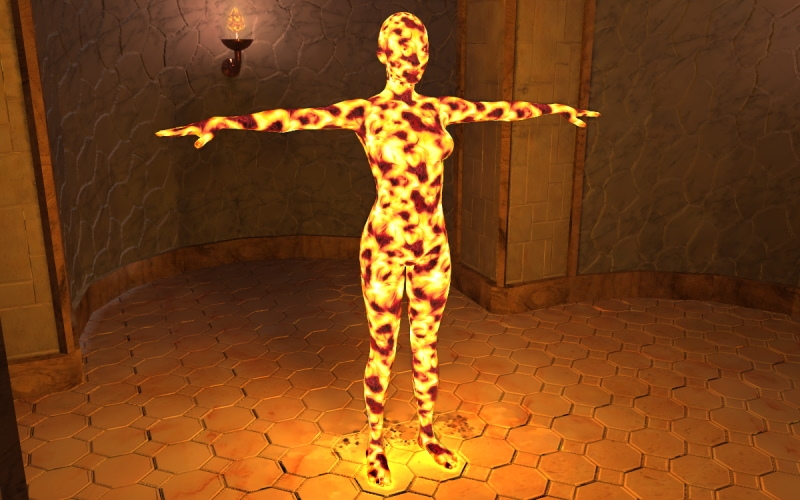
BB's flames work well for typical flame-shaped meshes, roughly teardrop or ovoid, but not so well for tall cylinders such as human torsos and legs.Transparency for flames on Sydney herself will pose some challenges - her inner mouth, tongue, teeth, and eye sockets will show through. Making her refractive solves that, but using refraction makes any part of the emitter behind a refractive surface show. I'm trying to figure out to juggle these goals.
It will save you considerable grief in matching UV seams if you make Blaze a choker necklace belt which will cover SydneyG2's body/neck UV seam.
If we end up making her refractive, you will see the flames of her clothes but she herself will be ghosted anyplace which is clothed. That would solve the neck seam issue.
This is a test using a vector-generated animated flame. Meh. It has some good points, and some bad points. The refraction ain't gettin' it - I can't see doodle behind/through her. if you're doing a comic strip, the animation would not be needed, and we could use a few still textures if they work better.
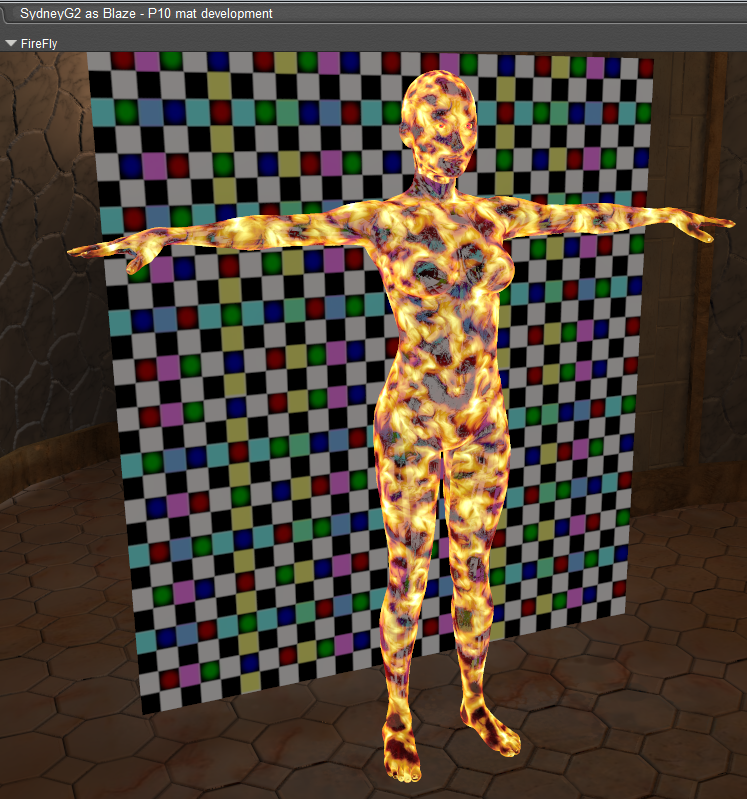
In another test, I had a checkered billboard behind her so that I could tell if she was see-through in refractive mode. I could see the billboard through the dark parts of the flames, without her inner parts showing, but the billboard's pattern was distorted. I had her index of refraction set to 1, which shouldn't distort, so I haven't figured that out yet.
Poser 12, Poser 13, Poser 14, in feet.
OSes: Win7Prox64, Win7Ultx64, Win11
Silo Pro 2.5.6 64bit, Silo 2025.1, Vue Infinite 2014.7, Genetica 4.0 Studio, UV Mapper Pro, UV Layout Pro, PhotoImpact X3, GIF Animator 5
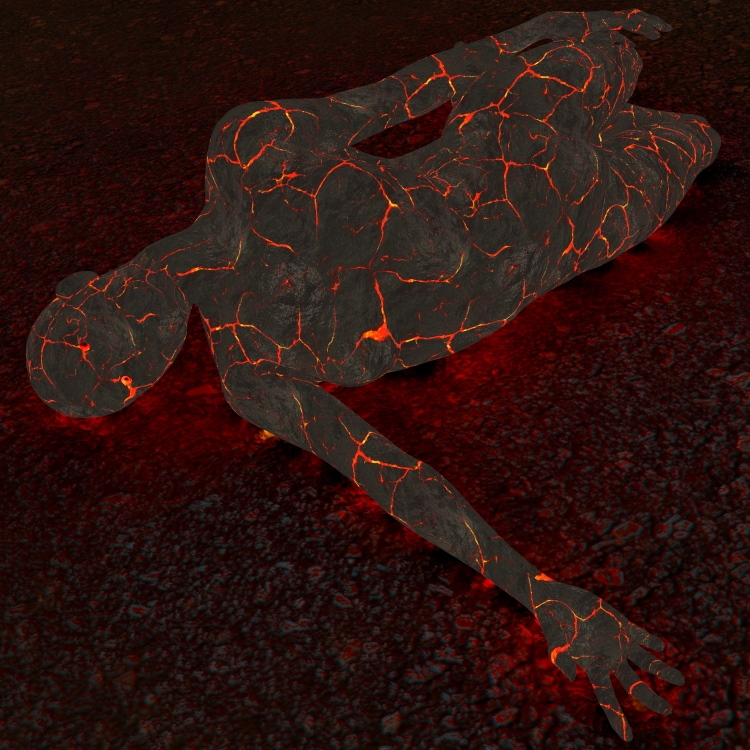
That looks loads better than what I came up with. Remember I said she was going to look like cooling magma (lava) when she was in fire form. That's really close. I don't really need her to be refractive. I think I can get away with not being able to see through her. Show me that shader and I'll tweak it to what I want.
You are doing some amazing things for me, cousin. And I appreciate more than you know.
If I had a nickle for ever time a woman told me to get lost, I could buy Manhattan.
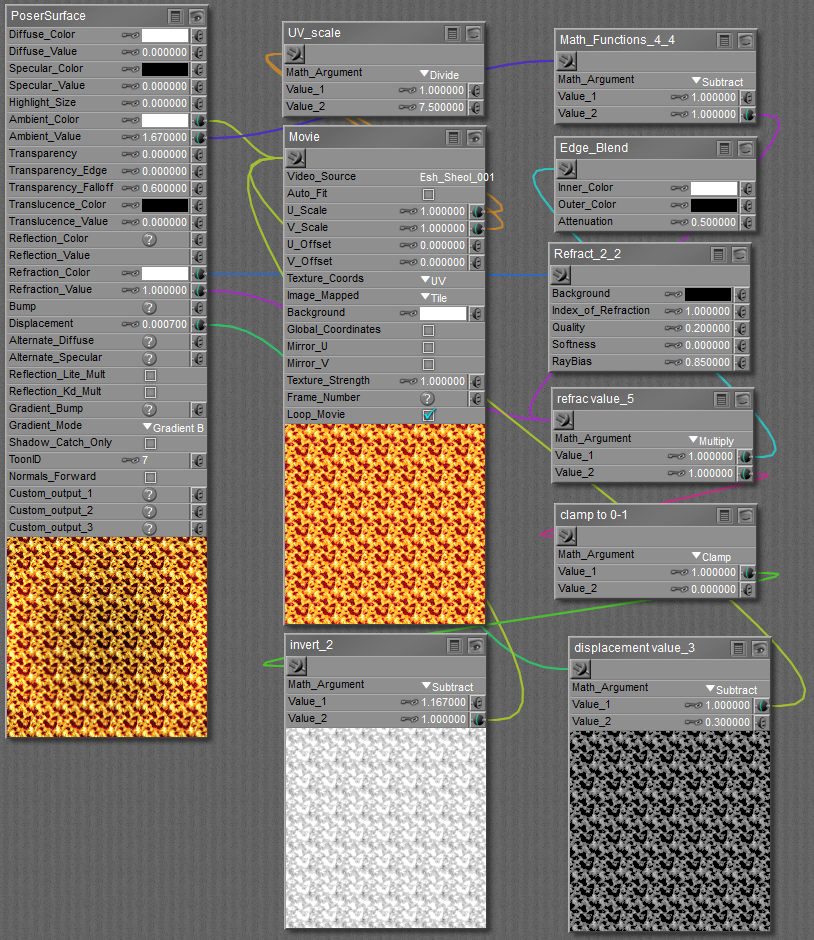
I had a bunch of nodes in there for temporary use, allowing for quick alterations. I removed those to simplify it. This is the body material; it tiles 7.5 times, but all of the head parts would tile at more like 3.
With the billboard behind her, you can see through her in refractive mode, without the inner parts being visible, unless she has her mouth open, in which case you'd see them if looking into her mouth:
It would probably be easier if I made/packaged an mc6 material file, if you can download one.
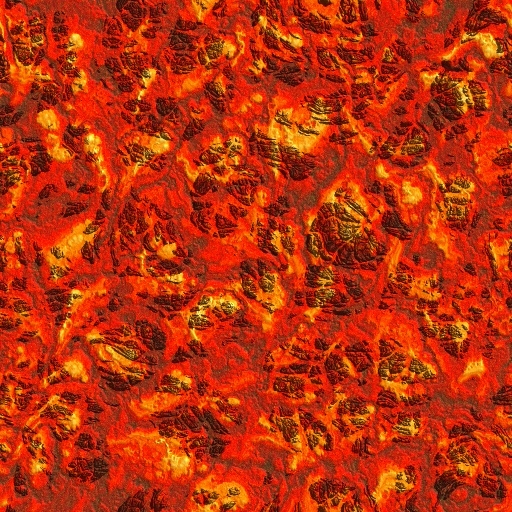
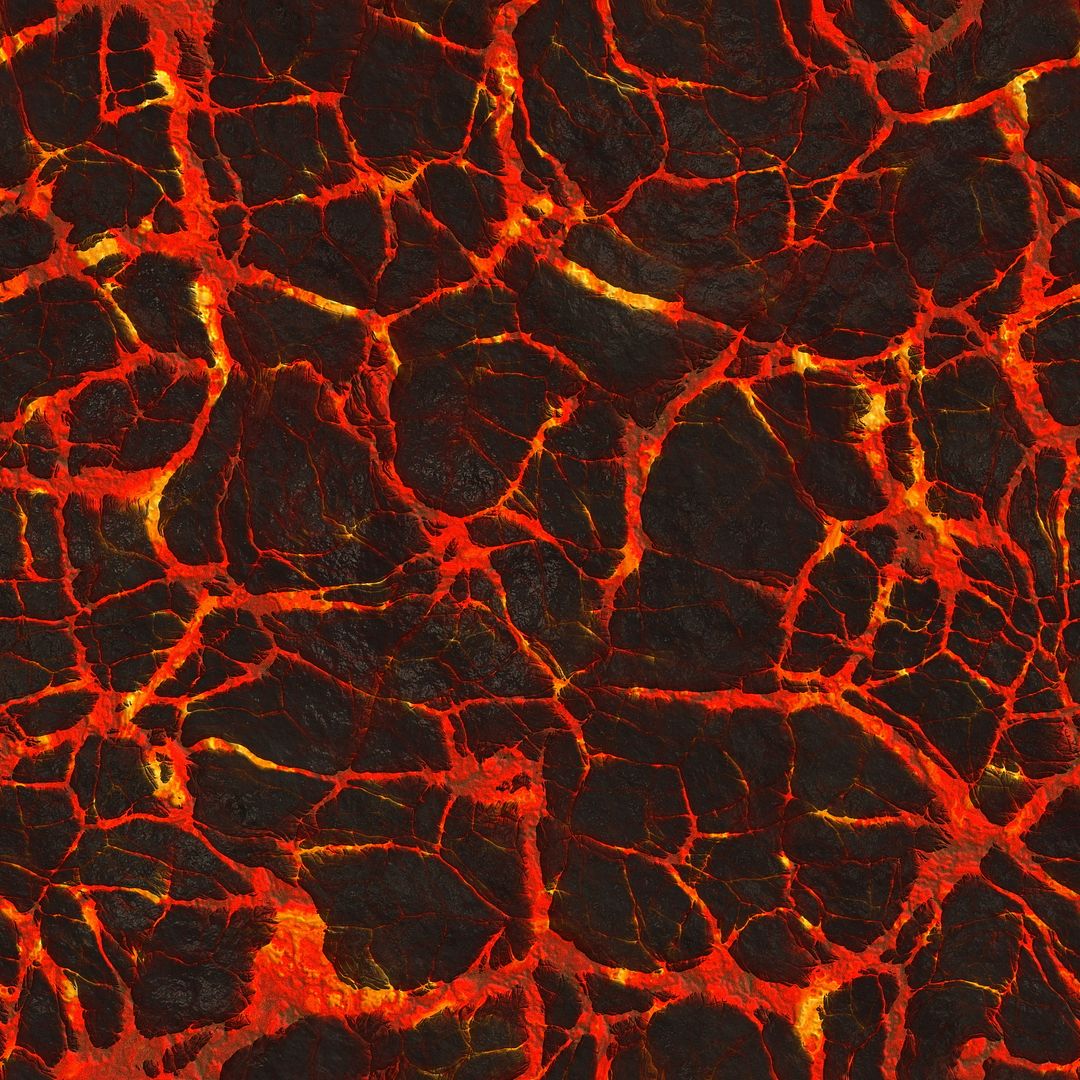
If she is supposed to look like cooling magma, she could be opaque, which immediately solve the emitter problem. I don't think I have a magma texture, but I think I can generate some asymmetrical seamless tiles with Genetica. You'd want more than one so that the cracks aren't the same every time she is in that mode.
edit, update: Hah! I'm pretty sure I can not only make a cracked/cooling lava asymmetrical seamless tile, but I can animate the transformation from full molten lava through stages of cooling/cracked stony surface, on to human skin. :D Even if you're doing a comic (i.e., still images), this would be useful because you could show Blaze in any stage of transformation.
Poser 12, Poser 13, Poser 14, in feet.
OSes: Win7Prox64, Win7Ultx64, Win11
Silo Pro 2.5.6 64bit, Silo 2025.1, Vue Infinite 2014.7, Genetica 4.0 Studio, UV Mapper Pro, UV Layout Pro, PhotoImpact X3, GIF Animator 5
Quickie proof-of-concept demo - I'll add a segue from the solidified lava into human skin.
Poser 12, Poser 13, Poser 14, in feet.
OSes: Win7Prox64, Win7Ultx64, Win11
Silo Pro 2.5.6 64bit, Silo 2025.1, Vue Infinite 2014.7, Genetica 4.0 Studio, UV Mapper Pro, UV Layout Pro, PhotoImpact X3, GIF Animator 5
Asymmetrical seamless tile for you to experiment with
Poser 12, Poser 13, Poser 14, in feet.
OSes: Win7Prox64, Win7Ultx64, Win11
Silo Pro 2.5.6 64bit, Silo 2025.1, Vue Infinite 2014.7, Genetica 4.0 Studio, UV Mapper Pro, UV Layout Pro, PhotoImpact X3, GIF Animator 5
Can you save a picture? I Can post a single frame of the animated texture. In my last post that's a link to a single frame of the lava texture.

Poser 12, Poser 13, Poser 14, in feet.
OSes: Win7Prox64, Win7Ultx64, Win11
Silo Pro 2.5.6 64bit, Silo 2025.1, Vue Infinite 2014.7, Genetica 4.0 Studio, UV Mapper Pro, UV Layout Pro, PhotoImpact X3, GIF Animator 5
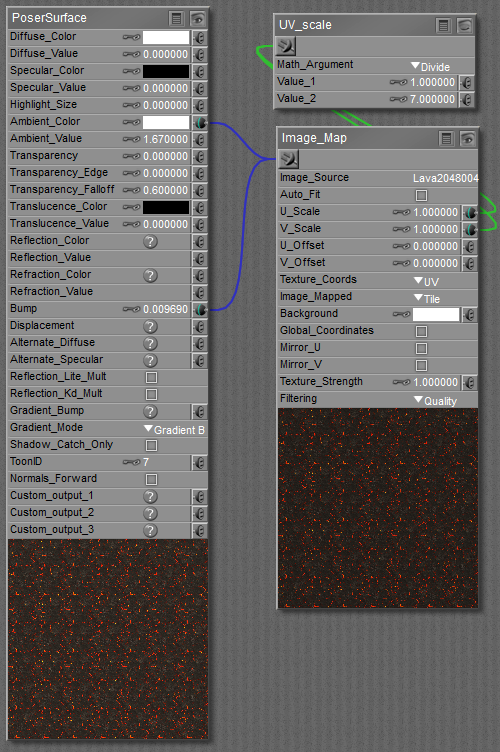
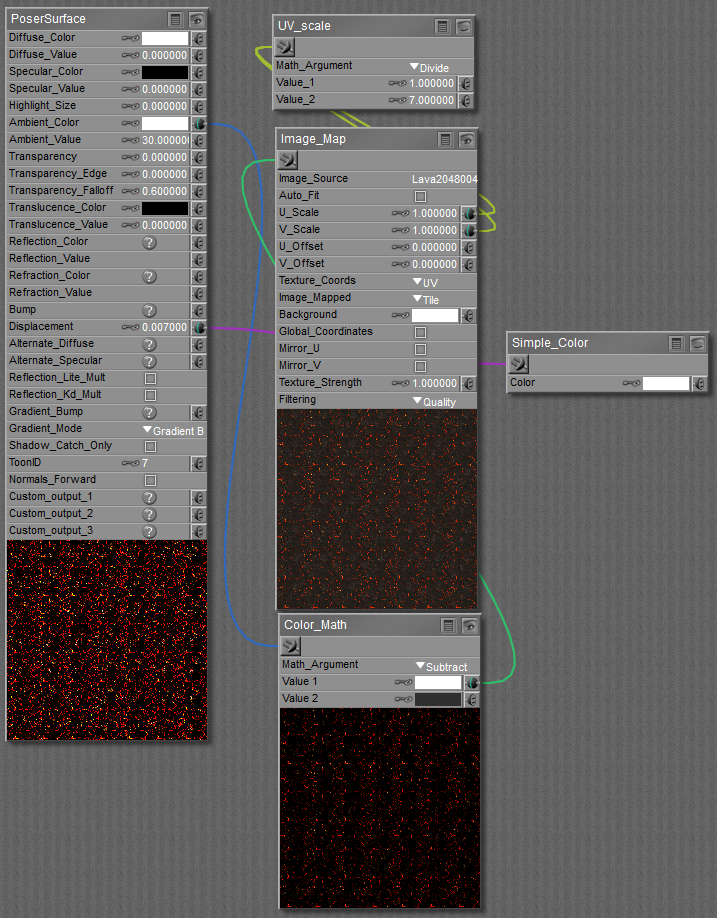
Cooling lava material; tile 7 times for body/nails, and tile 3 times for head/lips and inner mouth parts. Conform a second SydneyG2, make her invisible in camera, boost her ambient and give her a smidge of displacement so that she envelopes the visible Sydney. PS: I use Poser native units; adjust the amount of displacement if you use some other measure unit in Poser.
 .
.
Poser 12, Poser 13, Poser 14, in feet.
OSes: Win7Prox64, Win7Ultx64, Win11
Silo Pro 2.5.6 64bit, Silo 2025.1, Vue Infinite 2014.7, Genetica 4.0 Studio, UV Mapper Pro, UV Layout Pro, PhotoImpact X3, GIF Animator 5
That's really outstanding Seachnasaigh.
W10 Pro, HP Envy X360 Laptop, Intel Core i7-10510U, NVIDIA GeForce MX250, Intel UHD, 16 GB DDR4-2400 SDRAM, 1 TB PCIe NVMe M.2 SSD
Mudbox 2022, Adobe PS CC, Poser Pro 11.3, Blender 2.9, Wings3D 2.2.5
My Freestuff and Gallery at ShareCG
I can save the pictures. But I will have to save them to my govt pc. And we are not allowed to plug usb devices into these machines, so I will have to see if I can get a CD-RW and transfer them to my laptop.
Yes, it is really outstanding work. That cooling magma render is EXACTLY what I am looking for!
If I had a nickle for ever time a woman told me to get lost, I could buy Manhattan.
seachnasaigh posted at 8:40PM Wed, 14 October 2015 - #4233670
Can you save a picture? I Can post a single frame of the animated texture. In my last post that's a link to a single frame of the lava texture.
Is this the image you are using for the cooling magma?
If I had a nickle for ever time a woman told me to get lost, I could buy Manhattan.

seachnasaigh posted at 9:30PM Wed, 14 October 2015 - #4233671
Testing the "cooling lava" texture...

I need this texture! Is there anyway I can get my hands on it too?
Thank you, EldritchCellar.
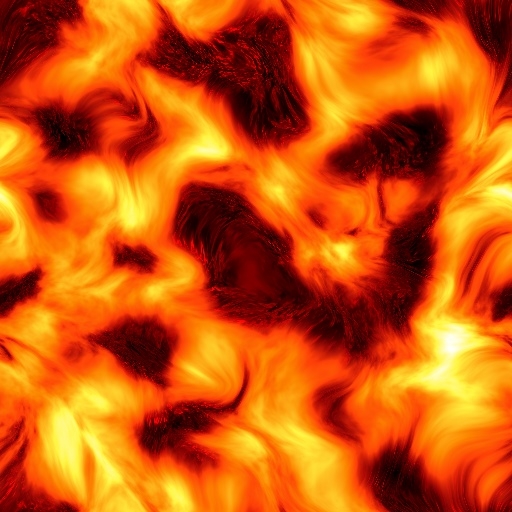
Rokket, that image you reposted is the swirly fire texture (well, one frame of an animated texture), not the lava texture.
Quietrob, yes.
I can't post big images, and I can't post GIFs. I have to post links to them. So, below, you will see bold italic names; these are clickable links.
small demo of the texture transforming: cooling lava demo
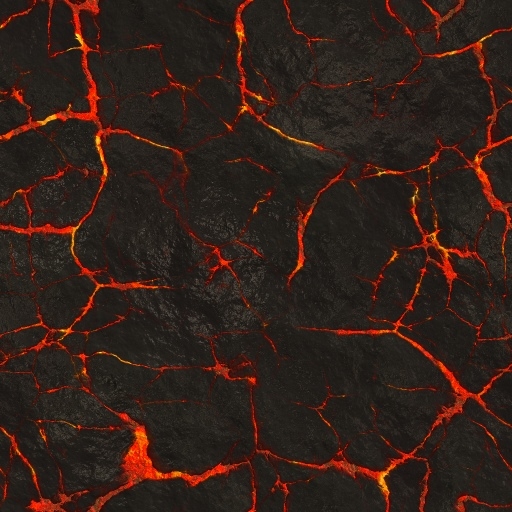
cracked lava asymmetrical seamless tile (one frame; you'll need to look for the magnifying glass icon to expand the image, perhaps twice; there is another button to download it): cracked lava tile
If you can't do that (maybe you're not seeing links in your browser), here is a smaller tile of post-able size, frame 20 of the cracked lava sequence:
These will suffice for material setup testing. The way that I actually use them in final setups is that I use Genetica to generate a sequence of asymmetrical seamless tiles (I can make them any size, and change how many frames from start to finish). I can save the result as an AVI, a matrix, a GIF, or a numbered sequence of JPGs or PNGs. I choose sequentially numbered JPGs.
I put the set of sequentially numbered JPGs into a folder, maybe "lava set one", and put that folder into my runtimetexturesseachnasaigh folder. Nothing else goes into that "lava set one" folder.
Now it's ready to use. In the material room, I create a movie node instead of an image map node. In P9 (SR3.2) and later, you can load the first JPG of a numbered sequence into the movie node. As the Poser scene progresses through timeline frames, the movie node will read the JPGs in sequence.
So, In the lava material screengrabs, I would replace the image map node with a movie node to do an animation.
Anyway, both the swirly fire and the cracked lava have 30-frame folders, so I guess you'll have to wait until port to download the full versions.
Poser 12, Poser 13, Poser 14, in feet.
OSes: Win7Prox64, Win7Ultx64, Win11
Silo Pro 2.5.6 64bit, Silo 2025.1, Vue Infinite 2014.7, Genetica 4.0 Studio, UV Mapper Pro, UV Layout Pro, PhotoImpact X3, GIF Animator 5
Yeah. Now I CAN'T wait to get in port. This is going to take my story to a whole new level. Originally, I was going to have to do a lot of this in post, which wouldn't have turned out anywhere near as good as what you did.
Thank you again, so much!
I just found out we will be out here a bit longer, though....
If I had a nickle for ever time a woman told me to get lost, I could buy Manhattan.
Thanks! I was able to download both textures. I'll put them to use as soon as I can figure out what you're talking about. I mean I just want the magma burn look for a single frame. It sounds as if you are running a simulation while I am using a single frame.
I wonder if it's possible to dissect the GIF and save just one frame of it and then apply the texture to the skin.
Rob,
Just set it up like you are doing an animation. Set the figure to do a pose at frame 15 or 30, then render the movie out as image files. You can then chose which one looks the best for what you want.
Or you can put the figure in the pose at frame 1. Setup the materials the way he showed you above. The materials will shift through the animation and you can chose the best frame that way.
If I had a nickle for ever time a woman told me to get lost, I could buy Manhattan.
edit: cross-posted with Rokket, and I'll add that by using the frame number node and a math functions node, you can dial in whatever magma JPG you want in any frame of the Poser scene. I'll set that material up for you.
quietrob posted at 4:50AM Thu, 15 October 2015 - #4233767
Thanks! I was able to download both textures. I'll put them to use as soon as I can figure out what you're talking about. I mean I just want the magma burn look for a single frame. It sounds as if you are running a simulation while I am using a single frame.
I wonder if it's possible to dissect the GIF and save just one frame of it and then apply the texture to the skin.
No, Poser isn't running a simulation, the movie node simply reads each JPG in the folder one by one. For stills, just copy the material shown for the cracked lava, and browse for whichever JPG best matches your desired stage of molten/solidified lava. For animated textures, you would replace the image map node with a movie node. In the post with two material screengrabs for lava, the upper one is for the visible doll, and the lower screengrab is for a second invisible "emitter" doll. The material screengrab for the swirly fire material near the top of the page uses the movie node, with the first JPG of a numbered sequence loaded (Esh_Sheol_001)
Yes, it would be possible to load the GIF into a GIF/Flash/video editor and save out the individual frames. But being small and with GIF color limitations, it wouldn't be very good. The GIF was only intended to demonstrate that the texture is animatable. I'll be packing up a zip with the sequential JPGs in folders. I should also make material presets for them, including one that smoothly segues from fully molten to fully skin.
more molten 512 pixel frame:

Poser 12, Poser 13, Poser 14, in feet.
OSes: Win7Prox64, Win7Ultx64, Win11
Silo Pro 2.5.6 64bit, Silo 2025.1, Vue Infinite 2014.7, Genetica 4.0 Studio, UV Mapper Pro, UV Layout Pro, PhotoImpact X3, GIF Animator 5
seachnasaigh posted at 4:15PM Thu, 15 October 2015 - #4233770
edit: cross-posted with Rokket, and I'll add that by using the frame number node and a math functions node, you can dial in whatever magma JPG you want in any frame of the Poser scene. I'll set that material up for you.
quietrob posted at 4:50AM Thu, 15 October 2015 - #4233767
Thanks! I was able to download both textures. I'll put them to use as soon as I can figure out what you're talking about. I mean I just want the magma burn look for a single frame. It sounds as if you are running a simulation while I am using a single frame.
I wonder if it's possible to dissect the GIF and save just one frame of it and then apply the texture to the skin.
No, Poser isn't running a simulation, the movie node simply reads each JPG in the folder one by one. For stills, just copy the material shown for the cracked lava, and browse for whichever JPG best matches your desired stage of molten/solidified lava. For animated textures, you would replace the image map node with a movie node. In the post with two material screengrabs for lava, the upper one is for the visible doll, and the lower screengrab is for a second invisible "emitter" doll. The material screengrab for the swirly fire material near the top of the page uses the movie node, with the first JPG of a numbered sequence loaded (Esh_Sheol_001)
Yes, it would be possible to load the GIF into a GIF/Flash/video editor and save out the individual frames. But being small and with GIF color limitations, it wouldn't be very good. The GIF was only intended to demonstrate that the texture is animatable. I'll be packing up a zip with the sequential JPGs in folders. I should also make material presets for them, including one that smoothly segues from fully molten to fully skin.
more molten 512 pixel frame:
Thank you! I'm beginning to understand just what you are speaking of now. I'm not trying for animation, Just a body burned into a magma like form i.e. "the cooling lava" texture. Where can I find out what edge blend (blending the edges of the textures so there is no seam?) means and the other terms as well? Lord Help me if Poser actually came with a detailed manual.
W10 Pro, HP Envy X360 Laptop, Intel Core i7-10510U, NVIDIA GeForce MX250, Intel UHD, 16 GB DDR4-2400 SDRAM, 1 TB PCIe NVMe M.2 SSD
Mudbox 2022, Adobe PS CC, Poser Pro 11.3, Blender 2.9, Wings3D 2.2.5
My Freestuff and Gallery at ShareCG
Rob,
The purpose of the animation is to allow you to pick the frame you want.
You don't have to run an animation. You could set up the materials like seachnasaigh posted and just search the folder for the image you want that is closest to what you are trying to achieve. It might take trial and error, where you could just go frame by frame with the animation and it's already set up. No going back and forth between the pose room and material room.
If I had a nickle for ever time a woman told me to get lost, I could buy Manhattan.
rokket posted at 7:58AM Fri, 16 October 2015 - #4233877
The purpose of the animation is to allow you to pick the frame you want.
Exactly. You can just as well browse for whichever lava tile shows your desired stage of melt. I used the movie node because I wanted to be able to render an animation showing the complete transformation.
@Eldritch: Thank you for the edge blend tut link.
@Rob: The edge_blend node does not blend in UV seams; indeed, Rokket might want to consider making Blaze a choker collar for her outfit to hide that UV seam at the neck, or be prepared to do a bit -not much- of postwork touchup.
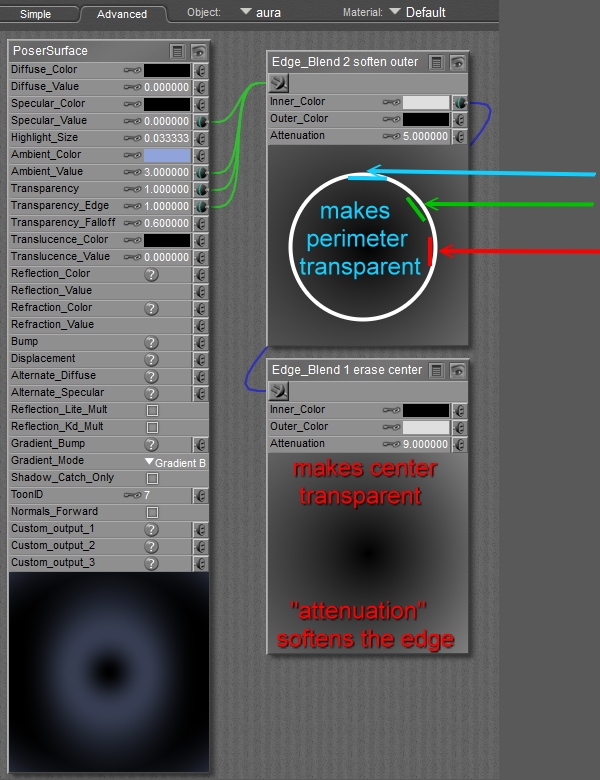
For this project, I intended to use two edge_blend nodes daisy-chained together to make a faintly visible glow aura around Blaze. It uses a mesh which envelopes Blaze, like an inflated body suit. The first edge_blend node will "erase" (make transparent) those parts of the aura mesh which are orthogonal to the camera view (see red ray in my diagram). The second edge_blend fades away the outer perimeter where the mesh is tangential to the camera view (see light blue ray). All that remains visible are the "in between" parts, with the strongest visibility at 45' surface normal relative to the camera view (see green ray).
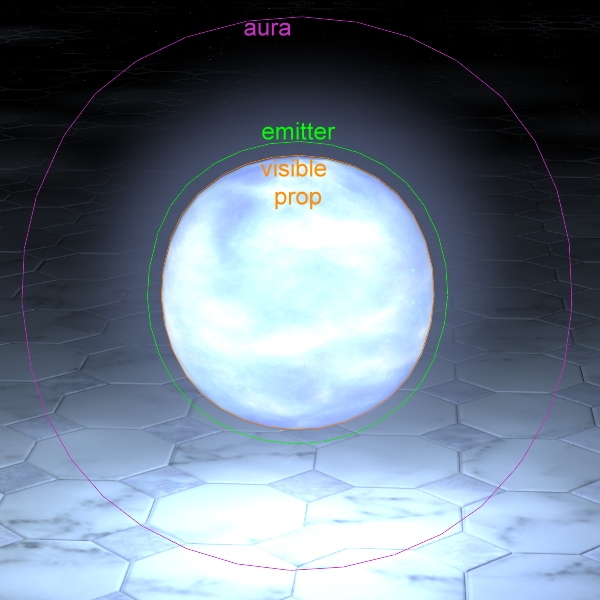
The elegant beauty to this method is that if Rokket changes the camera view, the aura adapts itself automatically! :D
Because the outer edge is completely transparent, you don't perceive an edge of the aura mesh. However, this also means that you must "shell" the aura outward from the doll more than you might have thought. In this demo render, with the mesh outlines superimposed, the aura mesh sphere actually touches the floor. Note that you clearly see the inner visible ball (because edge_blend 1 cleared the center), and there is no hard outer edge to the aura, just a soft fading away (thanks to the second edge_blend). Note that the black and light grey color blocks are reversed from edge_blend 1 to edge_blend 2. One kills the inner, two kills the outer. You adjust the visibility by darkening/lightening the light grey blocks. Adjust falloff by the attenuation - higher number means more edge softening.
Since Rokket is planning a comic, and so will only need stills, he could just render Blaze and her unseen emitter, then do another render of only Blaze with no background. In PhotoShop, you overlay the Blaze-only object onto the full render, and give the Blaze-only object a fiery-colored "shadow".
Poser 12, Poser 13, Poser 14, in feet.
OSes: Win7Prox64, Win7Ultx64, Win11
Silo Pro 2.5.6 64bit, Silo 2025.1, Vue Infinite 2014.7, Genetica 4.0 Studio, UV Mapper Pro, UV Layout Pro, PhotoImpact X3, GIF Animator 5

EldritchCellar posted at 9:04PM Fri, 16 October 2015 - #4233871
That tutorial was simple yet amazing. Done properly I can see many uses for it, the least not being a toon mode. Perfect! Now I can see what you guys are talking about. The best thread just got better. Thanks Eldritch!
After work today I will be taking my laptop ashore. They put a WIFI router on the ship for us, but I couldn't even check my email with it. It's not very stable. I believe I complained about it in this thread about 200 pages back...
If I had a nickle for ever time a woman told me to get lost, I could buy Manhattan.
That render wasn't done in Poser that's for sure... mad post if so. I won't even venture a guess.
W10 Pro, HP Envy X360 Laptop, Intel Core i7-10510U, NVIDIA GeForce MX250, Intel UHD, 16 GB DDR4-2400 SDRAM, 1 TB PCIe NVMe M.2 SSD
Mudbox 2022, Adobe PS CC, Poser Pro 11.3, Blender 2.9, Wings3D 2.2.5
My Freestuff and Gallery at ShareCG
Ok, I'll venture. Vue? Carrara?
W10 Pro, HP Envy X360 Laptop, Intel Core i7-10510U, NVIDIA GeForce MX250, Intel UHD, 16 GB DDR4-2400 SDRAM, 1 TB PCIe NVMe M.2 SSD
Mudbox 2022, Adobe PS CC, Poser Pro 11.3, Blender 2.9, Wings3D 2.2.5
My Freestuff and Gallery at ShareCG
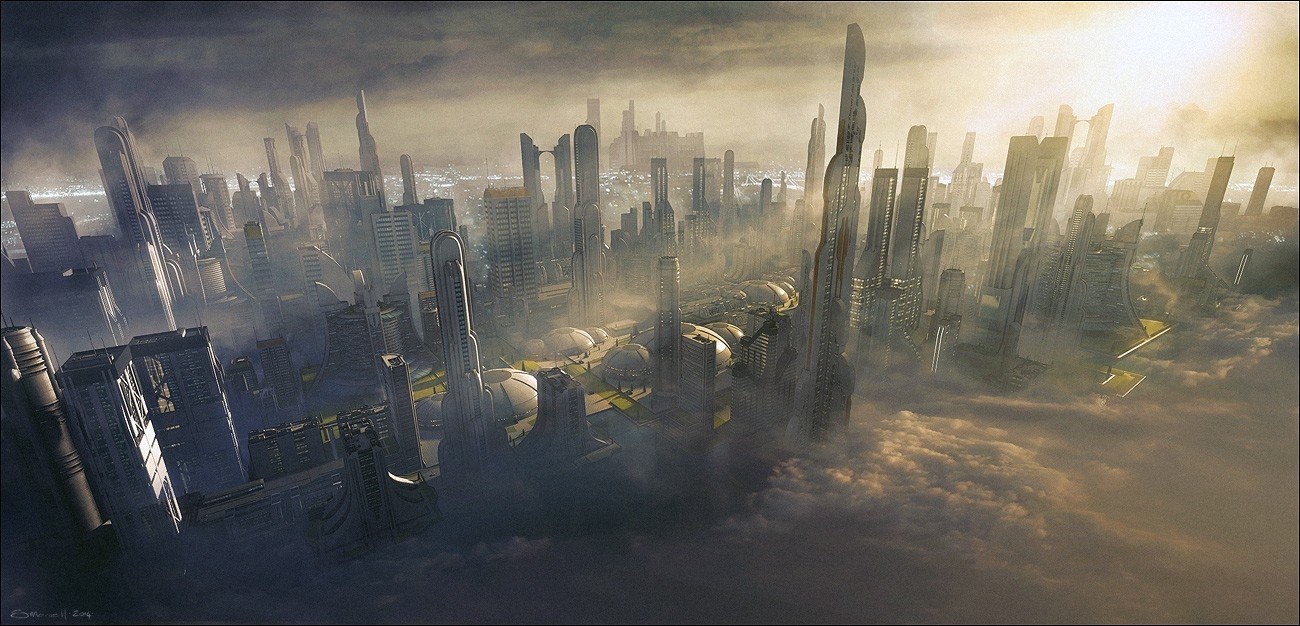
I think you just have to adjust a few things to do this. If you look in the sticky covering materials, there is a thread in there about making fog. BB shows how to do something like in that render. Close up or a grand scale, the materials setup would be the same, you just have to make adjustments for the size. I will experiment with this tonight and see if there is a way to post my results using a CD-RW...
If I had a nickle for ever time a woman told me to get lost, I could buy Manhattan.
As Eldritch alluded, Poser is not an environmental studio, so fog and such takes a bit of doing. And, as Rokket suggested, fog can be done in Poser, but it takes some adjusting of materials and several test renders to dial it in. Too little and you see no fog; just a bit too much and you get whiteout. An it will indeed work at any scale.
There are two modes of atmo fog; depth cued -which is relatively resource light- and volume, which will require lots of CPU cycles to finish. Here is a material screen grab of volumetric fog by Bagginsbill. Bear in mind that he has his Poser set to inches; if yours is set to Poser native units, you'll need to adjust, notably math_functions_2.
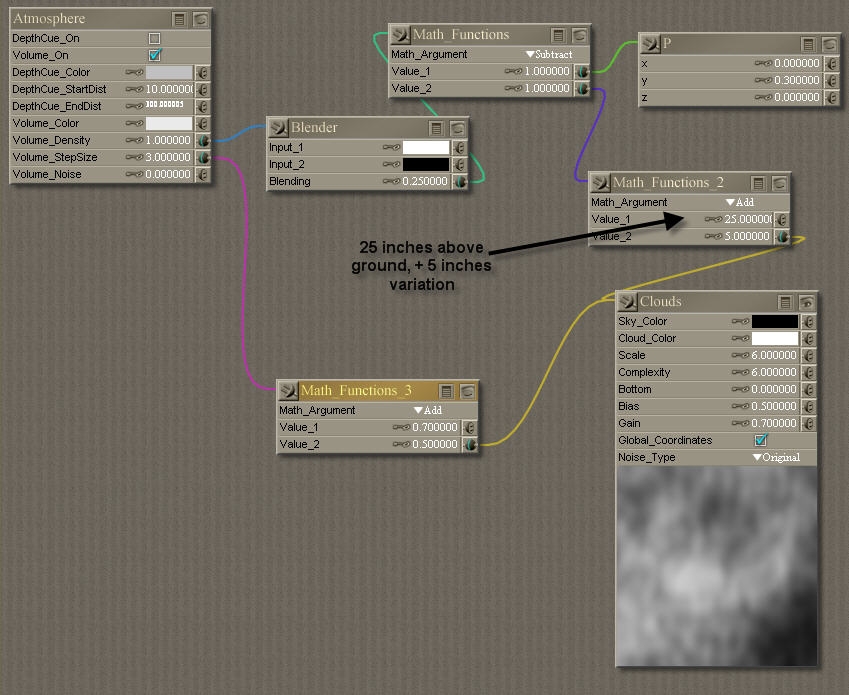
Other options are to use a horizontal fog plane fitted to the city -perhaps with a bowled center to clear the interior- with turbulence displacement and edge_blend tube props to get Godrays. You'd need to avoid awkward geometry intersections, but this would render much quicker.
For an urbanscape that size, I would probably scale the city down as Rokket suggested. You can do it full scale, however. I'm working on a scene now in which I did the opposite; I scaled the ship up to fit a small character represented by a regular Poser-scaled doll.
Poser 12, Poser 13, Poser 14, in feet.
OSes: Win7Prox64, Win7Ultx64, Win11
Silo Pro 2.5.6 64bit, Silo 2025.1, Vue Infinite 2014.7, Genetica 4.0 Studio, UV Mapper Pro, UV Layout Pro, PhotoImpact X3, GIF Animator 5

" Bear in mind that he has his Poser set to inches; if yours is set to Poser native units, you'll need to adjust, notably math_functions_2. "
Nope. Math nodes are not affected by units. The P node being compared to is driving the units. The P node's natural internal values are 1/10 of an inch, always and forever.
To change the effective scale you would change the multiplier in the P node's Y value. (Here I used .1 * 3 -- .1 because I don't want to count tenths of an inch - I want whole inches, so I divide by 10, and then times 3 because the three parts of a vector are averaged (added and divide by 3) when you plug into a numeric input.
Renderosity forum reply notifications are wonky. If I read a follow-up in a thread, but I don't myself reply, then notifications no longer happen AT ALL on that thread. So if I seem to be ignoring a question, that's why. (Updated September 23, 2019)
I would consider downscaling the entire city however, that would take a LOT of time. Still, it might make things easier as I try it out. I'll try it with the full scale version of the city and see how it works. I will probably prefer the lower CPU method. I have a very weak computer and everything takes longer. I don't mind the math but my computer does mind being taxed to anything tough.
Of course there is the magic render method where I set everything up and hit the sack. 4 hours later it might be close to getting done.
Thanks for clearing that up, BB. P node's internal unit of measurement in 1/10".
Rob, try using the hierarchy panel to parent all the pieces to one prop, then scale/move that master prop.
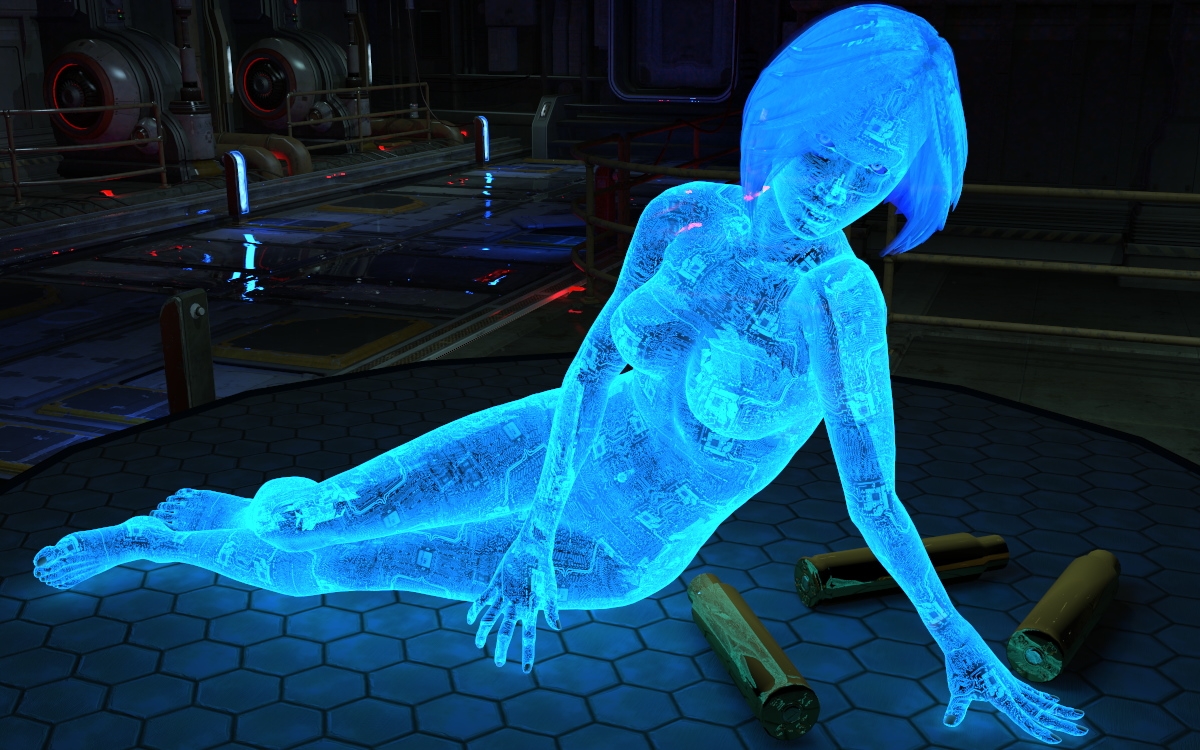
This SydneyG2 at normal scale; I scaled up the spent casings and the entire ARC ship section. I also added unseen IDL emitters to the ARC's lit parts. This was done in Pro2014GD but would work in P9 and up. I had an emitter for Cortana but didn't use it; she glows fairly well without it. Ooops. The hair - I added edge_blend and reduced transmap, but I should have multiplied instead. That error caused the solid bottom edge at the back of her hair. The refraction also needs some adjustment.
. "Chief, can you hear me?" .
Poser 12, Poser 13, Poser 14, in feet.
OSes: Win7Prox64, Win7Ultx64, Win11
Silo Pro 2.5.6 64bit, Silo 2025.1, Vue Infinite 2014.7, Genetica 4.0 Studio, UV Mapper Pro, UV Layout Pro, PhotoImpact X3, GIF Animator 5
Privacy Notice
This site uses cookies to deliver the best experience. Our own cookies make user accounts and other features possible. Third-party cookies are used to display relevant ads and to analyze how Renderosity is used. By using our site, you acknowledge that you have read and understood our Terms of Service, including our Cookie Policy and our Privacy Policy.
I am going to try the shader now. I have BB's fire shader, and I tried it on Sydney just to see what it would do. To make her fire it didn't work. Too much transparency. But I am not giving up.
If I had a nickle for ever time a woman told me to get lost, I could buy Manhattan.