Welcome to the Poser - OFFICIAL Forum
Forum Coordinators: RedPhantom
Poser - OFFICIAL F.A.Q (Last Updated: 2024 Jun 01 3:00 am)

JASA Indie for Genesis 8 and 8.1 Female

Photo Backgrounds: Melting Spring

Stylized Circus Tent - Extended License
Subject: Suggestions/help for comic/illustration workflow.


I won't tell you to use my method, but it is an alternative for you. I use Poser to create the scenes and render them, then I use a program called Comic Life that you can find at Plasq.com. It's relatively cheap and comes with balloons and diffent fonts and graphics you can use. You can check out a sample of my work at http://clark.freehostia.com/
IMHO this is something the animation palette is great for (besides animation)
Load some assets at frame 0 (and set all keyframes to constant/grey), then skip a few frames (e.g. go to frame 5) and start setting up your scene/characters/poses/lighting for your first panel. As soon as you get some part the way you want it, you can move to the next frame and continue - that way you can always go back. For example you set up the scene one way, then go to a new frame and change the lighting and camera angle to see if it looks better. Repeat ad nauseam - each frame adds a negligeable amount to the overal file size
Once you've got panel 1 the way you like it, skip a few more frames and start on panel 2. A lot of times all that changes is that you load in some different poses for your characters and maybe change the camera. And so on.
You do have to keep track of keyframes (the blocks in the animation palette indicating you changed a parameter). They can be very useful but they can also be a pain.
Useful: you can reposition props, or change a characters appearance in panel 1 and that change propagates through all subsequent frames (provided there are no subsquent keyframes on those parameters).
Pain: you have to keep an eye on those keyframes, they tend to get generated when you're not expecting them, and any linear/orange or spline/green ones (while great for animation) can cause wierd things to happen with this kind of "sequential art" workflow.
Hope that helps,
ian
My own workflow is extremely simple:
Set the scene. That is to say, load up the room, furniture, props, etc and do the basic lighting for the scene.
Add the characters. I have them saved out in my Figures folder.
Clothe the figures. If conforming, use the morph brush to tighten the fit and get rid of bumpy shoulders.
Load base poses. Tweak to get what I really want. If Dynamic clothes, do the Clothroom magic at this point.
SAVE THE SCENE. Each frame that I render gets saved to a PZ3 with the project name and frame number in the title.
Render. - I use high quality for me own comic renders. I do not care for the "look" of the "comic render", so I use good IDL lighting and high render quality. My renders usually take from 10 to 20 minutes. Occasionally more if there is something "busy" in the scene.
Export - I take the image out and do whatever modifications (if any) I feel needed in GIMP2.
Save to the Comic Life Project folder. Yes, I'm with EClark... Comic Life is THE way to lay a comic out.
Hint - I go for a "Graphic Novel" approach, so most of my renders are full page... one scene per page. However, if you are going to mount 4 or 6 images on a single page, there is no need to render them at 1600x900. 640x480 or so works very well.
Load the image into the project. Drop the bubbles in. Type the conversation.
Repeat.
My $.02
Comic Life seems to be something that would make my life 100% easier, though they seem to have a CL3 out for the mac but not for the PC.
All of this is a lot to take in and I'm not the most organized person, so I may stick to ianr's method of keeping it all in one file with frames. My HD space is also limited and that might be a better way of keeping my drives from getting full too fast.
basic, do you know of a filter for GIMP that mimics comic book style art? I don't use GIMP but maybe there's one that's similar that I can get for Photoshop, I'm trying to go for the comic illustration aesthetic and if the one in Poser is no good, I'd prefer to do it in post process.

Quote - Comic Life seems to be something that would make my life 100% easier, though they seem to have a CL3 out for the mac but not for the PC.
All of this is a lot to take in and I'm not the most organized person, so I may stick to ianr's method of keeping it all in one file with frames. My HD space is also limited and that might be a better way of keeping my drives from getting full too fast.
basic, do you know of a filter for GIMP that mimics comic book style art? I don't use GIMP but maybe there's one that's similar that I can get for Photoshop, I'm trying to go for the comic illustration aesthetic and if the one in Poser is no good, I'd prefer to do it in post process.
Here's a video tute for rendering toon-style in Poser. Seems pretty easy to follow.
http://www.video-tutes.com/player/player.php?id=1561&T_id=16

Hi
Some of the filters in Photoshop will let you get a technique somewhat like comic art if you apply then in combination, make sure that you have a lot of contrast in your original renderings.
I did this in a couple of minutes from an existing Poser render, while writing this post...
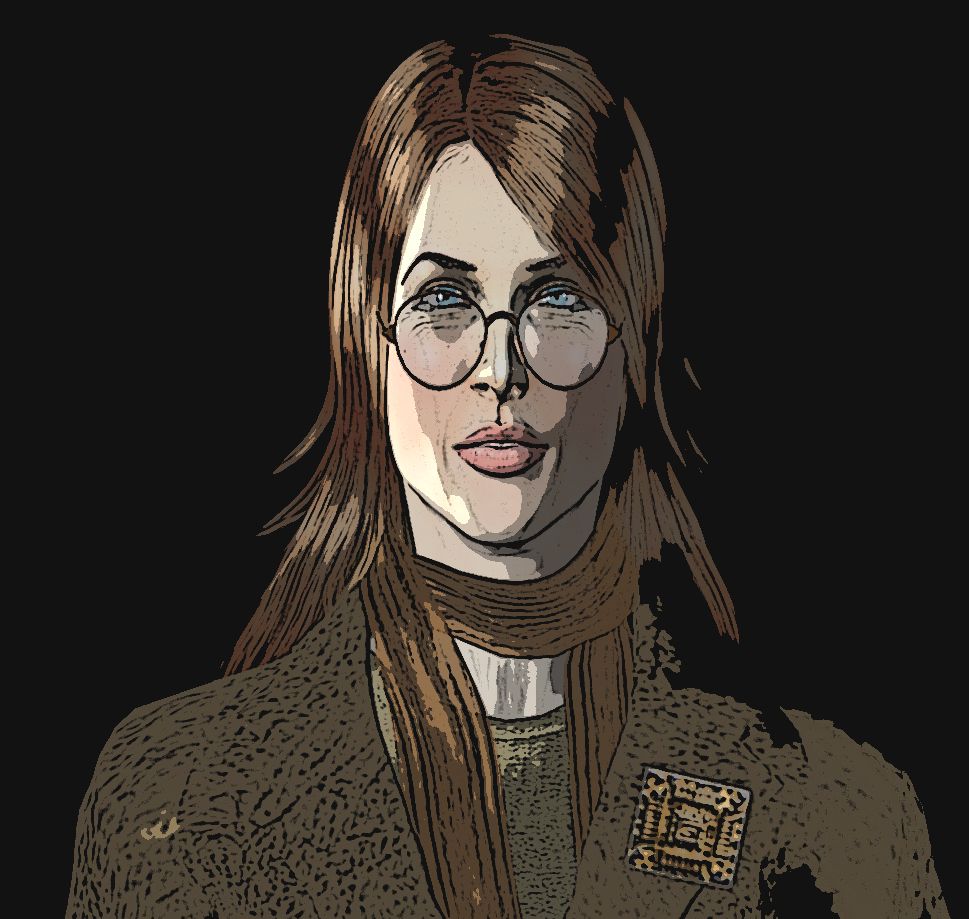
I just used 2 filters, but there are a multitude of variations that you can try.
I'm not suggesting that this be the first thing you try, but after you get the basics figured out, at some point you should look at animating your story and making a video out of it.
This could be done either using a comic approach, going from frame to frame, with speech balloons or with lip-syncing to recorded speech, either way you could add music and sound effects.
Instead of placing all you frames on a page just move from one to another through the video.
The built in lip-syncing utility in Poser works pretty well, and if you are going to use Inar's approach (using the animation palette) you will be learning how to do the animation at the same time.
I've been doing (what I think are funny) videos for quite a while and am having a lot of fun doing it.
Mike
If you shoot a mime, do you need a silencer?
Quote - basic, do you know of a filter for GIMP that mimics comic book style art? I don't use GIMP but maybe there's one that's similar that I can get for Photoshop, I'm trying to go for the comic illustration aesthetic and if the one in Poser is no good, I'd prefer to do it in post process.
Sorry...
As I said above, I don't care for comic style in general, so I'm no good to you for that advice. I use realistic rendering in my own work.
I'm willing to bet some of the other folks will have a number of ways to get you there!
<opps! Cross-posted with MikeMoss! There you go!>

i've used a PhotoShop plugin called Toonit by Digital Anarchy. Appearantly there is more than one software by this name so do a search for the right one. It gives you quite a few variations and one may suit your needs. The standalone Postwork Shop is also vary powerfull.
I've found that a couple of photoshop effects combined with multiple render passes to isolate items or layer different renders works as well or better for what I want to do without having to buy anything, though. So you might want to try that too.
________________________________

Quote - IMHO this is something the animation palette is great for (besides animation)
Load some assets at frame 0 (and set all keyframes to constant/grey), then skip a few frames (e.g. go to frame 5) and start setting up your scene/characters/poses/lighting for your first panel. As soon as you get some part the way you want it, you can move to the next frame and continue - that way you can always go back. For example you set up the scene one way, then go to a new frame and change the lighting and camera angle to see if it looks better. Repeat ad nauseam - each frame adds a negligeable amount to the overal file size
Once you've got panel 1 the way you like it, skip a few more frames and start on panel 2. A lot of times all that changes is that you load in some different poses for your characters and maybe change the camera. And so on.
You do have to keep track of keyframes (the blocks in the animation palette indicating you changed a parameter). They can be very useful but they can also be a pain.
Useful: you can reposition props, or change a characters appearance in panel 1 and that change propagates through all subsequent frames (provided there are no subsquent keyframes on those parameters).
Pain: you have to keep an eye on those keyframes, they tend to get generated when you're not expecting them, and any linear/orange or spline/green ones (while great for animation) can cause wierd things to happen with this kind of "sequential art" workflow.
Hope that helps,
ian
Too complicated.
Start as you suggest (everything will be keyframed by default in the first frame). Go to the next frame, set up everything the way you want it set up, then select everything in the animation palette and keyframe it all. Repeat for every subsequent frame.
This will mean every frame is keyframed, so there's no issue with things doing unexpected movement.
Privacy Notice
This site uses cookies to deliver the best experience. Our own cookies make user accounts and other features possible. Third-party cookies are used to display relevant ads and to analyze how Renderosity is used. By using our site, you acknowledge that you have read and understood our Terms of Service, including our Cookie Policy and our Privacy Policy.
I want to do a comic-esque story or at least a story using illustrated panels but I don't know how I should go about doing this with Poser. I found some good pre-made comic panels that I'll be using to frame everything in Photoshop so that's basically taken care of but I'm not sure how to approach anything else. If I'm doing a few panels on a page with the same people just in slightly different positions do I make a single poser file and match frames/camera angles to panels? Should I make seperate files instead? I'm not sure how long it's going to turn out but I'd like to not get overwhelmed on my first go at it.
Thanks. :)