Corel released its Painter IX version this fall. Their motto is
"Made By Hand." And new and improved features follow that
precept by looking more and more as if they came directly from an
artist's brush in hand. A good example is the new Artist Oil Paint
System whereby a brush can actually be set to fade out and run out
of paint; thus simulating a real brush.
Corel Painter IX ships in both full and upgrade versions with a
handbook including tutorials; access to downloadable tutorials by
Lynda.com; libraries of brushes, nozzles, gradients, etc.; and a
400+ page pdf User Guide on the CD. Also, there is wonderful
documentation in the
training section of Corel's website that can be accessed
from within Painter IX as well.
Minimum System Requirements
Macintosh®:
Mac® OS X (version 10.2.8 or higher)
Power Macintosh® G3, 500 MHz or greater
128 MB RAM
Mouse or tablet
24-bit color display
1024x768 screen resolution
CD-ROM
Windows®:
Windows® 2000 or Windows XP (with the latest service packs)
Pentium® II, 400 MHz or greater
128 MB RAM
Mouse or tablet
24-bit color display
1024x768 screen resolution
CD-ROM
Upgrade Eligibility
The price for Painter IX (US) is: $429.00 full; $299.00 upgrade
in the box. One can also download painter IX for a little less. The
price for that is: $399.00 full; $199.00 upgrade.
At present, Corel is running a special with Wacom, the maker of
digitizing tablets. Personally, I have used these tablets for the
past 15 years and even carry one with me for my laptop. The new
Intuos 3 is integrated so well with Painter IX that one does not
need to use the keyboard much at all. The bundle is really
impressive especially if one purchases the 9x12 tablet which is the
one I would recommend. I tested it and wrote a review about it. The
savings are great! And I do not work for either company. See
Wacom and
Corel to learn more about the
products and special purchase.
Corel Painter IX boasts an increase in speed, especially
brushes; stability; ease of use; integration with Photoshop files;
and realism through the new Artist Oil Paint System and Water Color
Brushes. The foregoing just outlines a few of the highlights of
this new version.
Since brushes and paint are at the core of any painting system,
we'll start by exploring those areas. After or during this review,
I might suggest that you download a demo of Painter IX so that you
can test these for yourself.
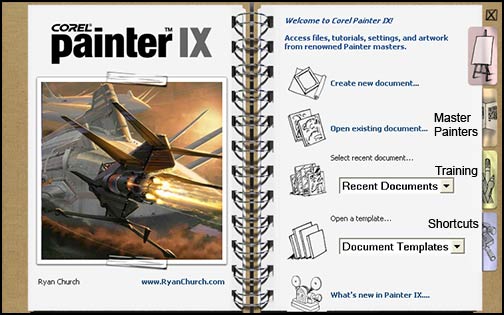
When one opens Corel Painter IX, one sees a welcome screen in
the form of a book. Each tab on the welcome screen gives the user
more insight into Painter IX. The second picture shows the last
section (shortcuts) of the book.
Corel breaks its improvements and new features into four
categories: Performance and Productivity, Creativity,
Compatibility, and Learning.
Performance and
Productivity
The Welcome screen which is removable, gives an introduction to
some of the areas of Corel Painter IX. It is a good quick reference
tool. As you can see, one can open up recent documents, existing
documents, templates, etc. directly from it as well as reset one's
individual Brush Tracking.
The first item one will notice is that the brushes are much much
faster. Yes, two or more muches are in order. I did not
find that I had to wait any more for a brush to draw or follow
itself. There is even a slider on the General Palette of the
Brush Controls to boost the speed more.

Corel has revamped the brush controls to make it easier to
access and change brushes. Even though some of the palettes are the
same or similar to those found in Painter 8, taken as a whole, the
improvement is wonderful. It is easy to change a brush on the fly
and now for the first time a special palette can be created with
all the information one needs for a particular project. This
palette can contain, brushes, commands, etc. Below are some of the
palettes from Painter IX. It is easy to see how they relate to each
other.
In the Brush Control palette on the right. Each category can be
opened as well as docked separately.
| All Palettes - Brush
Controls |
Brush Controls
Palettes |
 |
 |
| Brush Creator - Similar to Painter
8 |
Brush Selector - Similar to Painter
8 |
 |
 |
| Custom
Palette |
 |
Creating the custom palette simplified my work tremendously.
Between using it and the shortcuts for brush sizing
("]" denoting bigger and denoting
"[" smaller), the speed of my work
increased and so did my creativity because I didn't have to create
brush libraries and keep opening them continuously.
Shortcuts are an integral part of Painter IX. They are discussed
in Customizing Corel Painter IX:
Shortcut keys. Under Edit>Preference, one
will find Shortcut Keys where
commands can be assigned.
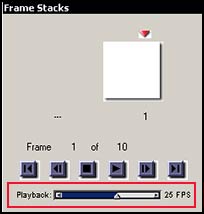
There are other productivity and performance
improvements in this release of Painter such as: scratch disk
placement - now, one can place the scratch disk wherever it will
perform the fastest; frames-per-second manipulation for movie
creation and editing; and multi-user support whereby users on a
network can store files in a user file directory. Also, all
settings in Painter IX can be set to default by holding down the
shift key when opening Painter.
There are two other items that I want to highlight: the improved
Tracker palette and the new Iterative
Save. The tracker palette has added two commands enabling
the user to save a brush stroke as a variant even well after it has
been performed.
The Iterative Save allows a work in progress to
be saved as many times as desired with the file name for example
being: ant_000.tif, ant_001.tif, ant_002.tif, etc. Any of these
saves can be recalled and even combined out of order. Suppose that
a sunset was wonderful in version 2, but was ruined in version 5,
but the foreground was great in 5. If the subject allowed for it,
both these versions could be created together into a version 6. in
other words 006.tif.
Creativity
When I think of Corel's Painter IX, one of the
first new features I think about is its Artists' Oil
Painting System A quick comparison of brush variables
between the Oil paints and the Artists' Oils will explain part of
the richness of this system
| Artists' Oils |
 |
| Oils |
 |
Earlier in this review, I showed the Artists' Oil palette open
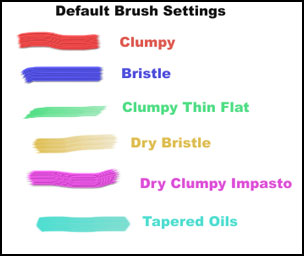
under the heading: Brush Control palettes.  The following is a list of
Artists' Oil brushes. The textures one can get are
impressive.
The following is a list of
Artists' Oil brushes. The textures one can get are
impressive.
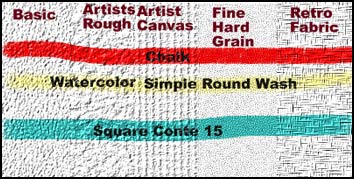
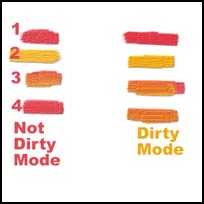
One setting for the Artists' Oils that really is nice is the
Dirty Brush Setting. This setting can be
turned on and off. It is on the Artists' Oils Palette as well as in
the Mixing Palette but has a different function in the
latter place. Line #1 was created with a brush stroke of red as
line #2 was created with yellow. Line #3 was created with the red
over the yellow, and it blended to an orange; however, in line #4,
notice that the orange is only continued if the Dirty mode was
selected in the Artists' Oils Palette. When not selected,
the original color continued "pure" for the new line.
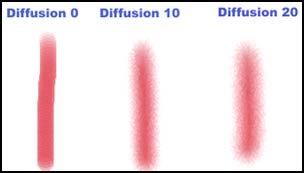
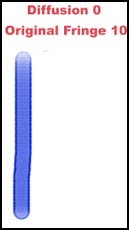
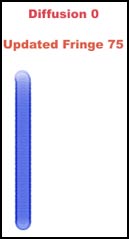
A paint form that has been enhanced is the Digital Watercolor.
 Now paint will stay wet between
sessions and the wet fringe can be changed dynamically after the
cessation of the brush stroke. However, For the fringe to change
noticeably, the Diffusion indicator has to be at
or near 0.
Now paint will stay wet between
sessions and the wet fringe can be changed dynamically after the
cessation of the brush stroke. However, For the fringe to change
noticeably, the Diffusion indicator has to be at
or near 0.
Â
One would expect to find Snap-To-Path in an
Illustration program, but Corel has incorporated it into Painter
IX. It is an excellent feature for painting exact lines.
| From Top Tool Bar |
Example of Painting around a Shape |
 |
 |
Remember how many steps it took to clone an image.
With Quick Clone it just takes one and its
properties can be set under
Edit>Preferences>General. One can choose
whether one wants to create an exact clone or use different brush
strokes to create a varied piece of art work. Any brush can become
a cloner by hitting the Rubber Stamp indicator on
the Colors palette. In addition, Cloning
can be selected from the Brush Controls menu and
specific Cloners can be created from regular
brushes. There are almost 40 different built in
cloners.
Corel has added seven KPT plug-ins to the other effects on the
effects menu. In addition, plug-ins from other sources can be added
as well. Painter IX also has some Dynamic plugins. Two of these
were used to create the changed images below.
| Original Image |
Liquid Lens |
Glass Distortion |
 |
 |
 |
Compatibility
In the past, switching between Painter and Photoshop had always
been somewhat of a chore. While one could do it in recent versions
and retain PSD files, working with both programs was sometimes
awkward. However, in Painter IX, while creating some of the screen
shots, adding text, and making selections, I forgot that I wasn't
in Photoshop. Finally, the standard moves are standard. Painter is
still not an image editing program and does not pretend to be; for
example, color select is a problem to use because
of the preview size of the image and the selection. However, one
can now do standard image editing movements comfortably.
In addition, when I bring images into Painter IX from Photoshop
or visa versa, the color remains the same. Painter IX boasts an
enhanced color engine, however, I found that the default settings
worked very well for me. Since I have always done the majority of
my work in Photoshop, I have always made sure it was color
calibrated. I have always had to work with the color settings. I
brought my standard calibration file into Painter IX. This is made
up of some digital images of colorful objects in my home
as well as Trumatch
swatches and a grayscale. I always make sure that these look
correct on the monitor and print accurately. I printed two tests -
one from Photoshop and one from Painter IX. I used the default
settings in Painter IX. They were both the same and matched the
monitor. I, then, created a file of rgb, cmy colors directly in
Painter IX. These colors matched those created in Photoshop and
printed out equally well. Thus, I know that I can create in both
programs and my colors will match. The color space I was using in
both programs was was RGB.
 The Color Management
Palette can be set up in numerous ways. There is a very
good tutorial on Color Management that can be accessed through the
link on the last page of the Welcome screen under
"Color Management." It will take you step by step through
the different ways it can be set up including explanations. I tried
no color management (which seems to be the way a new canvas
appears), default, and optimized for desktop printing. I did not
find variations either on the screen or printed. All were
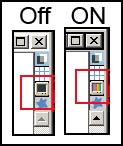
excellent. The picture on the right shows the On/Off toggles on the
upper right side of the canvas. Two
Color Management screens are shown below.
The Color Management
Palette can be set up in numerous ways. There is a very
good tutorial on Color Management that can be accessed through the
link on the last page of the Welcome screen under
"Color Management." It will take you step by step through
the different ways it can be set up including explanations. I tried
no color management (which seems to be the way a new canvas
appears), default, and optimized for desktop printing. I did not
find variations either on the screen or printed. All were
excellent. The picture on the right shows the On/Off toggles on the
upper right side of the canvas. Two
Color Management screens are shown below.
| Default Color Management |
Optimized for Desktop |
 |
 |
There are settings under each of the symbols as well as settings
accessed when the RGB colors are clicked.
Painter IX worked very well with my Wacom Intuos 2. However. The
Intuos 3 and Painter IX are created to be used together. Wacom sent
me an Intuos 3 loaner tablet to test with Painter IX.
Learning
Painter IX comes with many learning aids. While the hardcopy
handbook is interesting and does have some excellent tutorials, in
my opinion, it is not very useful beyond that. It is, however,
interesting to see how Painter evolved and inspiring to see the
type of work that can be created in Painter IX. The manual the
comes on the CD is much better. I copied it from the CD onto my
desktop so it would be available. The free Lynda.com tutorials are
very good. For more information on Corel courseware go to:
courseware.
So far I have discussed what is new or enhanced in Painter IX.
However, if you are a newby and have never used Painter before,
what can you expect? Firstly, you can expect a product that is user
friendly. It is easy to create brushes in Painter IX and change
them on the fly. The top tool bar is context sensitive and it lists
many of the variables for each brush. You can, also, access these
variable through drop down menus. Examples of these have been
pictured above. Also there is a brush creator to remake and rename
brushes.
The left side shows the changes available for a
brush as well as the stroke while the right side is for testing the
brush as you develop it. As stated earlier, if I have made changes
in a lot of brushes from a brush library, I can turn them back to
default. My own brushes I can rename and put in a library and/or on
a customized palette so that they are readily available. The
brushes are the heart of Painter. The mixer palette and color sets
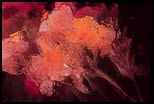
have been around, but for the new user, I will present them. One
can make color sets from an image. I will use this as an example. I
opened a photomontage I created and the Color Sets
palette. I, then, clicked on the right triangle on the color sets
palette and when the fly-out menu flew out, selected New Color
Set from Image. Below are all the colors in the image.
 |
 |
Since I decided not to use the color sets, but to create my own
colors as I went along, I divided the image into sections as I
worked on it and put sample colors from the image onto the
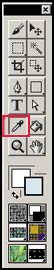
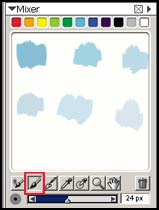
Mixing palette. I selected the Eye
Dropper from the Tools bar and the Apply
Color Brush from the Mixer. I picked up
the color from the image with the Eye Dropper and then brushed it
onto the Mixer. Once I was satisfied with these
blues that I could work with and modify, and add to, of course, I
clicked on the right arrow on the Mixer palette
and accessed its fly-out menu. I, then, chose Save Mixer
Pad and placed the file (sky.MXS) into the folder where I was
collecting all my material for this image. At anytime I can just do
Open Mixer Pad and select that file.
Since I was not going to clone my photomontage but loosely copy
it, I created a custom palette that would hold my brush variants so
they would be easily accessible and, as stated above, I put all my
mixer and color set files in my art folder that I created for this
project. One does not have to keep everything in the Painter
folder.
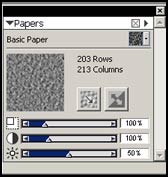
Painter has always contained many types of paper surfaces. The
defaults can be further manipulated, and once they are, added to
the finished image through the top tool bar: Effects>Surface
Control>Apply Surface Texture.
| Example of Paper Palette |
Some Paper Surfaces |
 |
 |
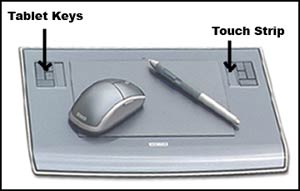
Finally, lets look at the Wacom Intuos 3 graphic tablet and
explore how it interacts with Painter IX. The Intuos 3 has made my
work easier because I can customize the Keys on the right and left
of the pressure sensitive pad as well as the Touch Strip.
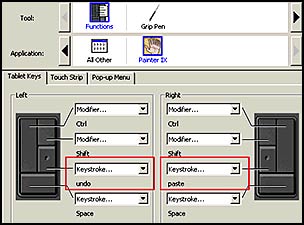
Thus, if I do a lot of undoes, for example, I can customize a
left key for undo and its right equivalent for something else.
Really a nice time saver! If you will notice, in the menu below
next to applications, the selected icon is Painter IX. I can
individualize the tablet keys and the touch strip for different
programs.
This is by far the easiest and I believe best Painter version
ever. If you have never used a digitizing tablet, the bundle is a
perfect way to start!


Comments