
Renderosity Forums / Poser - OFFICIAL
Welcome to the Poser - OFFICIAL Forum
Forum Moderators: RedPhantom Forum Coordinators: Anim8dtoon
Poser - OFFICIAL F.A.Q (Last Updated: 2026 Sep 07 8:55 pm)

Subject: Got Favorite Poser Tips and Tricks? Please post them here!


I love to use the shortcuts. As my keyboard is designed for Swiss French, I've redefined some. But the ones I use the most are:
2 to select the body of the currently selected character (any object, not only humans)
1 to reselect the last body part that was selected after having pressed the 2 key
Ctrl-0 to select the head cam (zero to the letter O)
the shortcuts you have to select the hands-related cams
Ctrl-M to select the main cam and the one you have defined for the auxiliary cam
Space + left click to pan the view
Ctrl + space + left click to zoom in/out
Alt-Click to turn around the currently selected part of a character (or a prop)
These shortcuts are at disposal in Poser 11, 12, 13 and 14.
When in the Material room of Poser 13 and 14: click on what you are editing the material in the pose view, press the letter M and you are now in direct manipulation tool, even though it's not displayed on the corresponding tools panel.
Learning those shortcuts represent a real time saving. And IMO it's one of the best features of Poser when it comes to any room
𝒫𝒽𝓎𝓁
(っ◔◡◔)っ
👿 Win11 on i9-13900K@5GHz, 64GB, RoG Strix B760F Gaming, Asus Tuf Gaming RTX 4070 OC Edition, 1+2 TB SSD's, 6+4TB HD
👿 Mac Mini M2, Tahoe 26.5, 16GB, 500GB SSD
👿 Nas 10TB
👿 Poser 13 and 14 ❤️
And if your current cam seems lost, double-click on it:
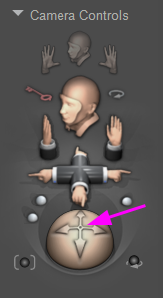
and press Ctrl-E
𝒫𝒽𝓎𝓁
(っ◔◡◔)っ
👿 Win11 on i9-13900K@5GHz, 64GB, RoG Strix B760F Gaming, Asus Tuf Gaming RTX 4070 OC Edition, 1+2 TB SSD's, 6+4TB HD
👿 Mac Mini M2, Tahoe 26.5, 16GB, 500GB SSD
👿 Nas 10TB
👿 Poser 13 and 14 ❤️
I've learned to use the shortcuts since I started developing on computers (circa 1986), and I've always find it faster.

𝒫𝒽𝓎𝓁
(っ◔◡◔)っ
👿 Win11 on i9-13900K@5GHz, 64GB, RoG Strix B760F Gaming, Asus Tuf Gaming RTX 4070 OC Edition, 1+2 TB SSD's, 6+4TB HD
👿 Mac Mini M2, Tahoe 26.5, 16GB, 500GB SSD
👿 Nas 10TB
👿 Poser 13 and 14 ❤️

I use favorites.
Catagories include characters, morph injections,conversion donors, Current testing item, and utilities such as light, camera resets, several props etc
This lets me stay in one folder and load anything I need without having to move around in the various runtimes
Bill
People that know everything by definition can not learn anything

I don't have anything to contribute because I still use processes most of you have long forgotten or advanced beyond. But as it is, I have two requests for Poser 14 tips. (1) I've long used the Translate Pull tool to select items in my scene that I adjust with the parameter dials. That works okay for a single figure but is totally useless in a multifigure scene - it doesn't select what I clicked on, as Nerd noted in a thread long ago. Anyone have a work-a-round or should I finally bite the bullet and use the direct manipulation tool that I know some use? (2) I search my runtimes by going to the Search tab, checking the Figures and Props boxes, and then type in a search term. The results are often dismal. Sometimes I get a few returns of what I know I have in my runtimes. Other times, the returns include poses, materials, etc. that I didn't request. Any library/searching tips out there?

Available on Amazon for the Kindle E-Reader Monster of the North and The Shimmering Mage
Today I break my own personal record for the number of days for being alive.
Check out my store here or my free stuff here
I use Poser 14 and Windows 11
I've been doing this so long that it no longer seems like a trick, but it's worth knowing that the animation palette is useful for more than just animations.
You can use it as a multi-level selective undo function. Every time you make a significant change, step to the next frame, and set all the keyframes on everything in your scene. I usually set everything to linear interpolation as well. If things don't work out you can just delete the frame, but if they 'sort of' work out you then have the option of selective copying from past versions, for example parts of a pose.
You can also use animation to interpolate between two poses, two expressions or what have you. Set up two keyframes a reasonable distance apart - say 5 to 10 frames - and then you can step along the timeline to mix one pose with another. When you find the blend you like, set a keyframe there and carry on.
There's probably more, but as I said, this workflow is now so ingrained that I no longer give it much thought.
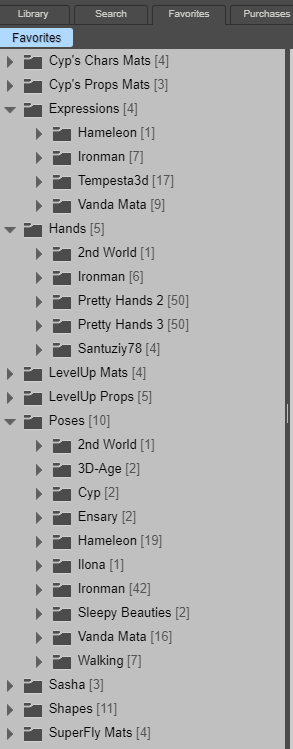
Same idea as willyb53. I have even setup a script to recreate, add any existing folder, to Poser's Favorites, that I can share, if someone's interested (terminal as admin, for windows)
𝒫𝒽𝓎𝓁
(っ◔◡◔)っ
👿 Win11 on i9-13900K@5GHz, 64GB, RoG Strix B760F Gaming, Asus Tuf Gaming RTX 4070 OC Edition, 1+2 TB SSD's, 6+4TB HD
👿 Mac Mini M2, Tahoe 26.5, 16GB, 500GB SSD
👿 Nas 10TB
👿 Poser 13 and 14 ❤️

Poser's Sketch effect is render-size dependent. What looks great at 600px wide will look quite different at 1024px or 2048px, and may have a cut-off edge on the final Sketch render. Thus you need to design your Sketch presets at the size you want to render to, and then note the target render size in the name of your saved custom preset (e.g. "1800px_fast__painterly010_run_on_smooth_shaded_with low_lights".
Also, when designing Sketch presets you need to make a quick test Preview render at the desired size first, in order for the Sketch Designer preview window to load up at full-size. Then you can see what effect your Sketch sliders are having, although at the cost of needing to pan across the Sketch Designer preview window to see figure details you may be interested in.
Learn the Secrets of Poser 11 and Line-art Filters.

Y-Phil posted at 4:40 PM Tue, 10 March 2026 - #4504545
Wow! Great tips I will have to try and set the shortcuts up.I love to use the shortcuts. As my keyboard is designed for Swiss French, I've redefined some. But the ones I use the most are:
2 to select the body of the currently selected character (any object, not only humans)
1 to reselect the last body part that was selected after having pressed the 2 key
Ctrl-0 to select the head cam (zero to the letter O)
the shortcuts you have to select the hands-related cams
Ctrl-M to select the main cam and the one you have defined for the auxiliary cam
Space + left click to pan the view
Ctrl + space + left click to zoom in/out
Alt-Click to turn around the currently selected part of a character (or a prop)These shortcuts are at disposal in Poser 11, 12, 13 and 14.
When in the Material room of Poser 13 and 14: click on what you are editing the material in the pose view, press the letter M and you are now in direct manipulation tool, even though it's not displayed on the corresponding tools panel.
Learning those shortcuts represent a real time saving. And IMO it's one of the best features of Poser when it comes to any room
willyb53 posted at 2:07 PM Thu, 12 March 2026 - #4504590
I use favorites.
Catagories include characters, morph injections,conversion donors, Current testing item, and utilities such as light, camera resets, several props etc
This lets me stay in one folder and load anything I need without having to move around in the various runtimes
Bill
Another great idea...so many good tips from everyone. As someone who only uses Poser sporadically it's great see all these tips from everyone.
Another trick I'd like to repeat here, especially because at first I was a bit hesitant to use it...
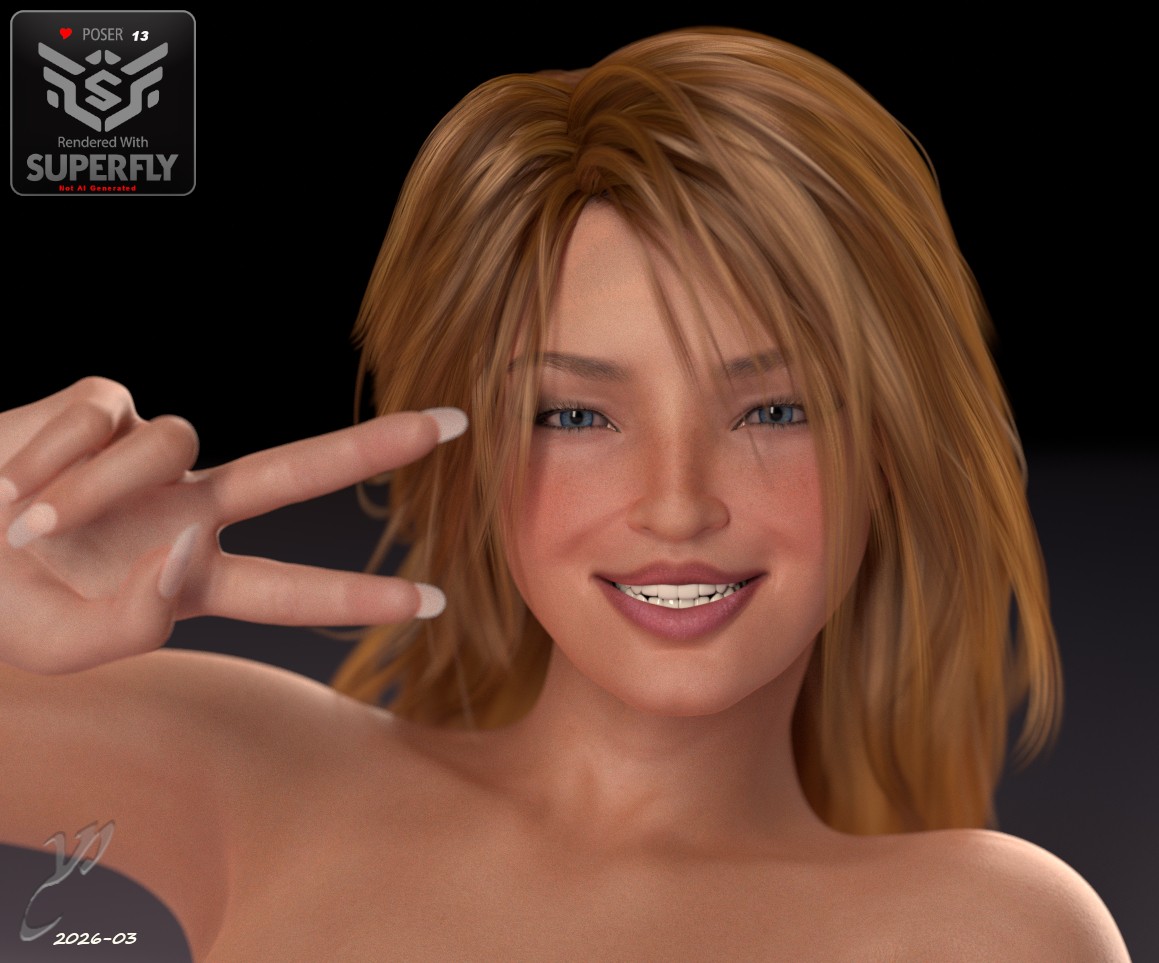
When rendering a close-up with trans-mapped hairs: they sometimes are not very good at their ends. Using Poser's "Motion Blur" can help:
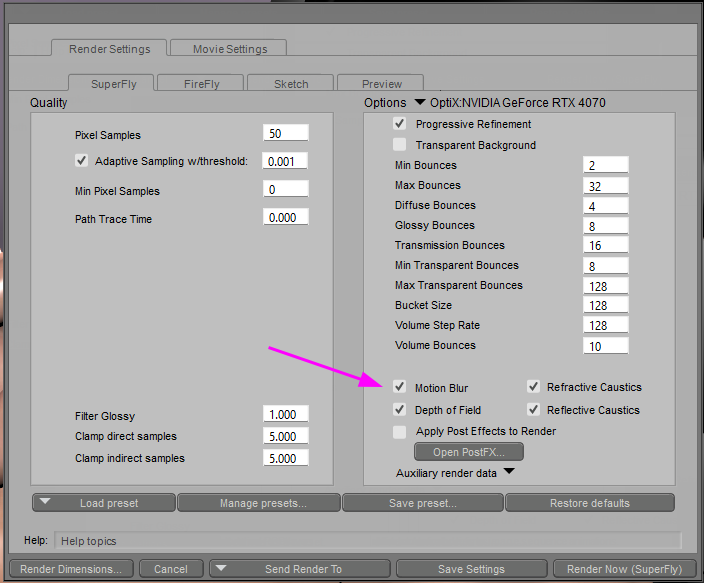
That plus a smaller focus distance associated to the correct Focal can give interesting result, such as:
The trick is to play with the frames:
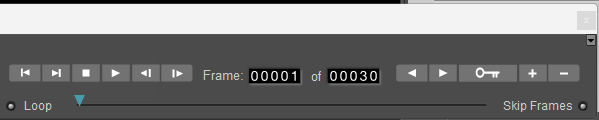
This will work properly regardless of the current frame number.
1. select your character/props
2. add a key frame (the "+" on the frames controls)
3. move one step forward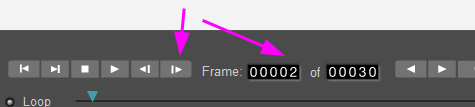
4, move slightly the hair extremities, even with the morphing tool in case there's no morphs
5. step back one frame
6. in the render settings: activate the "Motion Blur" and.. voilà
One can even control the effect by checking these values on the camera's properties:
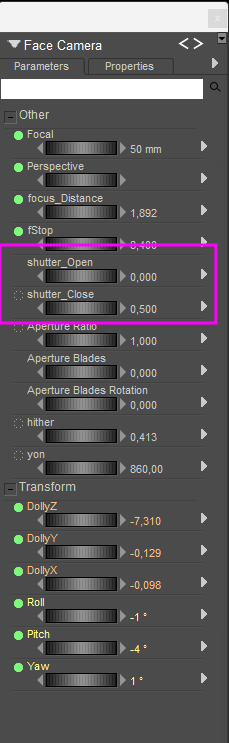
Poser will compute the strength of the effect (shutter_close minus shutter_open) and where to start (shutter_open)
Note that these values let Poser mimic a real cam with the mechanical stuff to let the light enter or not.
𝒫𝒽𝓎𝓁
(っ◔◡◔)っ
👿 Win11 on i9-13900K@5GHz, 64GB, RoG Strix B760F Gaming, Asus Tuf Gaming RTX 4070 OC Edition, 1+2 TB SSD's, 6+4TB HD
👿 Mac Mini M2, Tahoe 26.5, 16GB, 500GB SSD
👿 Nas 10TB
👿 Poser 13 and 14 ❤️
I don't know if it can be added here or not, but it looks handy to have a place with not only the tips & tricks but also some free tools, such as the scripts that I have developed for Shana's Tattoo sets. And it can be used for your own tattoo or whatever bitmap you would like to us to overlap any skin part.
Here: https://www.renderosity.com/forums/threads/2991817/poser-tools-for-shanas-tattoo-sets
For example Rhia4764 used this tool to add freckles, scars, etc...
Of course, the script is free and does not contains Shana's tattoos.
It's written for Python 3.7, so that it should be usable with Poser12 at least.
Freshly tested on Poser14:
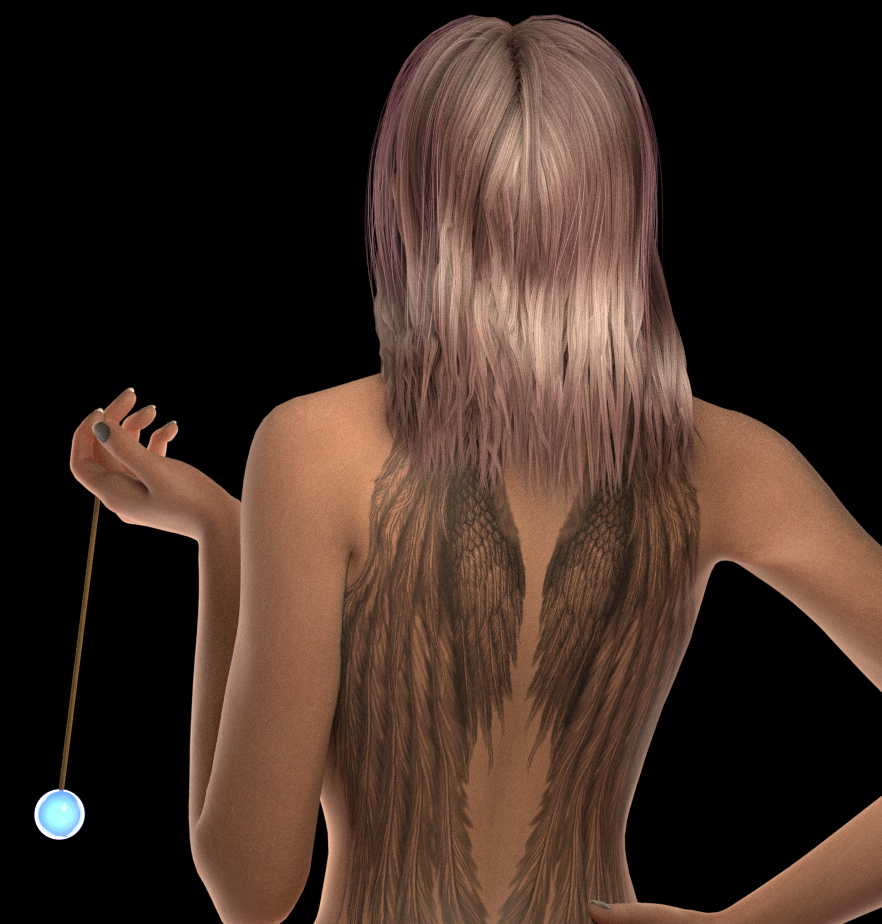
If its place isn't here, a mod can delete it without problem 😊
𝒫𝒽𝓎𝓁
(っ◔◡◔)っ
👿 Win11 on i9-13900K@5GHz, 64GB, RoG Strix B760F Gaming, Asus Tuf Gaming RTX 4070 OC Edition, 1+2 TB SSD's, 6+4TB HD
👿 Mac Mini M2, Tahoe 26.5, 16GB, 500GB SSD
👿 Nas 10TB
👿 Poser 13 and 14 ❤️
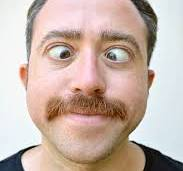
If you have a character with independently moving eyes, without a control to move them both at the same time: here's a trick I used to use long ago.
Add a small box in front of one eye, not too near, make this eye point to that new box.
Do the same with the other eye.
Create
a group, add the two boxes top the group, and don't forget to make both
either 100% transparent at render time, or ask Poser to ignore them at
render time.
When you move the group, the boxes move. So should the eyes do.
You
can use one box only, and you'll get good result if your box is not too
near the face or your character will have a funny look
𝒫𝒽𝓎𝓁
(っ◔◡◔)っ
👿 Win11 on i9-13900K@5GHz, 64GB, RoG Strix B760F Gaming, Asus Tuf Gaming RTX 4070 OC Edition, 1+2 TB SSD's, 6+4TB HD
👿 Mac Mini M2, Tahoe 26.5, 16GB, 500GB SSD
👿 Nas 10TB
👿 Poser 13 and 14 ❤️
If you have a character with independently moving eyes, without a control to move them both at the same time: here's a trick I used to use long ago.
Add a small box in front of one eye, not too near, make this eye point to that new box.
Do the same with the other eye.
Create a group, add the two boxes top the group, and don't forget to make both either 100% transparent at render time, or ask Poser to ignore them at render time.
When you move the group, the boxes move. So should the eyes do.
You can use one box only, and you'll get good result if your box is not too near the face or your character will have a funny look
I'll do this but I'll use a thin cycendar to also help visualize where the head is pointed if I want one figure looking at someone specific.
Available on Amazon for the Kindle E-Reader Monster of the North and The Shimmering Mage
Today I break my own personal record for the number of days for being alive.
Check out my store here or my free stuff here
I use Poser 14 and Windows 11
Y-Phil posted at 5:57 AM Fri, 17 April 2026 - #4505427Good idea!If you have a character with independently moving eyes, without a control to move them both at the same time: here's a trick I used to use long ago.
Add a small box in front of one eye, not too near, make this eye point to that new box.
Do the same with the other eye.
Create a group, add the two boxes top the group, and don't forget to make both either 100% transparent at render time, or ask Poser to ignore them at render time.
When you move the group, the boxes move. So should the eyes do.
You can use one box only, and you'll get good result if your box is not too near the face or your character will have a funny look
I'll do this but I'll use a thin cycendar to also help visualize where the head is pointed if I want one figure looking at someone specific.
𝒫𝒽𝓎𝓁
(っ◔◡◔)っ
👿 Win11 on i9-13900K@5GHz, 64GB, RoG Strix B760F Gaming, Asus Tuf Gaming RTX 4070 OC Edition, 1+2 TB SSD's, 6+4TB HD
👿 Mac Mini M2, Tahoe 26.5, 16GB, 500GB SSD
👿 Nas 10TB
👿 Poser 13 and 14 ❤️
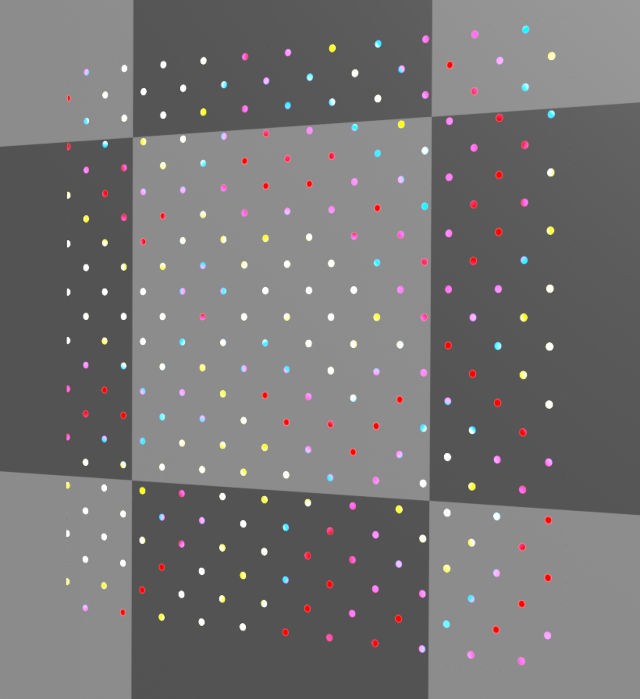
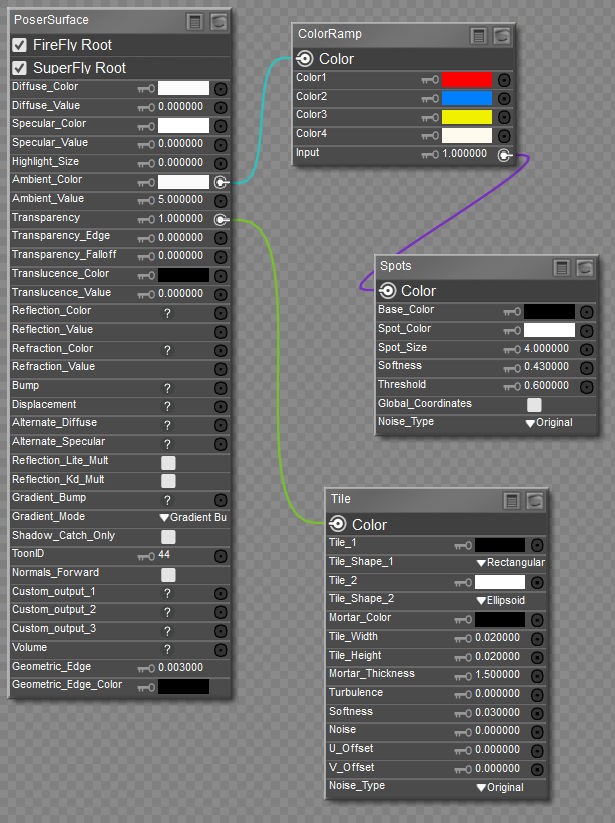
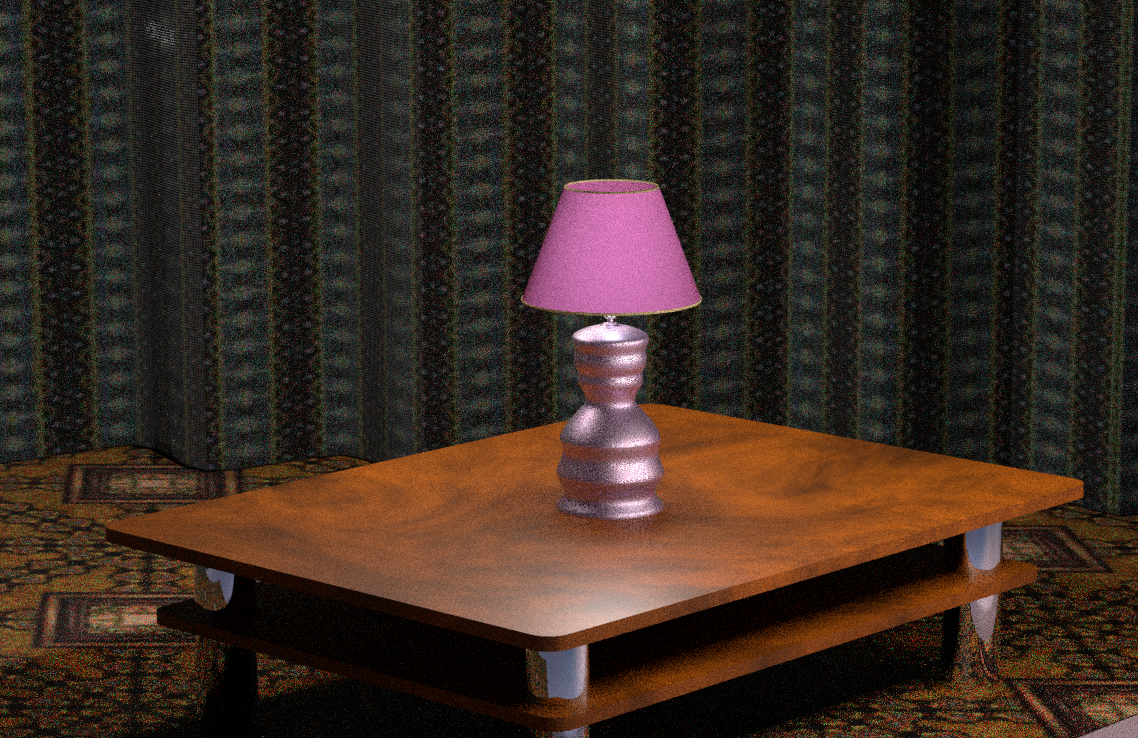
Ever wanted a nice lamp shade? You will need some translucence, a touch of transparency and the correct parameters.
Plus a few nodes if there is a mirror besides the lamp, so that the shade is also visible in the mirror:
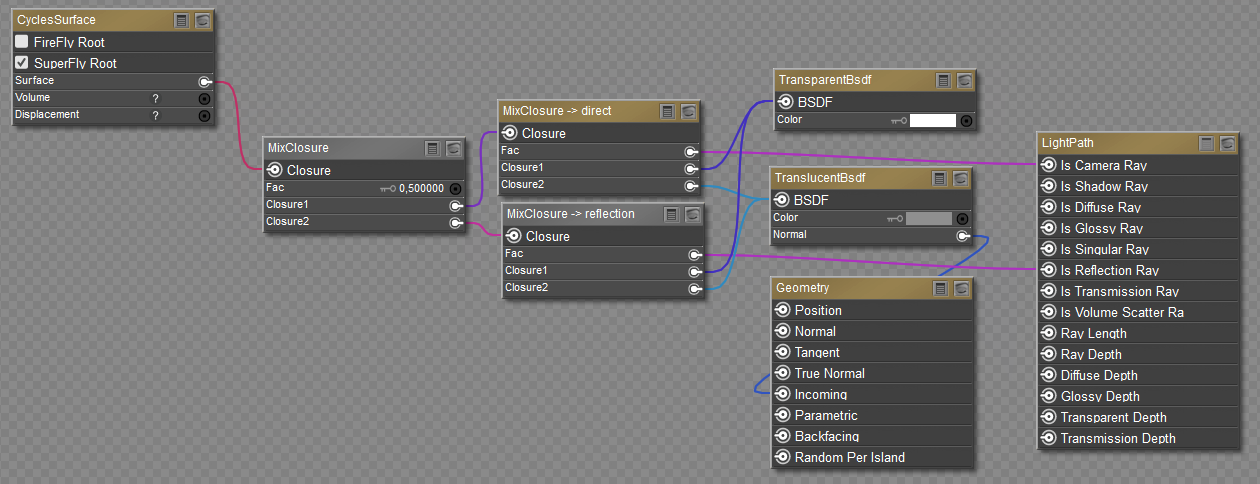
The selected node are enough if no mirror is present.
Here is what it looks like:
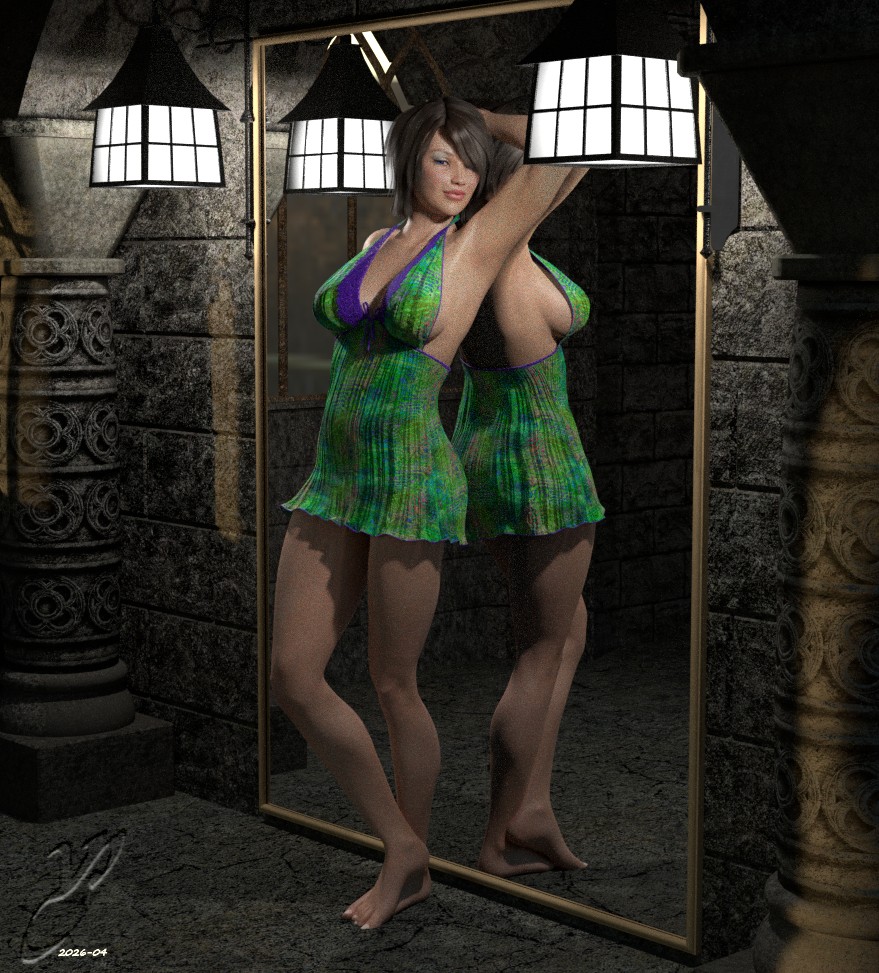
Inside each lamp, I have a point light at 10%, with inverse square attenuation.
The color chip on the Translucent node the intensity and the color of the shade. In this case: RGB= (143, 143, 143)
Example with a lamp, without reflection. The Translucent color chip color is set to RGB=(255, 151, 242)
𝒫𝒽𝓎𝓁
(っ◔◡◔)っ
👿 Win11 on i9-13900K@5GHz, 64GB, RoG Strix B760F Gaming, Asus Tuf Gaming RTX 4070 OC Edition, 1+2 TB SSD's, 6+4TB HD
👿 Mac Mini M2, Tahoe 26.5, 16GB, 500GB SSD
👿 Nas 10TB
👿 Poser 13 and 14 ❤️

Lots of good advice, links, and ideas on using the Poser Atmosphere here - How Do You Use The Poser Atmosphere ?
The 3Dcheapskate* occasionally posts sensible stuff. Usually by accident. And it usually uses Poser 11, with units set to inches. Except when it's using Poser 6 or PP2014, or when its units are set to PNU or something else.
*soon only to be available in two flavours - DAZ and Renderosity
You may know Ctrl-Y to open the Render Settings dialog, don't you?
But don't forget its nearest friend: Ctrrl-Shift-Y to open the Render Dimensions dialog... 
𝒫𝒽𝓎𝓁
(っ◔◡◔)っ
👿 Win11 on i9-13900K@5GHz, 64GB, RoG Strix B760F Gaming, Asus Tuf Gaming RTX 4070 OC Edition, 1+2 TB SSD's, 6+4TB HD
👿 Mac Mini M2, Tahoe 26.5, 16GB, 500GB SSD
👿 Nas 10TB
👿 Poser 13 and 14 ❤️
Using an HDRI as a background is convenient, but depending on the resolution and focus of the original photograph, objects added in Poser can sometimes appear unnaturally sharp in comparison.
# Bright Beachess by ShaaraMuse3D (https://www.renderosity.com/marketplace/products/168122/bright-beachess-16k-hdris), SM3D_HDRI_BrightBeach03_2K.exr
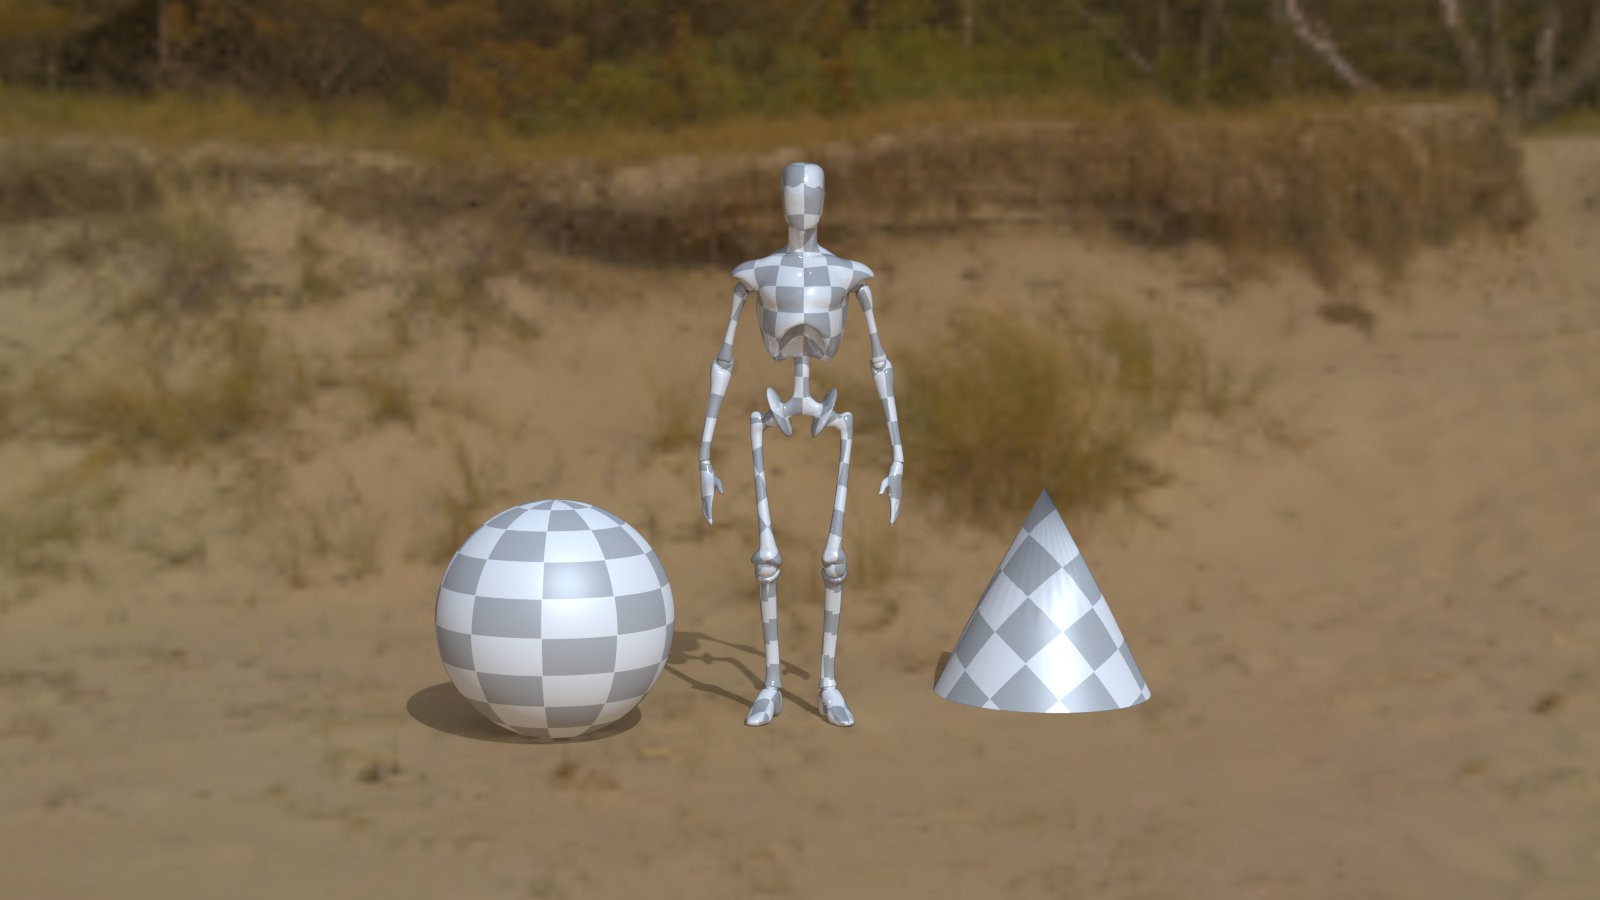
One simple way to adjust the focus on an object is to enable Render Settings - Depth of Field and adjust the focus_Distance and fStop values of the main camera. Of course, that is assuming you can accept the blur caused by the DOF...
In this case, the approach of setting a small value for focus_Distance to defocus distant objects is not ideal. In Poser, an HDRI background appear to be treated as an object located very far away, causing the entire background to be significantly out of focus.
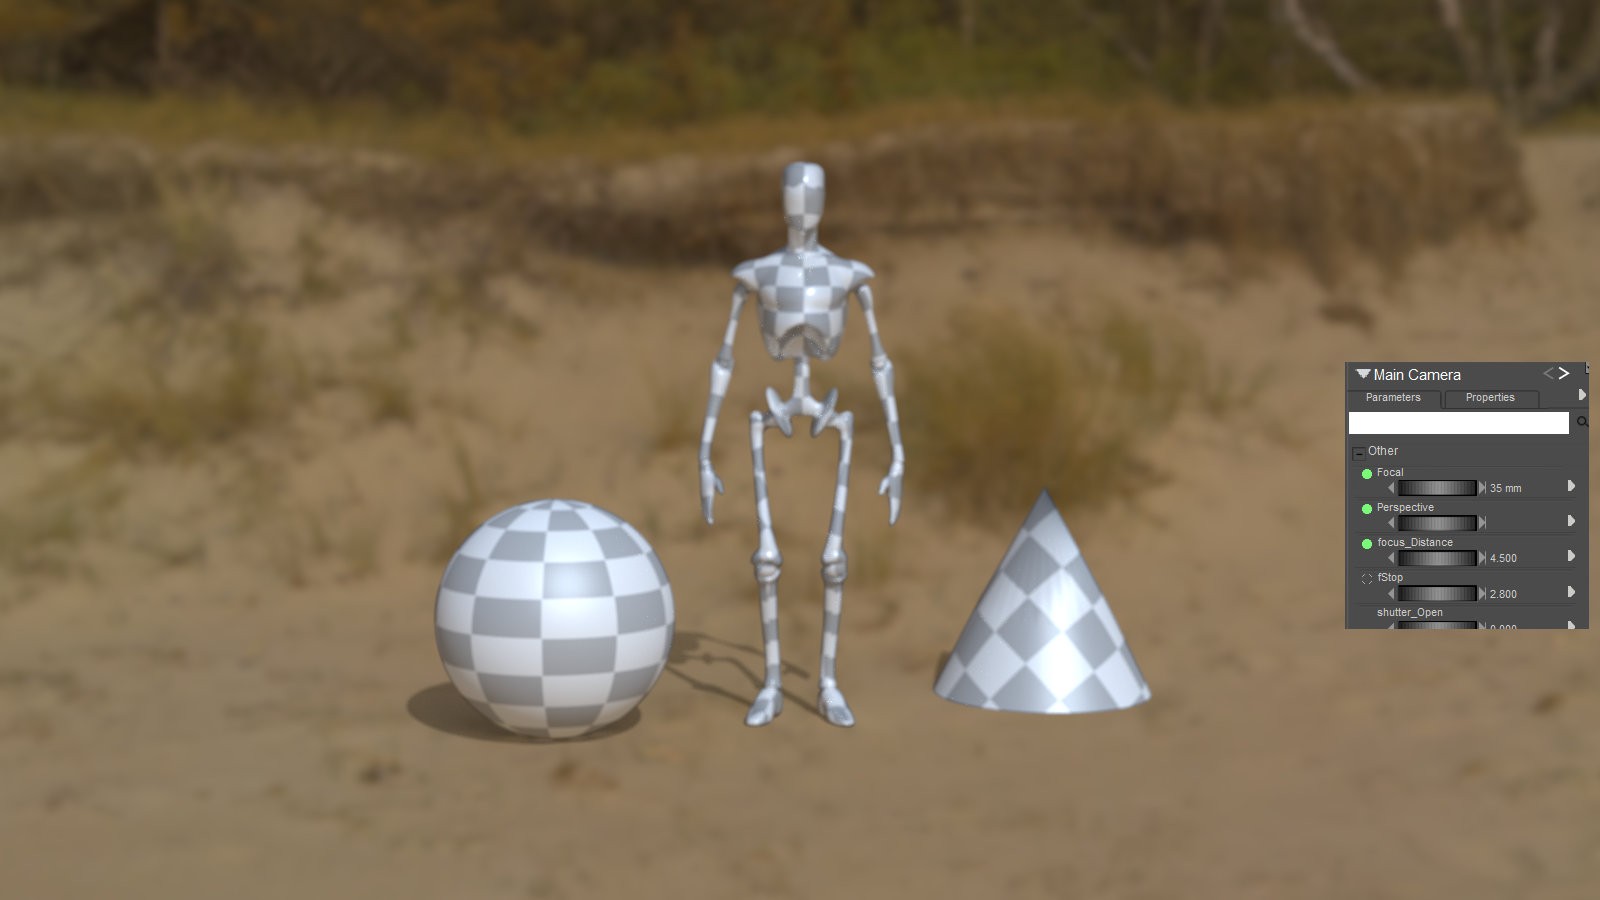
Therefore, it is recommended to fix focus_Distance at a large value (e.g., 300) and adjust the focus using the fStop value.
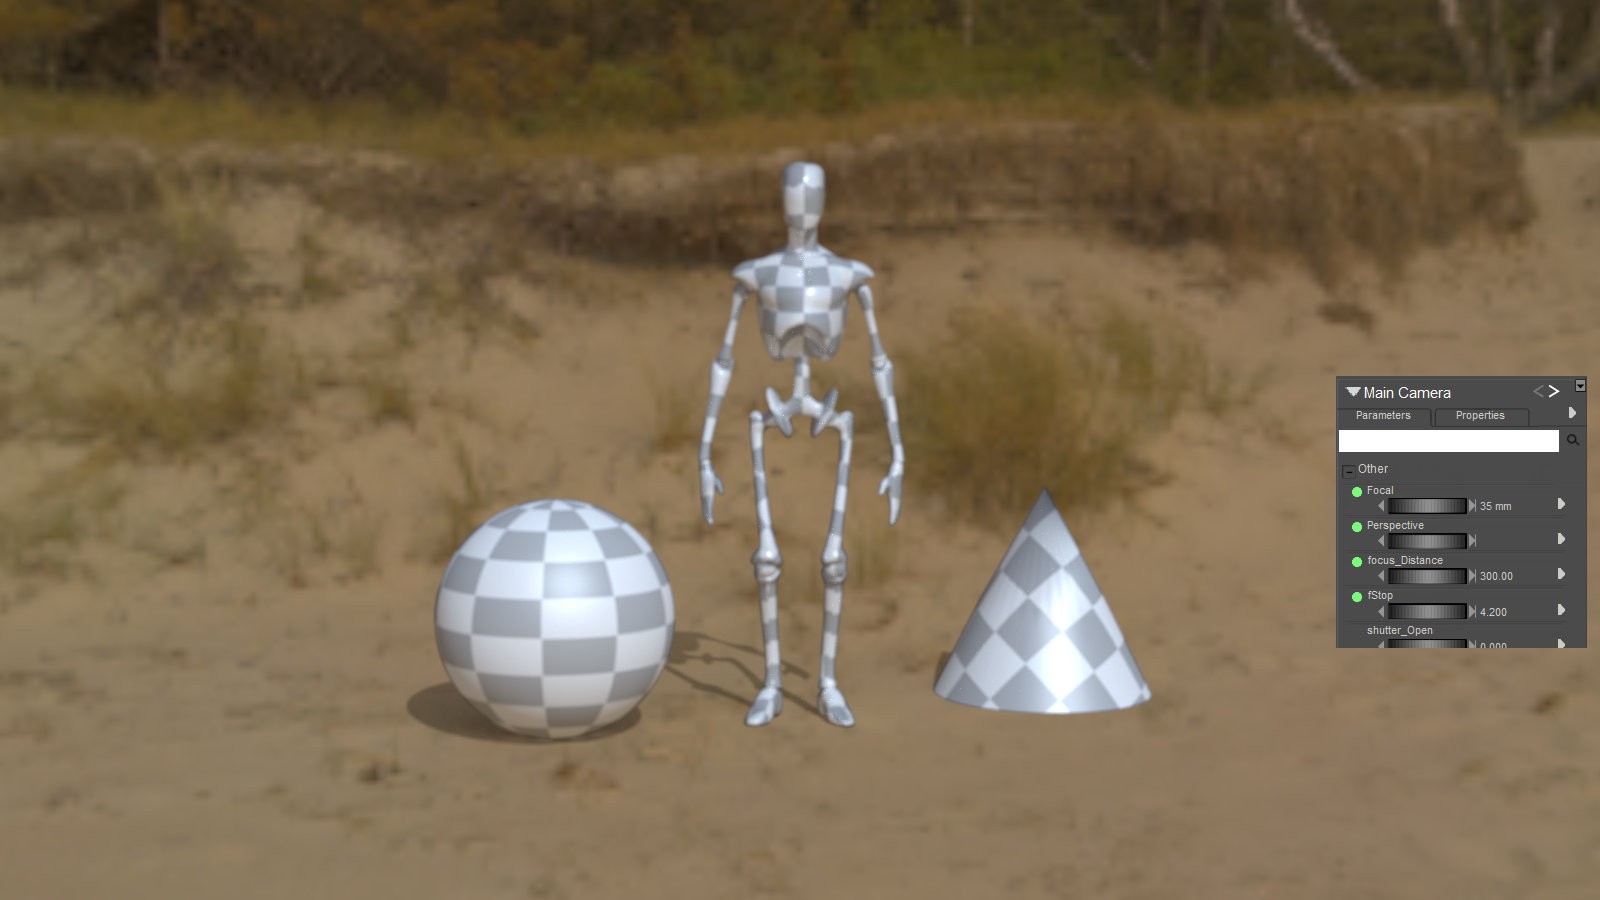
Such unnaturalness is not very noticeable with high-resolution HDRI.
# SM3D_HDRI_BrightBeach03_16K.exr
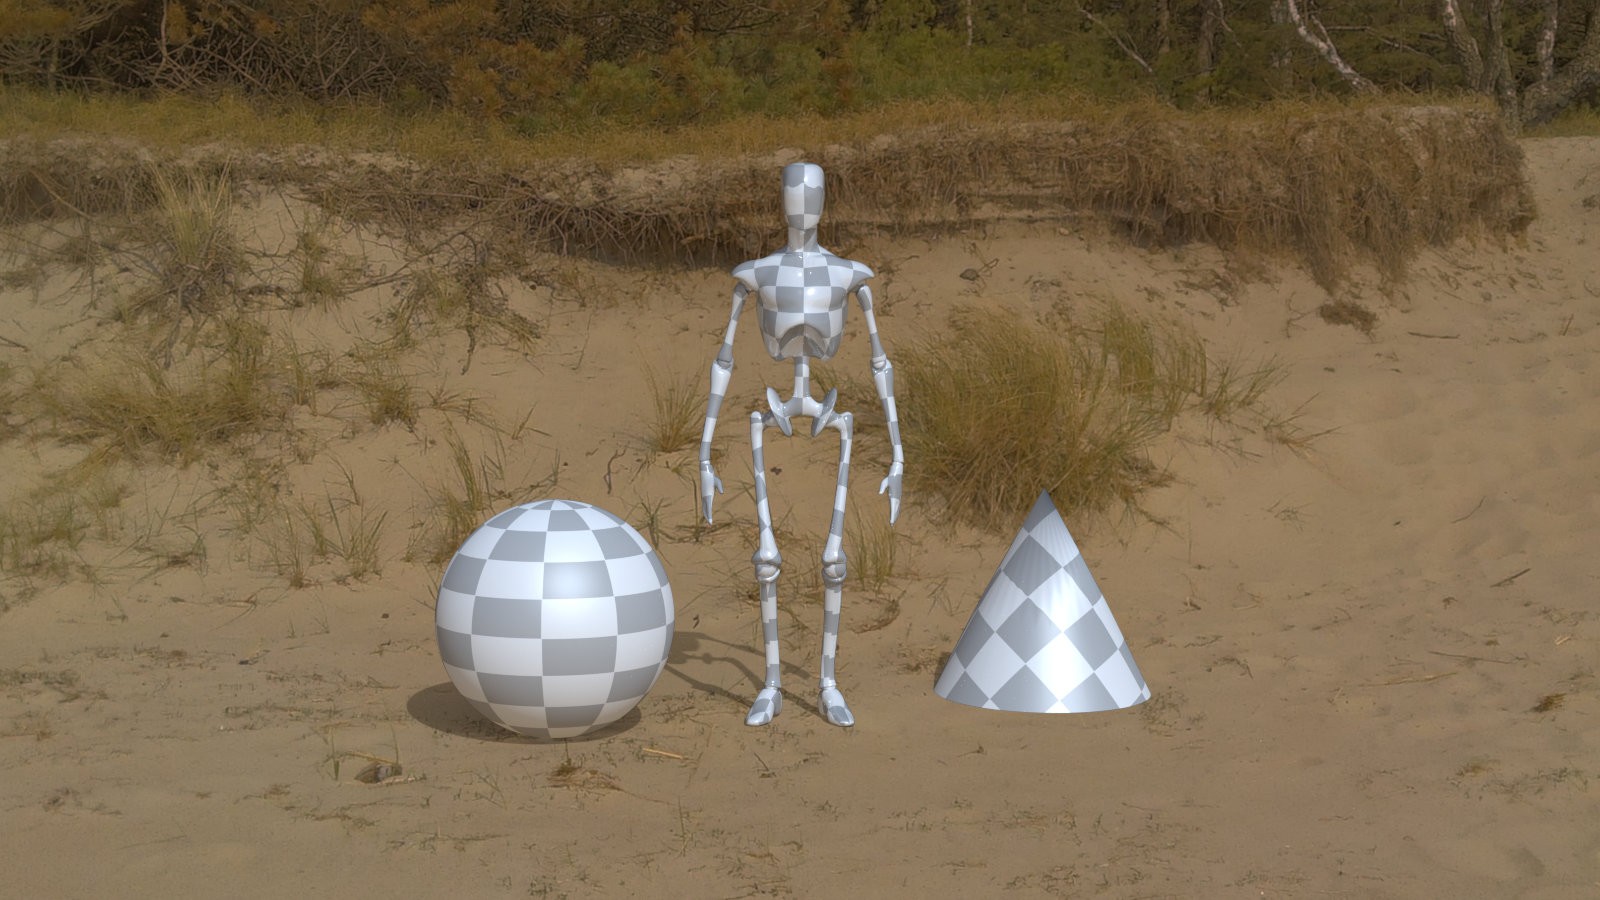
Even in this case, I believe that making even a slight adjustment to the focus will yield better results.
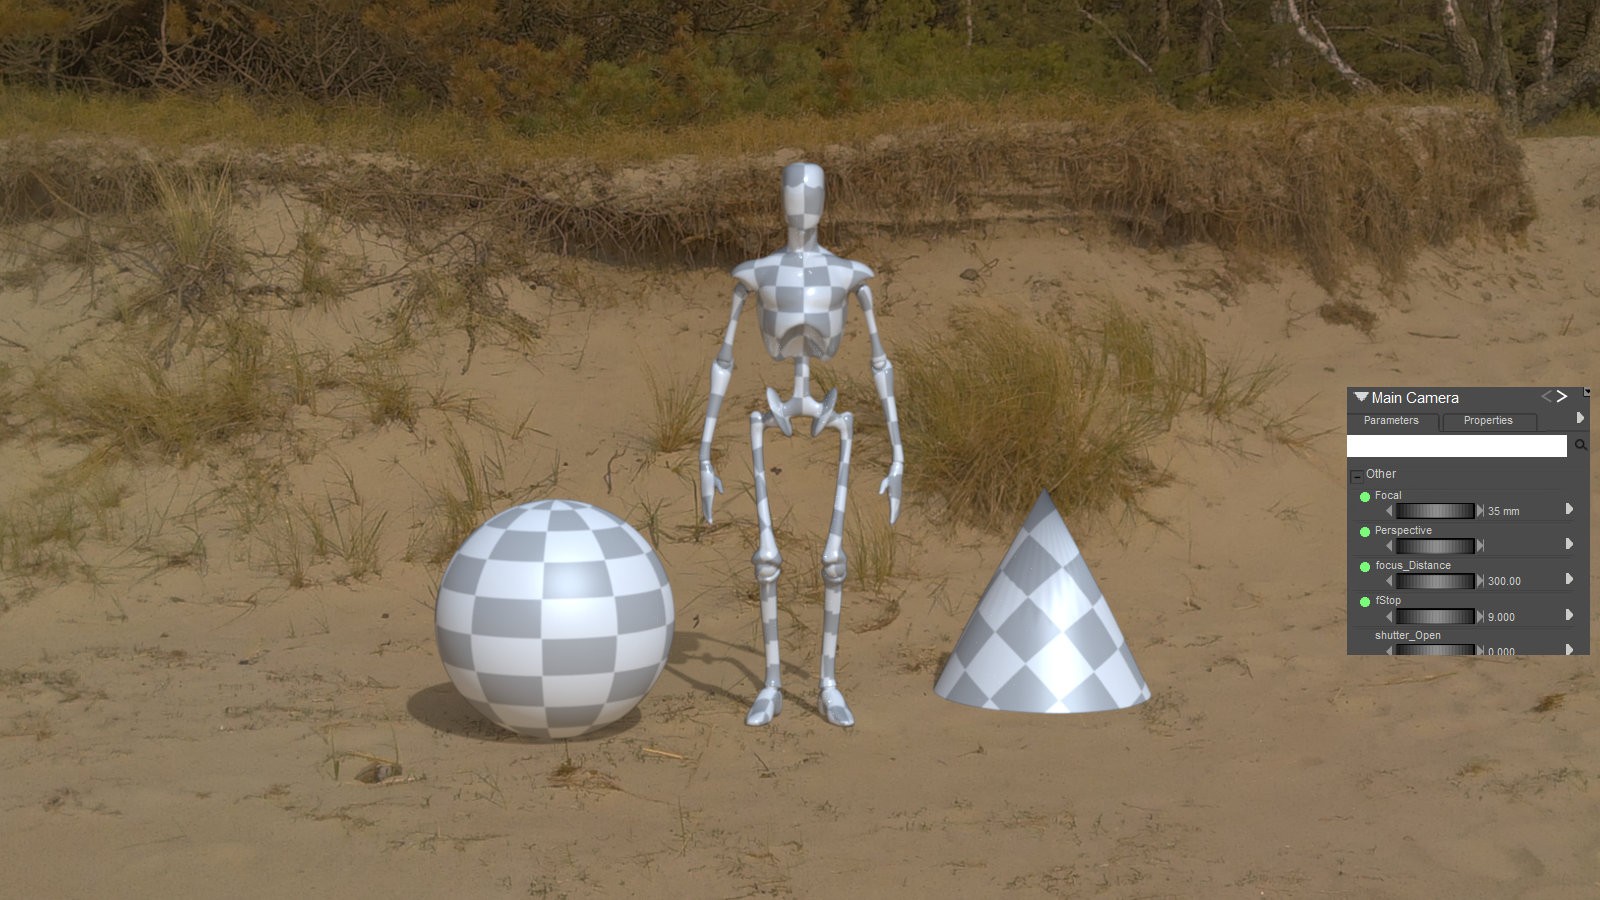
Please note, however, that the focus adjustment method described above is not suitable for scenes involving large objects or objects distributed across a wide area.

I often have multi-figure scenes, and developed some habbits to keep track and reduce software calculations for conformers long before grouping was added:
• I parent conforming clothing and hair to the BODY of the figure using them. This way everything is moved, hidden, unhidden, and scaled together.
• I go into the Properties tab of the BODY of each base figure in a scene and give it a unique scene name identifier. This also affects their listing in the Hierarchy editor and makes it easier to find specific characters in a large or complicated scene.
• I often create stock setups of given figures in different outfits, with everything parented, and save these to a custom folder for quick reuse across scenes.
All art is experimental. All life is art.
Buy me a coffee, or some ramen?

Privacy Notice
This site uses cookies to deliver the best experience. Our own cookies make user accounts and other features possible. Third-party cookies are used to display relevant ads and to analyze how Renderosity is used. By using our site, you acknowledge that you have read and understood our Terms of Service, including our Cookie Policy and our Privacy Policy.
Poser peeps~
If you've got some favorite tips and tricks that you use frequently as part of your workflow, please share them with the community and post images to show us what the results look like. Be sure to state which version of Poser you're using.
Let's get those creative juices flowing!