
Renderosity Forums / 3DS MAX
Welcome to the 3DS MAX Forum
Forum Moderators: wheatpenny
3DS MAX F.A.Q (Last Updated: 2024 Aug 27 11:07 am)
Welcome to the 3DS Max Forum!
Considering 3ds Max? Download the FREE 30-day trial here

Ready to purchase 3ds Max? Go here
Renderosity maintains a zero tolerance policy concerning the trading/use of illegal software.
Refer to the Terms Of Service for the lowdown concerning warez.
POSER/MAX FAQ - This covers MANY of the issues involved when using Max in conjunction with Poser.
Take the time to look over this post before starting a thread in the forum.
Checkout the Renderosity MarketPlace - Your source for digital art content!

Enjoy your stay and keep coming back!

Subject: Camera question


That kind of distortion (paralax) occurs when the camera is lower than the target.
This is a common problem that architectural photographers deal with every day. We in the digital world can correct this easily, but photgraphers need to use the features of a view camera to correct this.
The lens distortion from a short lens is a different thing but may also be happening in your photo.
I've done what your doing before and trial and error is the best approach.
Max does have a camera match utility that you could try. I never had any luck with it.

I don't really know how better to explain it. In a normal photo, without correction, if you shoot up from a low angle, like trying to shoot a tall building, the perspective shrinks as you go up. It distorts. So it looks like the walls are moving inward as you go up. I'm sure you've seen this distortion in Max. In fact, Max even exagerrates it a bit. But in this photo that I want to emulate, the camera is near the floor, shooting up a stairway. But instead of that normal kind of perspective distortion, it's opposite, so that it looks as if the walls, all the lines are moving out as you go upward. I can't figure out how to emulate that perspective trick. A fisheye camera would curve the lines. And I'm afraid I'm not so good at modeling that I could lean everything like that in the modeling process.
Talent is God's gift to you. Using it is your gift to God.

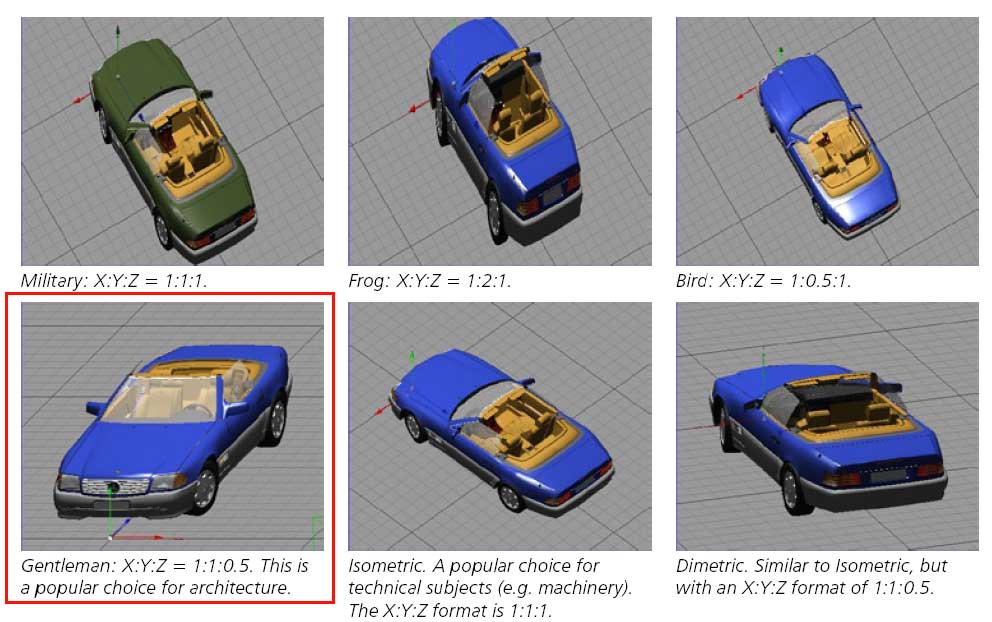

Max has Top, Bottom, Front, Back, Right, and Left views available, plus Camera views for any cameras you create, and a user-definable "User" view. (I've never experimented with the User view so I don't know anything about it).
Jeff
Hablo español
Ich spreche Deutsch
Je parle français
Mi parolas Esperanton. Ĉu vi?
Attached Link: http://www.tutorialsworkshop.com
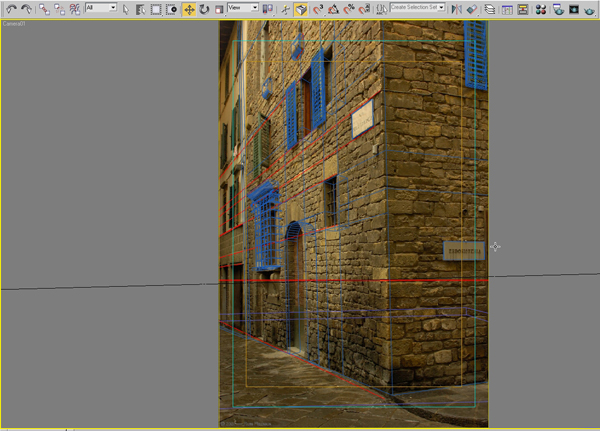
### Step 1Create a model! We won’t be discussing the modeling process here, as it’s something I have already covered in my previous post. So at this point I’ll assume that you have either completed my previous tutorial, or you can comfortably model from photographic reference. We’ll now move on to discuss the shader, material and rendering setup.
For this tutorial I’ll be using the setup below, which is very similar to that used in my previous tutorial (Premium subscribers can download the full scene file and follow along.) To produce the projection we’ll be using the Camera Map Per Pixel shader. This shader lets you project an image through a scene camera onto the geometry to which the shader is applied, and it is incredibly useful for things such as matte painting. Whilst quick to setup and not without it’s limitations, this technique is incredibly powerful and can garner incredible results with a minimum of fuss!
Step 2
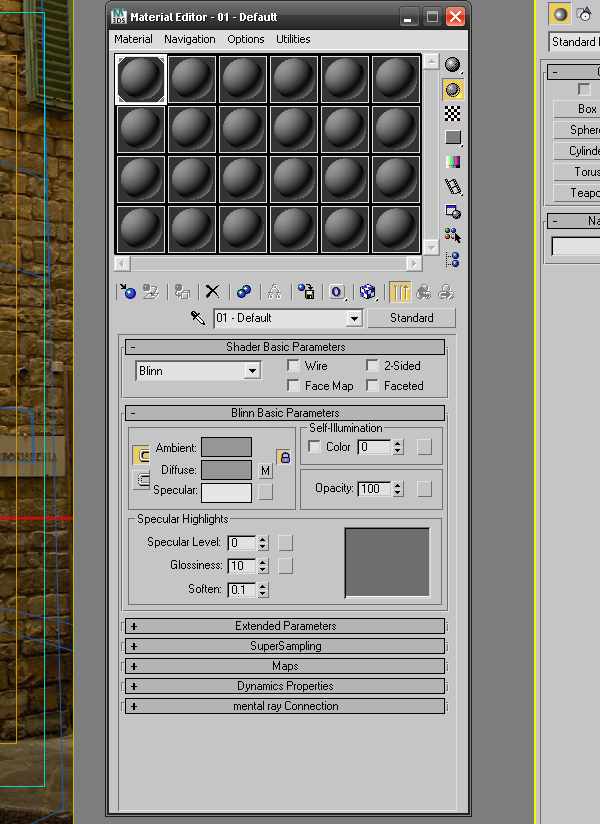
Press M on your keyboard to open up the Material Editor.
Step 3
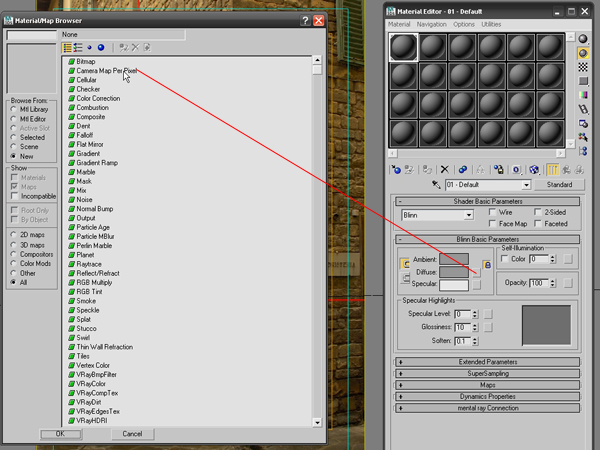
Click on the grey box next to Diffuse to open up the Material Map Browser.
Step 4
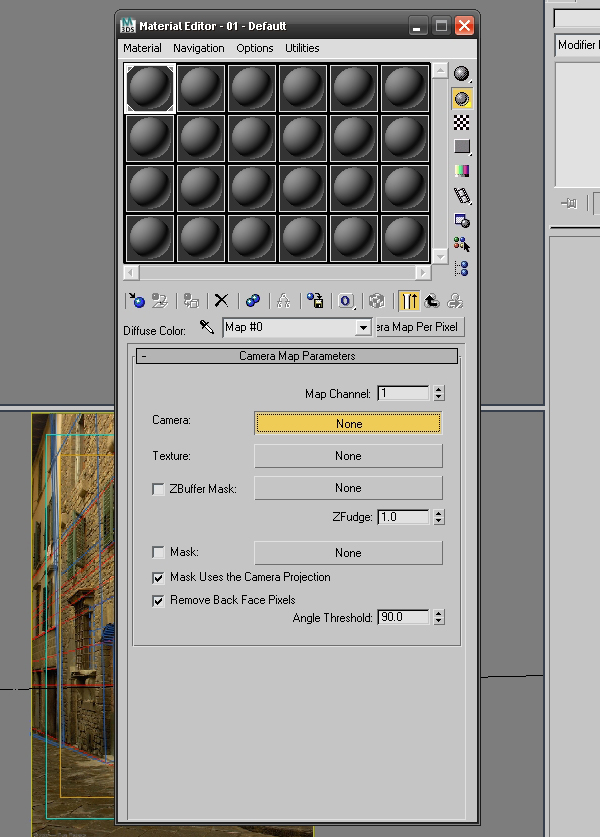
Assign a Camera Map Per Pixelshader to the diffuse channel of the material as shown. The settings for the shader are explained below :
- Camera – This needs to be the static camera through which our texture will be projected. Click it once to turn it on, and then choose the camera from your scene by selecting it in a viewport. Once assigned, the camera’s name appears on the button. This camera is then also used to render the Texture and ZBuffer Mask components detailed below.
- Texture – You can assign any kind of map to this channel, however typically this is where you put the file you want to project – in our case the background image we used to model the scene.
- ZBuffer Mask – You can remove certain areas of your model from the project in two ways. Here, you can assign an image file that contains Z-depth data which, when used with the ZFudge value, can ‘crop’ out parts of the projection based on their distance from the camera.
- Mask – The second method to remove areas from your projection is to use this mask channel. This uses a greyscale image in which the black areas of the mask create transparent pixels in your projection, white areas create opaque pixels, and gray areas are partially transparent dependant on the gray value itself.
- Remove Back Face Pixels – When on, this setting excludes faces from the projection if they point more than a certain angle away from the camera. The angle is defined by the Angle Threshold value, and this setting defaults to on.
Step 5
Before applying our new material we have to select all of the polygonal objects in the scene that we wish to project onto, and Attach them together, creating a single object. find more on http://www.tutorialsworkshop.com

Privacy Notice
This site uses cookies to deliver the best experience. Our own cookies make user accounts and other features possible. Third-party cookies are used to display relevant ads and to analyze how Renderosity is used. By using our site, you acknowledge that you have read and understood our Terms of Service, including our Cookie Policy and our Privacy Policy.
I want to duplicate an interior photo I have of an old house, but I'm trying to figure out the camera setting. I know the camera is fairly low, about kneeling height. But instead of the typical perspective where the walls move inward as you go up, it's the opposite. The walls move out as you go up. Now, I figure that must be a fairly shallow camera setting, less than 35mm. But just what I don't know, without getting too much of a fisheye effect. Any ideas?
Talent is God's gift to you. Using it is your gift to God.