
Renderosity Forums / Poser - OFFICIAL
Welcome to the Poser - OFFICIAL Forum
Forum Moderators: RedPhantom Forum Coordinators: Anim8dtoon
Poser - OFFICIAL F.A.Q (Last Updated: 2026 Nov 10 6:47 am)

Subject: maybe someone can fix this for me cause im tired and i dont think i did this rig

- 1
- 2

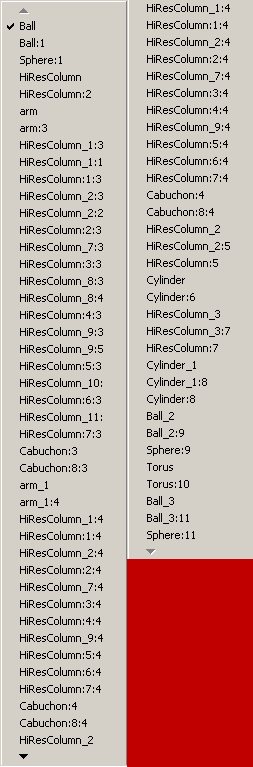
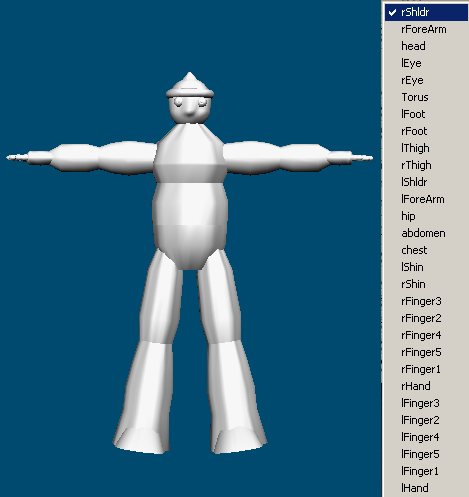
The attached image shows all the groups in your obj file. You need to loose all that "HighResColumn" and "Cabunchon" stuff and end up with only functional parts with descriptive names, eg "hip", "lThigh", "lShin", "lFoot", "rThigh", etc.
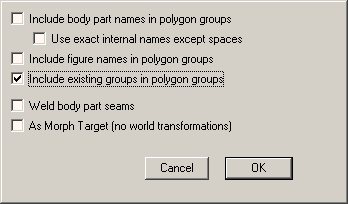
It will also help if you loose all that "_7:4" and ":6:4" type stuff of the end of the actor names. When exporting geometry from Poser, only use the "include existing groups..." and/or "As Morph Target", never use any of the other export options.
Stick with it, you will get there! 

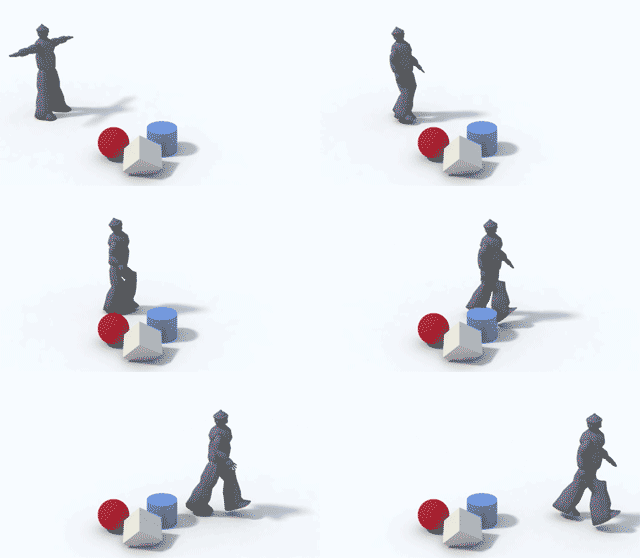
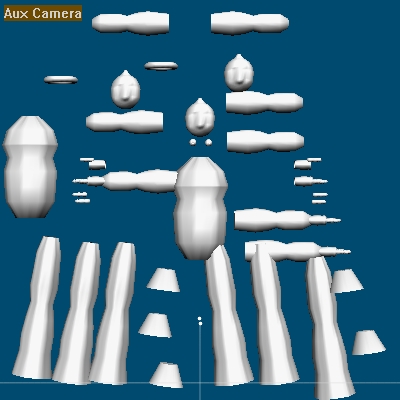
The object needs to be grouped before it can be rigged. The problem is there are too many groups, there are several copies of the legs head and arms all superimposed over each other, and the with the names used, it is impossible to tell what is supposed to be what.
Try this. Import the Robot.obj into Poser, select it then open the Group Editor. Click the Spawn Props button in the Group Editor, close the Group Editor, delete the original Robot object from the scene.
You are now left with the individual components of the obj file (see image above). Select any part with the cursor and pull it out of position, do this with all the parts. You will see that you have multiple copies of every part. You need to end up with only one copy of each part, and with those parts named appropriately.
If you can get to that point, I (and probably others) can give you some help with the rigging. But it's pointless trying to rig the robot until the geometry is fixed.
oh WOOOW O.O i thought hmmmm interesting. ok i better fix it i hate to have to redo the whole thing
is this better guys?
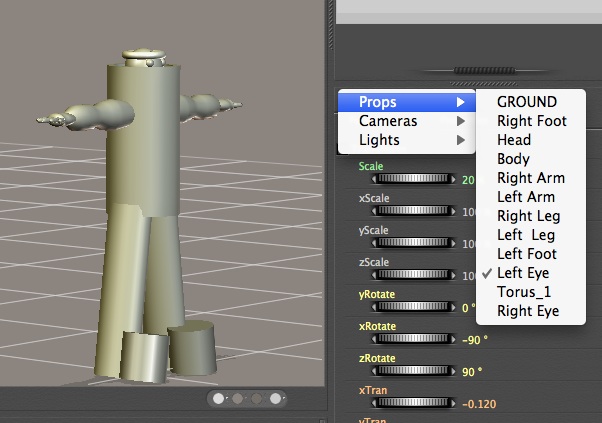
Quote - omg...what happened to the morphs i used =o
Turn off "Use external binary morph targets" in Poser's General Preferences. Having this option enabled only causes problems in my opinion. Also make sure "Use file compression" is turned off, as you won't be able to edit files that have been compressed.
I have partially fixed your obj file. I didn't have enough time or motivation to do the hands, so this obj is without hands, but they could be added later. Otherwise the obj is ready to rig within the limits of the grouping and mesh topology.
If you IM me with an email address, I will send you the obj. Suggest you don't post your email address in the forums as spam bots might see it.
I sent you two obj files last night, did you get them? If so we can proceed to rig the object, that is to say turn it into a figure and adjust the joints. I suggest we work with the second obj I sent you "Robot-B-02.obj".
I'm no expert at rigging figures, but I think I should be able to at least show you how to do a basic rig. If someone more experienced than me wants to help, please chime in.
There is not just one way to make a figure, what I will show you is just one of several ways. Let me know if you want to proceed.
Quote - I sent you two obj files last night, did you get them? If so we can proceed to rig the object, that is to say turn it into a figure and adjust the joints. I suggest we work with the second obj I sent you "Robot-B-02.obj".
I'm no expert at rigging figures, but I think I should be able to at least show you how to do a basic rig. If someone more experienced than me wants to help, please chime in.
There is not just one way to make a figure, what I will show you is just one of several ways. Let me know if you want to proceed.
yes i gotten them, thank you so very much for all the help your giving me =)
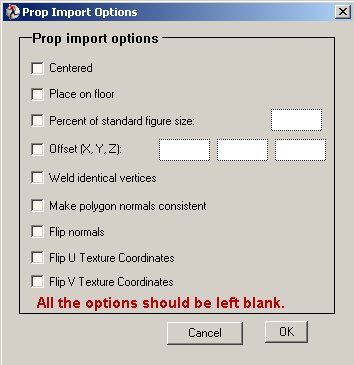
Import the "Robot-B-02.obj" into Poser, all the Import Options should be left blank. Open the Grouping Tool, press the "Spawn Props" button, close the Grouping Tool.
Delete the Robot-B-02 prop from the scene. We now have all the individual parts of the figure, next we need to set the parenting hierarchy for the figure.
Open the Hierarchy Editor.
To be continued...
Quote -
OK, let's start to make the figure.Import the "Robot-B-02.obj" into Poser, all the Import Options should be left blank. Open the Grouping Tool, press the "Spawn Props" button, close the Grouping Tool.
Delete the Robot-B-02 prop from the scene. We now have all the individual parts of the figure, next we need to set the parenting hierarchy for the figure.
Open the Hierarchy Editor.
To be continued...
I got all that i'll wait for the next part
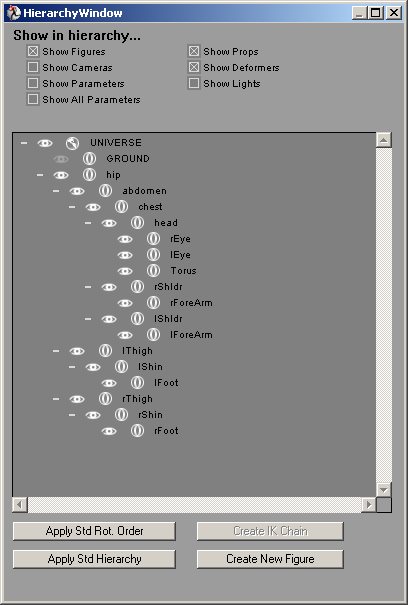
Drop the rEye, lEye, and torus on the head. Drop the head on the chest, the chest on the abdomen, and the abdomen on the hip.
Drop the rForArm on the rShldr, drop the rShldr on the chest (you will need to click the "+" on the hip and abdomen, to see the chest). Do the same for the left arm, droping the lForArm on the lShldr, and the lShldr on the chest.
Drop the rFoot on the rShin, drop the rShin on the rThigh, drop the rThigh on the hip. Do the same for the left leg. The hierarchy is now complete. It should look like the picture above.
Next step is to create the figure.
To be continued...
Whoops! I did not follow my own instructions correctly  . In the image from my last post, the left leg is above the right leg in the hierarchy. This does not matter in terms of function, but as I said it will affect how the parts are displayed in the drop-down menu. If you follow my instructions exactly, you should end up with the right leg above the left leg.
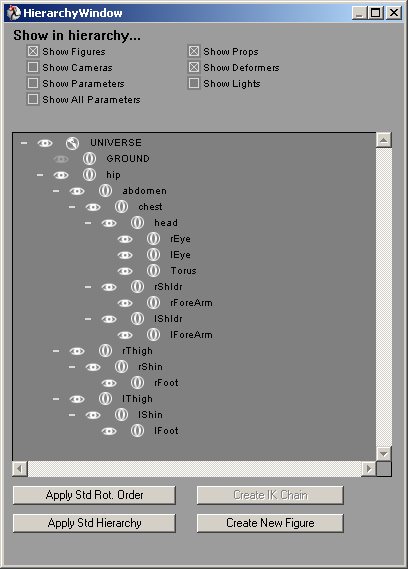
At this point it is probably a good idea to save a pz3 (scene) file, so you don't loose your work this far if something should go wrong in subsequent steps.
With the Hierarchy Editor open, select the hip (the base of the parenting chain). You should see a button at the bottom of the editor "Create New Figure", press that button. You will be prompted for a name, use "Robot-C-01", and press the OK button. This will create the figure file (cr2) and place it in the New Figures folder.
You now have a figure, but there is still a lot of work to do before it's joints will work well. Start a new document (scene) and have a look at your new figure.
I have to go and eat now, so it may be a while until my next post.
To be continued...
Quote - is making his hand posable more complcated?
It's all basically the same procedure, but if the hand is to have separate posable fingers, then is is a lot more work because of the many extra parts. That's also why I did not include the hands in the obj file. I just did not have the time to do the extra work.
If you want to model some hands (or extract them from your original obj) we can add them to the base obj. But they would need to be grouped correctly, if they are wrong, I don't have time to fix them at the moment.
Quote - ok please tell me what i need to do to add them to the model
To do it in Poser, you would import the Robot-B-02.obj, then import the hands, then export all that as one new obj. Remember only use the "Include existing groups...", and optionally "As Morph Target..." in the export options.
Or alternatively you should be able to combine the parts in your modelling app.
Note that when you created the figure in the last step, Poser wrote a new OBJ file for it, and placed that file in the same folder as the cr2.
After creating the figure we need to tweak the joints to try to get the figure bending nicely. The first step is to set the "Joint Order". One thing that affects how the figure bends is the order of the rotation channels in the channel stack. There is a standard convention for the channel order and we shall be following that convention for the most part.
Load the Robot-C-01 figure in a new document. Open the Joint Editor, select the rShldr. At the bottom of the Joint Editor you will see a section named "Joint Order", the current order will be YZX, click on the small black arrow and select XYZ. Select the rForArm and set the joint order to be XZY. Select the rFoot and set the order to ZYX. Repeat the same procedure for the left side of the figure.
Save the figure back to the Figures palette as "Robot-C-02". We are going to do incremental saves, so that if anything goes wrong, we can always revert to the last good version.
The next step will be to set the joint centers.
To be continued...
Quote - akura_ Would you mind if I download this figure? I have been watching the thread and would like to learn how to do this myself. It would be easier to follow along if I was using the same figure as you and lesbentley
pdg
No not at all . be my guest ^^ les is doing a huge amount of help for me =)
and i got higharcky editor open but none of the body types are listed and in group editor was i suppose to selete all before using spawn props
I haven't had a chance to look at your new obj yet. Providing it it is made correctly the instructions so far should be the same for the new object, except that in the parenting step you would first parent all the fingers to the hand (if it has separate fingers), then parent the hands to the ForArms. Then just proceed to follow the rest of the instructions in that step.
I'll leave out detailed instructions for rigging the hands for the moment, and come back to them when I have had a chance to look at the new obj file.
... To continue.
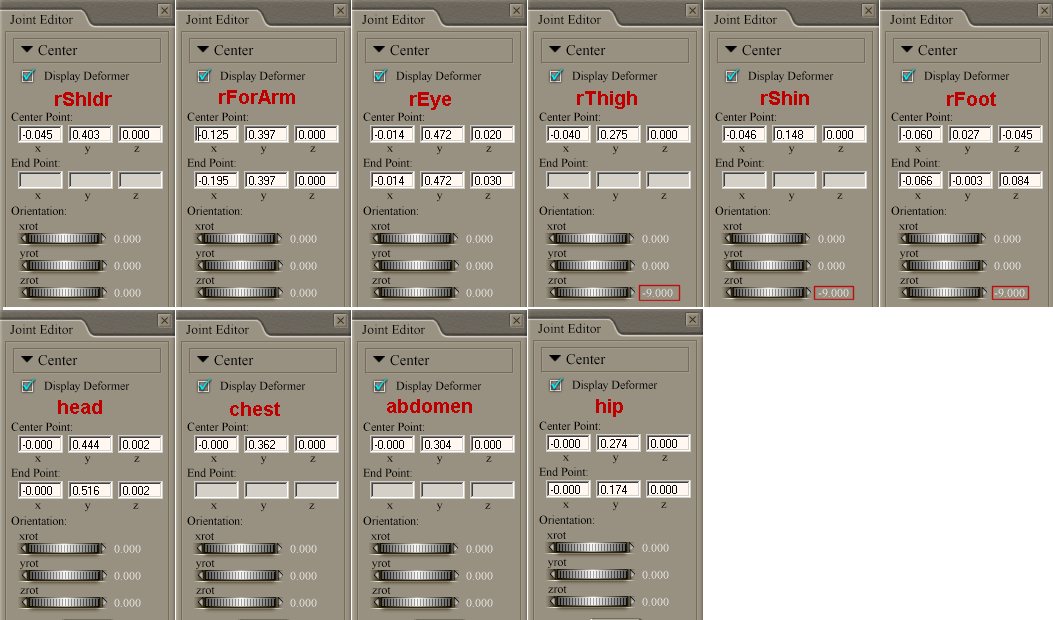
In this step we will position the joint centers. The joint centre is the point around which the actor will rotate when a body part is bent. There is often no unique "correct" placement for the joint center, you just have to experiment and find what works best.
At the moment the placing of the joint centers is only provisional, on a best guess basis, we may need to change it later as we adjust other parameters of the joints. Don't move any parts of the figure in this step, the figure should be in its zeroed state.
Open the Joint Editor, select the rShlder. Set the Centre Point to x -0.045, y 0.403, z 0.000. Select the other actors in turn and set the Centre Points as in the graphic above. Don't forget to set the z Orientation on the leg parts, this ensures that the joint is in line with angle of the leg. Don't set the centers for the right arm or leg, we can do that automatically.
Memorize the figure (Alt+Ctrl+F). From the menu bar do, Figure > Symmetry > Right to Left, when prompted to copy the joint zones, answer "Yes". This should mirror the joint set up from the right arm and leg to the left arm and leg.
Memorize the figure. Save the figure back to the palette as "Robot-C-03".
In the next step will be the adjust various other joint parameters.
To be continued...
Adjusting the joint parameters.
At the moment some of the joints bend in a pretty crazy way. Don't despair, we will start to fix that now.
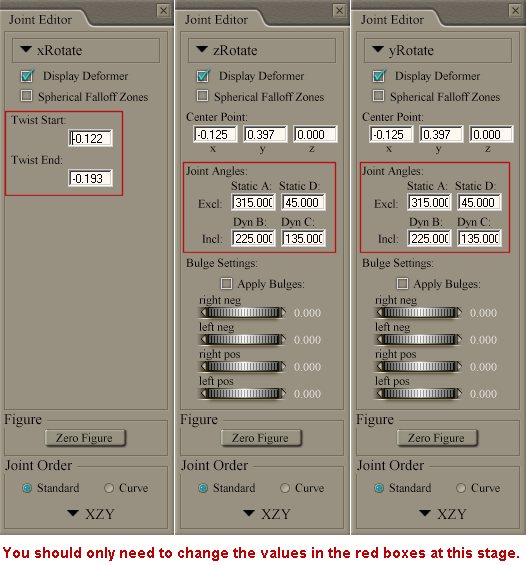
Select the rForArm, open the Joint Editor, click the little black arrow near the top, and select "xRotate" this is the twist parameter for the forearm. You should be able to see the twist icon in the forearm which is a green line with a green bar at one end and a red bar at the other. we want the twist to extend the whole length of the forearm, to do that the ends of the icon need to be at the ends of the forearm. If we place the cursor over one of the bars we will be able to drag that end of the line to where we want it, try that now. The ends of the bar can also be moved by typing numbers into the numeric fields in the Joint editor. The red bar is where the twisting starts from and the green bar is where it ends.
I have shown the values that I feel are correct in the image above. You can type those values into the numeric fields to get the same values as I have used.
After setting the xRotate (twist) parameter, click the black arrow again and select "zRotate". If poser did the same for you as it did for me, this will be completely the wrong way round. The zRotate icon consists of two green lines and two red lines. Parts of the figure between the angle of the green lines will bend at full strength, parts between the angle of the red lines will not bend at all, parts between the red and green lines will bend at a lesser strength, more strongly near the green line and less strongly near the red line.
Set the values for zRotate as in the graphic above.
Now select yRotate. Its icon is the same four lines.
Set the values for yRotate as in the graphic above.
Now from the rForeArms parameters palette, try bending it in various directions, then try the same thing with the lForArm, which has not had its parameters set, and see the difference!
In the Joint editor click on Zero figure to zero all the figures rotations. Memorize the figure (Alt+Ctrl+F). From the figure menu do, Symmetry > Right to Left. This will mirror your settings from the right side to the left side. Do Memorize again.
Save the pz3 so it is ready for the next step.
Note that in the forearm xRotate was the twist parameter, but twist is not always xRotate, it varies depending on the Joint Order.
Now it is my bed time, so you will have to wait until tomorrow for the next instalment.
To be continued...
akura_
I downloaded your DJMAN.obj. It is all one group! An obj can't be converted into a figure unless there is one group corresponding to each actor (body part). The name of each group should clearly reflect what the body part is. Take a look at the Robot-B-02.obj I sent you, and how that is structured. Your object needs to follow the same type of scheeme.
A can't advise you on how to do the grouping, that would depend on your modeling application, and I don't know much about modeling. I sugest you seek advice on how to do the grouping in the Renderosity 3D Modeling Forum.
Alternatively if you can produce two separate obj files, one with a right hand and one with a left hand, we could add those to the Robot-B-02.obj.
http://www.megaupload.com/?d=4GKXDCNP
http://www.megaupload.com/?d=4E4HR8HW
Here are the models for the hands Less. I had to export them as .lwos only way i was able to keep them together. and My modeling program im using is Poser 8 ^^
Quote - My modeling program im using is Poser 8 ^^
That's very courageous of you to use Poser 8 for a modelling program! But I don't understand why you then have to use LightWave. Why can't you just export the obj files from Poser, and leave it at that?
I'll try to add the hands to the Robot-B-02.obj, but first I need to find some free utility that can convert LWO to OBJ, as P6 does not seem able to import you lwo files.
Quote - > Quote - My modeling program im using is Poser 8 ^^
That's very courageous of you to use Poser 8 for a modelling program! But I don't understand why you then have to use LightWave. Why can't you just export the obj files from Poser, and leave it at that?
I'll try to add the hands to the Robot-B-02.obj, but first I need to find some free utility that can convert LWO to OBJ, as P6 does not seem able to import you lwo files.
smiles ^.^ well for some reason when I exported the hands. only one finger was exported even though i click export all >.> sides the ground
Quote - I cross-posted with your last message. I don't know why you would only get one finger, you should get everything that is selected, that is to say has an "x" against in the Hierarchy Selection box. Try it again, perhaps you made some mistake the first time.
I exported using defult settings and still same thing.
OK, don't bother about the hands. I will extract them from your original obj file and add them to the base Robot-B-02.obj. Hopefully I can do that sometime today, I will then email you the new obj file. When you receive the obj file could you please upload it to your megaupload account, so that parkdalegardener, and anyone else following this thread can also follow the steps of the tutorial?
Quote - OK, don't bother about the hands. I will extract them from your original obj file and add them to the base Robot-B-02.obj. Hopefully I can do that sometime today, I will then email you the new obj file. When you receive the obj file could you please upload it to your megaupload account, so that parkdalegardener, and anyone else following this thread can also follow the steps of the tutorial?
of course =) ^_^
Quote - > Quote - OK, don't bother about the hands. I will extract them from your original obj file and add them to the base Robot-B-02.obj. Hopefully I can do that sometime today, I will then email you the new obj file. When you receive the obj file could you please upload it to your megaupload account, so that parkdalegardener, and anyone else following this thread can also follow the steps of the tutorial?
of course =) ^_^
Thanks. I downloaded the obj last night and after finding that it wasn't up to date with the tut by les I started grouping the figure in Poser hoping to catch up. This would be a much better solution
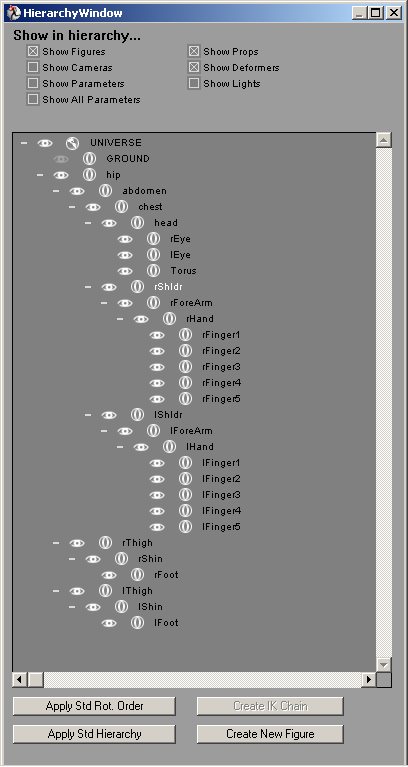
Go back to page one of the thread and start following the steps (I think it starts at post number 17). Anywhere I mention "Robot-B-02.obj", just take that to mean the new "Robot-C-01.obj". In the post where I talk about setting the parenting hierarchy (I think that is post #19), first do the extra step of dropping all the rFinger parts on the rHand, and all the lFinger parts on the lHand, then drop the hands on their respective ForeArms. Then just follow on with the rest of that step. the hierarchy should now look like the image above.
Now follow the rest of the steps in the tutorial, from that point on.
Quote - OK, we now have an obj file we can work with "Robot-C-01.obj", the link is in akura's post above. So download that, and let's proceed with the tutorial.
Go back to page one of the thread and start following the steps (I think it starts at post number 17). Anywhere I mention "Robot-B-02.obj", just take that to mean the new "Robot-C-01.obj". In the post where I talk about setting the parenting hierarchy (I think that is post #19), first do the extra step of dropping all the rFinger parts on the rHand, and all the lFinger parts on the lHand, then drop the hands on their respective ForeArms. Then just follow on with the rest of that step. the hierarchy should now look like the image above.
Now follow the rest of the steps in the tutorial, from that point on.
I'm on it les. Thanks. Between this and Geep's tutorial on building a house the old brain is working overtime.
- 1
- 2

Privacy Notice
This site uses cookies to deliver the best experience. Our own cookies make user accounts and other features possible. Third-party cookies are used to display relevant ads and to analyze how Renderosity is used. By using our site, you acknowledge that you have read and understood our Terms of Service, including our Cookie Policy and our Privacy Policy.
can someone check this to make sure i rigged his right please. I dont think i did this right =(
Done in Poser 8
http://www.megaupload.com/?d=8K8EQ6KG
http://www.megaupload.com/?d=1Q16XO0X