Toyen opened this issue on Oct 17, 2014 · 15 posts
Toyen posted Fri, 17 October 2014 at 3:49 AM
I posted this on autodesk forum a while ago and got no reply so I thought I might as well try my luck here : )
Hello everyone!
I hope you are having a great day!
So, I have been struggling with Xgen for a while now. After watching several tutorials, reading through the manual and spending a lot of time trying to figure Xgen out trial/error style, I am still having trouble with the very basic workflow.
I´ll start with the basic issues I am having right now and will be adding more to the list.
1. The size and placement of guides and primitives.
What I have noticed is that the guides do not always correspond with the size of the mesh. In my case (trying to create long hair for a female character) the mesh I import is usually too small and the guides that I add with Xgen therefore end up being super big so I have to scale the mesh up trying to guess what would be the right size.
This causes another issue to user who for some reason just need everything in the scene to be big. The guides and generated primitives are then too small.
So:
Small mesh - too big guides and primitives
Big mesh - too small guides and primitives
Is there a way to make the guides and the primitives automatically correspond with the size of the mesh?
I was trying to follow this tutorial - http://knowledge.autodesk.com/support/maya/learn-explore/caas/CloudHelp/cloudhelp/2015/ENU/Maya/files/GUID-48475A56-0F29-46DB-976B-F35763E78B38-htm.html
I was following the video in the "Modify and shape guides for the base hairstyle" and around 1:35 they generate a first preview with just the basic settings increasing density to 20 so there are more hair primitives.
Now, this is what MY preview with basic settings (with density set to 20) looks like: http://forums.autodesk.com/autodesk/attachments/autodesk/area-b41/9420/1/preview.png
Quite a difference isn´t it.
Can somebody please tell me why my primitives are NOTHING like those in the video and some of them do not follow the guides, which are placed rather close to the scalp?
I´d be very glad for any help I can get.
Thank you.

agape posted Sat, 18 October 2014 at 3:02 AM
Toyen, it looks like you and I are the only ones who come here anymore....and nobody has responded to my questions either. I think they should delete this part of the forum since it is worthless. I am going over to the Autodesk forums. You may want to do the same.
Toyen posted Sat, 18 October 2014 at 3:40 AM
I posted this on Autodesk forums and I got no reply as well. Their forums are pretty dead as well : / : (

Modulok posted Sun, 19 October 2014 at 4:02 AM
Your problem appears to be a matter of scale. Your model is probably way smaller than the Autodesk model. When working with a character like in the Autodesk tutorial, first make sure your character is approximately real-world scale or at least scale similar to theirs. This matters quite a bit when making an initial Xgen description. It also matters for other areas such as certain shaders when rendering take scale into account, as do certain physics driven processes available in Maya.
For example, a human female could be around 165cm tall as measured in Maya. It can be anywhere close to this. (In fact it can actually be just about anything so long as you know this and are willing to tweak various Xgen attributes to compensate, etc.)
However a 2cm tall character will produce seemingly odd results compared to a tutorial that might assume the character is 200 cm tall. This is because things such as the density attributes and so forth when creating descriptions with Xgen are somewhat relative to scene units. They're not scene units, but they do take scene units into account. They also take surface parametrization into account. The more uniform the polygon spacing is - the better! To get results close to the Autodesk results you're going to have to scale your character to the same approximate world-space scale as theirs, which I'm guessing - and this is just a guess - is probably real-world scale or thereabouts.
Be aware you can scale the guides with the scale tool just as you would
ordinary geometry Place your guides first without concern for their scale. Then once they're placed select them in the Outliner and scale them appropriately. Then move on to modifying their shape to follow any contours you want, etc.
When scaling the guides they're easiest to select in the Outliner window via Window -> Outliner. Expand your collection and description and shift+select all of the guides at once. Select them all and uniformly scale them as appropriate for your model. Always remember to click the 'update' button in the XGen window. Otherwise your primitives may not match your guides. This can occur even when "auto update" is enabled.
If your scale isn't the same as theirs you will have to adjust your density and width attributes higher or lower to get a similar look. Attributes such as primitive length are relative to the guide lengths which is why we scale those first.
The size if your guides aren't going to automatically correspond for your mesh because Maya has no idea what your mesh is. To Maya, it's just a shape. It could just as easily be a be a mountain and you're making a forest or it could be a toothbrush. Maya can't tell the difference.
-Modulok-
I hope this helps some.
P.S. This forum indeed goes through cycles of a lot of crazy activity and then it's like a a great plague strikes and it's a ghost town. Nemirc and myself have seen it die and rebound several times.
Toyen posted Sun, 19 October 2014 at 4:25 AM
Oh my savior!
Hello there Modulok and thank you very much for your reply! I will try to scale my mesh and try to create another hairstyle as soon as I have a spare moment to spend with Maya.
I was thinking it had something to do with the scale so I was scaling my mesh up and down trying to get different results but never got the right results.
So the best way to get the right scale would be to create a two locators and a distance tool between them to measure the height of my female mesh, right?
I would also need to switch the units to cm somewhere I guess.
And about the forum activity, now that I finally got a reply from someone about Maya, I am going to bring this forum back to life!
Toyen posted Mon, 20 October 2014 at 8:20 AM
Hello there again!
I just tried to create a new XGen hairstyle today, this time with real world character scale (height - around 170cm) and the results are a bit better but still far from the ones in the video after setting density to 20 so my guess would be, they have the character scaled waaaaay up beyond real world scale.
Which makes me wonder, why was this not mentioned in any video tutorials or even in the user manual. It´s quite an important bit, the scale thing.
So I have no choice but to go trial/error with this until I get the right scale I guess.
However, lets say I get the right scale, create a hairstyle and now I need to scale my character down (or even up) and I´d like the description to scale along nicely as well.
I have tried selecting both ,my characters geometry and the description in the outliner and scaling them up (hoping that as I´d scale them both up, I´d automatically get better results when it comes to the density and other settings) but as soon as I scaled them both up a little bit, the hairstyle got messed up completely and at one point it wasnt even following the figure´s scalp anymore.
So I tried to scale it back down but this time, it wouldn´t scale at all.
I know I can set the length of the Xgen guides by scaling them but I have no idea how to handle things like this, when I need to scale the hairstyle up or down after the editing of the description is finished.
Any help would be much appreciated! : )
Modulok posted Mon, 20 October 2014 at 4:06 PM
I wouldn't worry about matching their parameters so much as I would matching their look. Establish your scale first. This holds especially true when trying to scale rigged characters with simulations and dynamics involved. For sanity sake, avoid it if you can.
That said, you could probably write an expression to adjust the relevant attributes based on your character's world-space bounding box to try and maintain the same relative look. However unless there is a compelling reason to do this for a given shot, I would avoid it.
-Modulok-
Toyen posted Wed, 22 October 2014 at 12:08 PM
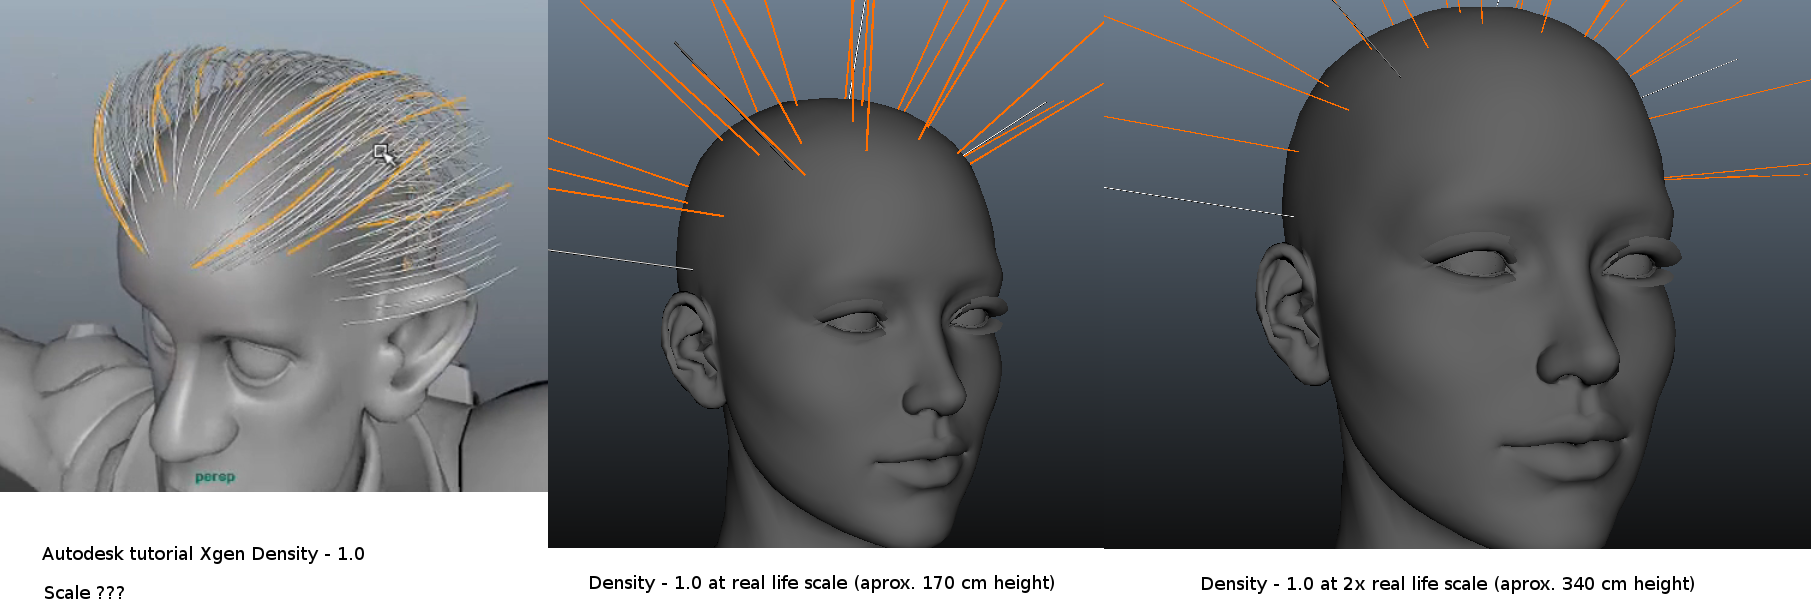
I thought I´d post pictures of my progress trying to get the right scale so when the density is at 1.0, it looks like in the video tutorial.
Here´s what I found:
Scaling the character up/down seems to affect the scale of the guide curves as well as the generated primitives but not their density. (I could be wrong but this is what it looked like when I tried it today, see the attached picture).
Having the character somewhere around real life scale (150 - 200 cm I´d say) seems to be the range where the guides and the primitives have just about the right size (or at least a size that is not that bad to work with and better looks can be achieved with further adjustments).
However the starting density still remained an issue at any scale when I played with it today.
I have included a picture. On the left is the density from tutorial set to 1.0. You can see there´s much more hair primitives than there is in my pictures on the right.
I know I could probably just increase the density to a higher number to get the desired look but I still wanna try to get to the bottom of this and figure out why the density is different.
Let me know if you have any idea and have a wonderful day! : )
Modulok posted Fri, 24 October 2014 at 6:12 PM
Looking good so far. I would just up the density attribute myself and not worry about it but I admire your perseverance!
-Modulok-
Toyen posted Sun, 26 October 2014 at 10:16 AM
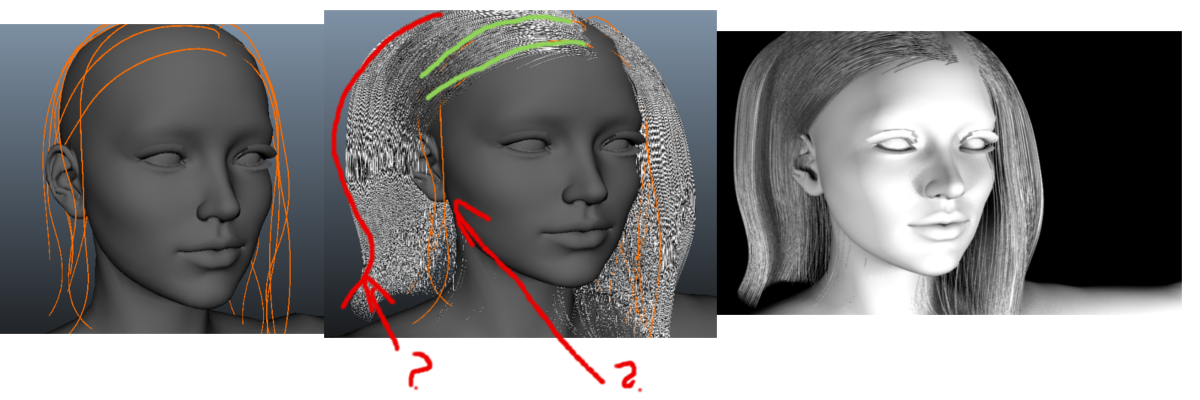
As you can see from the picture on the left, the guides are all places very close to the scalp.
However, when I generate a preview, I am getting this weird volume in the back and I have no idea why that is happening since the guides are all very close to the head.
Also a little bit too much volume is on the right side as well.
And on the left side there also seem to be two guides that do not have any followers and I have no idea why.
Any tips and advice why this is happening would be very appreciated if you have any experience with creating hairstyles with Xgen! : )
Modulok posted Tue, 04 November 2014 at 11:30 AM
I'm guessing, and this is just a guess until I have time to look into it further, but I guess that you have some overlapping guides? The instances are interpolated between the guides, so if the guides are overlapped and so forth, the placement of the instances gets a bit confused.
Toyen posted Tue, 04 November 2014 at 11:59 AM
Hello there Modulok!
I also asked the youtuber who creates various Maya tutorials and got almost the same response.
So I guess the way to go about this is to try to keep almost the same distance between each guide to make the interpolation of primitives nice and clean and make sure they aren´t too close together or overlapping?
I did not have time to play with Xgen again yet but as soon as I get some new results, I´ll post them here : )
Modulok posted Tue, 04 November 2014 at 7:19 PM
I look forward to your results!
-Modulok-
Toyen posted Sat, 15 November 2014 at 3:45 PM
Hello there!
Here´s a quick update on my hair situation!
 - There is however one big issue. After re-opening the scene, I am not able to render the hair.
This has happened to me a few times before. In the Preview/Output tab, after setting operation to "Render", I am not able to select Renderer. The Renderer is set to "None" and cannot be changed even though I have mental ray enabled.
I have noticed that sometimes when I was working on the hair for the first time (not re-opening the scene) even though the Renderer was set to "None" and could not be changed to Mental Ray, I was still able to render the hair. Sometimes this is not the case after saving the scene and opening it again.
Any idea what could be causing this problem?
It might be a bug in which case I might try to load this description into a new maya scene, apply it to the scalp mesh and render it there or I will have to create the hairstyle in one go if I want to be able to render it.
Toyen posted Fri, 21 November 2014 at 12:07 PM
Here I´m posting the latest developments which I also posted on youtube related to my battle with XGen! : D
I started all over again and I have now saved and opened my file a few times and it is rendering properly so far, so I hope Maya will be nice to me and will keep rendering as I try to improve my hairstyle : )
Just wanted to show you and everyone else who might be interested how I´m playing with Xgen.
I´d also love to see what other people are doing with Xgen since there´s not much stuff out there yet so to anyone who might be reading this and is playing with Xgen, send me a link to what you´re doing with it! I´d love to see that.
I am especially interested in character hair creation but I´ll be excited to check out anything and everything else : )
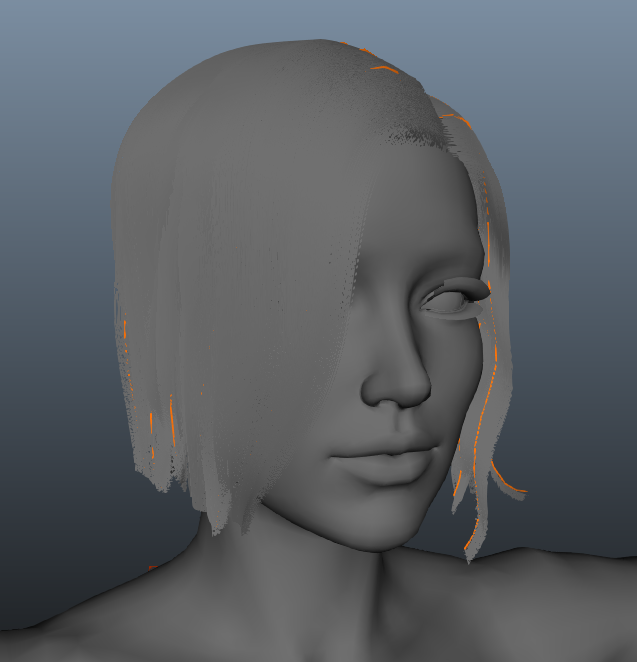
Now to my hairstyle. It doesn´t look very good but it´s a start.
Here are two quick renders - http://s30.postimg.org/n05xjrvkh/Untitled.png
And here´s the guide placement - http://s23.postimg.org/8yhriyjnd/image.png
I think I am still not placing the guides the right way. I started from the bottom of the scalp when populating it with guides to make sure there are no bald spots and went up to the top and I did not really have any bald spots except for the in the front you can see in the picture on the right.
The absolute disaster however are the ends of the hair that look really spiky and chopped.
I added a clumping modifier thinking it would kind of soften the ends but as you can see it didn´t.
I think this might be because the guides that are lying on the shoulders are pretty straight and do not have that many curve points and were placed by hand to appear as if the hair was softly lying on the figure which it really doesn´t and that brings me to another thing.
The hair penetrating the figure. I know that in the tutorial, this was fixed when the head was being animated but is there really a way to make the hair primitives recognize that they should collide with a static figure mesh that is not being animated yet?
I tried adding the collision modifier and using a cache I created by exporting my static mesh but this didn´t do the trick.
Ideally the best way to get the most real looking static shape of the hairstyle would be if I could somehow run a short simulation of the guides and their primitives reacting to gravity and colliding with the mesh so they´d "drape" over the body´s surface nicely within a short period of time.
Can this be done with Xgen?
I have looked at the modifiers and the "Force" and "Directional force" ones looked like a way to go.
So I looked them up and it says that the Force modifier applies a force along the X, Y, and Z axis. By default, Force is set to -1 along the Y axis to act as a gravity force.
Which is exactly what I´d need but I got a lot of errors (probably one error per guide it seemed : D ) after applying the modifier saying // Error: XGen: No pipe data is found with the name fxNetForce. //// Press the ESC key to stop playback.
But that doesn´t matter now as I still need the primitives to collide with the mesh first before I can add gravity o them.
Now back to the shape. A few days ago I saw a method of XGen primitives being generated from polygon tubes and it seemed that this way can give some nice looking results after adding a few modifiers.
I had originally wanted my hair in the front to be two braids but I figured I´d probably not be able to braid the guides so I didn´t really go for it but, if I were attempting to create a long braided tail, using the tube grooming method sounds like the best way to go, doesnt it?
Also today when googling Xgen, I found this - http://beccajbaldwin.com/?p=67
Although it´s not a braided tail, the results with the tube grooming method look pretty great.
In the article it says that the hairstyle was created using this method but it looks to me that the hair on the scalp was created by regular placing and shaping of the guides while the ponytail was created with the tube grooming but I´m not sure.
I might try to recreate this hairstyle as an exercise and see what I can come up with.
Anyways, any feedback would be much appreciated!
Thank you and have a wonderful day : )