
Cage opened this issue on Feb 24, 2010 · 592 posts
Spanki posted Sun, 04 April 2010 at 6:23 AM
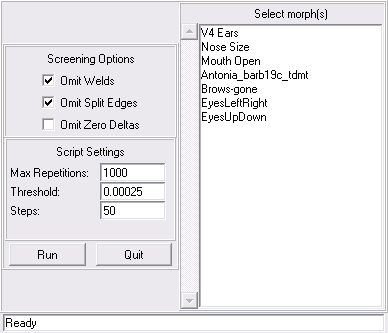
Omit Welds / Split Edges / Zero Deltas and Max Repetitions all operate as before.
The Threshold value is also the same as before, but I do want to talk a bit about it and in combination with the Steps value. The image shows the default values in all cases and that's probably a pretty decent setup to start with, but I've mostly been doing tests with V3 (and some with Antonia), so other meshes and situations may require some adjustments.
For the Threshold value, on tiny/dense meshe areas, you're probably going to need to go tighter (smaller, more precise number) than that.... I recommend just inserting a '1' in front of the 2, giving you "0.000125". That's twice as tight a value and pretty easy to do (just click in the right place and hit the 1 key :) ).
Likewise, if you feel like you need to loosen up the tolerance, a good place to start is by just deleting the '2', giving you "0.0005" which is twice as loose.
re: Steps value...
The Steps value controls "how quickly" the script tries to move the vertices into place. With a value of 1 (the smallest allowable value), it would move the vert half-way between where it is currently and where the script thinks it needs to be. A value of 50 (the current default) causes the script to move it 1/50th of the way (for that pass/loop of the process) towards where it thinks it needs to be.
So I can hear you thinking "I don't want this thing to take forever - I should just use a 1"... the problem with that is that in order to restore the relative relationships between all the vertices, each vertex depends on it's neighbors being where THEY are supposed to be, so vertices that might already be in place (or very close to it) could suddenly be moved way out of place, due to thier neighbor being whacky (the code can't really tell which is the offender). So, the idea is to take baby-steps, which tends to spread the whackiness around a bit more evenly, as they are all shifted into place.
Related to the above, using a small value makes bigger adjustments per loop, but since that can throw other vertices off, it doesn't necessarily reduce the number of loops ultimately needed, so it's not (exactly) a 1:1 relationship between number of steps and how long the process ultimately takes. Also, due to other inherent properties of the process larger-step case (with tiny adjustments, per loop), also lets the verts in densely packed areas maintain a better ending position/shape and areas of low-density (large polygons) mesh will shrink less.
Ok, with the above in mind... feel free to experiment, but in general, the tighter the tolerance, the higher the step value should be. Normally, if I drop down (half) the tolerance to "0.000125", I also 'double' the step value to 100 (think inverse proportions).
There are actually 2 other pieces of code in place (internally, not adjustable) that help control overall mesh shrinkage and differing mesh densities, so some of the above is less crutial than before.
Anyway, have fun!
Cinema4D Plugins (Home of Riptide, Riptide Pro, Undertow, Morph Mill, KyamaSlide and I/Ogre plugins) Poser products Freelance Modelling, Poser Rigging, UV-mapping work for hire.