Welcome to the Blacksmith3D & Texture Transformer Support Forum
Blacksmith3D & Texture Transformer Support F.A.Q (Last Updated: 2023 Sep 06 3:04 pm)
BLACKSMITH3D Version 7.0.6.0 FreeTrial & Updates
FOR WIN: http://blacksmith3d.com/files/Blacksmith3D-v7.0.6.0-Win.zip
FOR MAC:http://blacksmith3d.com/files/Blacksmith3D-v7.0.6.0-Mac.zip
Please see our video tutorials at YouTube.com/user/Blacksmith3d/videos, visit Our Store, or Our FreeStuff. Stay up to date with the newest versions by subscribing to our Email Update List for Blacksmith3D and Texture Transformer.Please remember to add renderosity.com to your safe senders lists.
Click on these links for our Blacksmith3D and Texture Transformer Manuals and Blacksmith3D Manual resource files for tutorials
Texture Transformer Version 2.0.6.0 FreeTrial & Updates
FOR WIN: TextureTransformer-v2.0.6.0-Win
FOR MAC:TextureTransformer-v2.0.6.0-Mac
The current Blacksmith3D version is 7.0.6.0 (Free Trial same as unregistered version, so trial users do not need to download and install additional software, simply buy the license and register through the Trial when ready). PLEASE CLICK HERE for additional links to older versions or the TTv2 base packs.

Subject: Best way to proceed


Thats the dilemma wrt B3D.
The only way Blacksmith hides its seams is if you use its UV option. I suspect your model already has UV appled that you wish to modify (?). If thats the case, your best bet is to use the Photoshop projection to manually paint between the groupings (seams) and blend it manually.
If you use the B3D UV, then you may need to further subdivide the model to gain a higher resolution. The idea behind B3D is that the high res UV mapping will have seams so fine it will be hard/impossible to notice. Then you copy the High res UV to a version of the mesh with lower, more managable poly density. Its not clear in the docs, but this is key.
There's documents?? brb....i don't see a manual or pdf in my zip nor on their site. Could you let me know where I should be able to find it. It would be of great help and maybe it would answer alot of my questions. I have no idea how to do BS3D uv maps. I need a manual :(
Yep, my prop is already uv mapped. I managed to use the clone brush as my best option and the seams disappeared but everything was blurry.
I wrote to Dave and he kindly wrote back and his main suggestion was that I needed to up the resolution (pixel size) of my reference tile. I made a 600x600 tile in Filter Forge and was trying to use that. That didn't work at all so I ended up using my prop's texture that was applied to it as my reference resource. I'd click on an area and then use it on the seams (like in PSP or PS). The results were better but not good.
I am going to export a huge Filter Forge tile and try it again.

Hello Burpee,
There is a auto UV mapping function inB3D (Reality). It's a good tool to quickly automap a model and affect the rigt map. For a rapid mapping and texturing, it's enought and easy to use.
Personnally,for more advanced projects, i use silo for modeling (and uv mapping) and then both UVMapperPro or ultimate Unwrap3D to get a good uv mapping, depending of the project.
Concerning B3D, you can find several videos on you tube to get familiar with all the functions. As B3d is moving to V5 with a new name, there is a more complete tutorial on: www.realitypaint.com.
Hope it helps
hello again Burpee,
Another precision: Painting is using a color or a texture to paint directly according to the brush you use.
Clone is a little bit different: You can import an image in the workspace, place and scale it to get the right proportion with your model and when selecting clone brush (don't forget to pick your model first), just click on your imported image while pressing "alt" to define the source and then paint the desired area of your model. Source will follow your brush.
hope it helps
Hey Fly, thanks for responding and for the links. I used BS3D to finish my project but was not very happy with the results. there were just 'OK'. I used a high resolution image but still got semi-blurry results in some areas.
You also have to be careful about painting on edges as the texture stretches down the sides. I did alot of touch up cloning in PS on my texture jpg.
I have to say that Dave is awesome when it comes to helping and got back to me very quickly via email with his answers. I belive that I need more practice and playing with the softness and other sliders to find what works best for me.
I'm going to be using it again shortly on a hair seam so I can see if all the new info I learned helps.
Hello Burpee,
To avoid semi blur or texture stretching, just select your 'paint brush" and use fade by angle with the default settings: I use Reality for skin texturing and a face (or the rest) is not so plane :-). I can acheive very good results even on bumps.
If its appear on very angle sides, one solution is to select and hide the face you dont want to paint, do your paint, and then invert. As the paint goes perpendiculary from the screen, if you have an angle facing, it is difficult for the soft to decide wich poly will receive the paint. In 3Dcoat for example, the enty of the nose hole is very difficult to acheive..if the brush is to large, it could touch strait angle and the result is very...ugly!
As you mentionned, there ares so many functionalities that it takes a lot to learn all the tricks!
I use a lot the "brush image": If you rotate a little your object, you can move again your reference image to adjust precisely and apply your corrections.
Hope it can give you some ideas,
Have a nice evening!
Fly, you've been extremely helpful, thanks bunches!
The hair that I made and was going to paint seams on in BS3D has modeling issues. I made it like a toon hair but I need to either completely redo it in the traditional way or move some of my seam areas.
I think I'll go way back to a 'before uving' version and try mapping it in BS3D after moving some of my vertices. I never would have tried that if you hadn't mentioned it. Thanks.
Hello burpee,
What modelling tool are you using? Usually, there is a uvmapping function.
If it's still free you can get hexagon for free.
If you're modeling a toon hair, i assume that you did a simple strand and then copy/paste to achieve your model and then, with a displacement brush or a bend tool, move your hair to give the right shape.
If it's the case, begin with a simple straight cylinder, extrude the extreme dots, subdivide once to get a smoother shape and the directly do a cylindrical UVmapping. It will gives you something like a square uvmap. Apply a name for the material and save your object. It will be the base for your hair. Most important: Don't do any bending or deformation before saving your first strand.
Move your object to place the first strand, then copy and paste till you get enought strand.
At this point, you can deform your strand during the process. Depending of your modeler, textured uvmap can be applied, showing you if your distorsion is not too strong.
When finished, save your complete model and adapt it (parented or conformed) to your model.
If your hair is supposed to get different colors, then create different initial strands.
Have fun!! (hairs ares a nightmare for me :-))
Good evening
PS: Very impressed by your art!! You're doing amazing images!
About my art, you are so kind with your praise. I haven't posted any art here in years because I haven't been producing any. I've really gotten rusty, lol.
My modeller is Hexagon2.5. I am using its uv function but it is a really poor uver. Quite often, with odd shapes, it will shrink one half of the mapping. I.E., on a symmetrical object it will have the right or left side much smaller than the left. You then have to move point by point to fix it. I've never been able to make the relax tool bend to my will. UVing takes me longer than any other part of the production process. Well, not completely true because texturing can take awhile but I enjoy that.
About the toon hair, it's really cute but I modelled it like a hat then cut it into bangs, left side and right side and uved them separately. I don't think that's the way to do hair correctly. The way you mention is what I see more often.
The uv portion of my workflow is my worst. I don't think I understand it completely and I've never gotten the pins to work for me. Above you mention the cylindrical uv map function. I always use unfold because I don't understand how the cylindrical mapping will give me a flat texture jpg result. There has to be a seam somewhere in it so it can be layed for creating a texture jpg in PS or PSP or Gimp, etc.
BS3D has a video showing cylindrical texturing of a shirt/blouse but he doesn't go all the way with it and show you your resulting texture map jpg. It makes no sense to me.
Hello Burpee,
In Hexagon, create a cylinder; select edge and define a loop cutting your object following the edge of one side, then apply the seam definition (the head icon). Edges will turn black blue: your seam is done. (so, it can unfold like a paper sheet)
then, click on cylindrical, and you will get a perfect square map. Did it rapidly in hexagon and the tested the object in silo, it works well and the map is perfectly square.
Only have after to texture in bs3d to get your initial object and the right texture map.
If you use hexagon, just import your initial uv and textured object and use the curve bending option, works very well.
Hope it helps
Hello again Burpee,
UVmapping is a real difficult thing, i agree, the same for me! (only have 2 different specialized soft only for this :-) )
In fact, it's like wrapping a paper on something. Imagine the straight part of a bottle: You can wrap a piece of paper around it. It's the same for cylindrical mapping.
There ares many UV types: Hexagon only provides 4 types: spherical, planar, cylindrical and cubic.
Has your hair should be defined now, it could be hard to do it properly with those tools (and hexagon uvmapper is not very easy to use) . You're right, you should have seams. Has there should be distortion in your mesh due to the modeling, LSCM unwrapping seems to be a good tool (but this method is not aviable in hexagon).
So, the best i think is to start again with a basic mesh as described in the previous post.
If you like, i can try to uvmap it for you with my tools if it can help acheive your project.
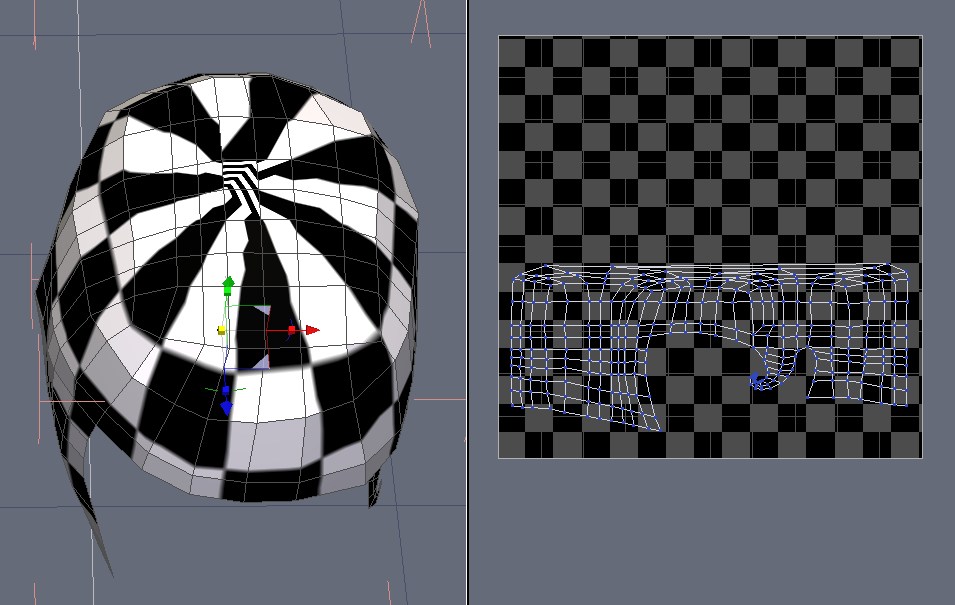
I went all the way back to Hair_3.hxn (the almost finished hair is Hair_20) to get an unsmoothed one piece hair object. I used the cylinderic uvmapping and found that Hexagon adds a seam automatically. I got a nice result but the top of the head's uv map is all wrong. the sides look excellent...I need to play with points, I think.
I am including a screen shot of the cylindrical uv map. It shows the top of the head where I need to fix the test pattern distortion. This is a very rough object but I wanted to see if the cylinderical mapping would work. You mentioned cylinder so I tried the cylindrical mapping (but I think you meant a cylinder primitive, lol).
Thank you for offering to uv map it. I have a very hard time accepting those kinds of offers. I send you a huge thanks, though. I need to do this myself so I can learn but I also need guidance and you have supplied me with much.
Hello Burpee,
As it is mapping follows the green axis, there is effectively a great distortion at the top
One simple solution would be to affect a material for the top and another for the front_side polygons.(select for the top all the polys included where your texture is showing triangles)
For the side_front, a cylindrical UV should be fine. For the top, a spherical mapping should give a better result (play with the scale gizmo to get similar square than the sides) .
Then, move (as they not overlap) in your uvmap your two uv pieces, save your model and have a try in BS3D. You should get a very nice result.
Thank you for your image, it helps understand!
(sorry for my english, as you can see, it's not my native language :-))
Hi Fly, your English is much better than any Spanish I would attempt. That's the only other language that I speak at all...muy poquito, lol.
I have decided to use the object above as a type of skull cap and will add layers ontop of it. This way I can hide the top of the scalp and create a hair part (where the hair divides and hangs on either the left or right side of the head).
I think it is worth working with to get it correct. The renders I did of the finished hair (before I started reworking it) are very cute.
Thank you again for all your help. When I am finished with it I will post an image here :)
Hi jhonsmith, I did, in fact, end up using cylindrical wrapping....my first time. I did not know that it had an automatic seam on the vertical (for vertical cylinder). Worked out perfectly except for the top of the head. Other people managed to create a triangular pattern (with the checker texture) on the top of the pate but I struggled so I made hair strands that covered the top.
At the moment I am making the uv checker pattern the same size on all pieces then I'll smooth everything and go to texturing. That will be another adventure, lol.
Thank you everyone for your help. I is truly appreciated.
This is interesting stuff, thank you.
During the last two years, I have been trying very hard to learn how to use Blender. I have made a lot of progress but have a long way to go.
How useful would I find Blacksmith3d now? For me, texturing in Blender is one of the most difficult things to do well, especially if I want to export to a game (secondlife). Would Blacksmith3D make this easier, or just confuse me?
Thx,
Joey
Hello Joey301,
As far as i know, Reality paint work with .obj format and Second Life with .Dae.
If you export from blender in obj format, RealityPaint will allow you to texture very easely. Then re import in blender and export in dae for second life.
I don't know if there ares Uvmapping constraint to set your content in second life, then,if not, the auto uvmapping option in BS3D V4 or V5 (realitypaint) will help you get a very rapid UV Mapping and texture very rapidly your project. You can paint directly, but, as it is a 3d painting application, you can also copy your texture from a photo, even at a very high resolution. There ares many ways/functionalities to apply textures. As there ares settings for painting, if the angle of your mesh is to high, it avoid stretch painting. I use it mainly for texturing human models. you can do amazing things.
I have more complex programs to do the same work but use RealityPaint because they introduce a new interface in V5 that speeds my work.
As they introduce a new version, the manual is not completely up to date but there are many tutorials on youtube and many new tutorials on their website.
Hope it helps,
Privacy Notice
This site uses cookies to deliver the best experience. Our own cookies make user accounts and other features possible. Third-party cookies are used to display relevant ads and to analyze how Renderosity is used. By using our site, you acknowledge that you have read and understood our Terms of Service, including our Cookie Policy and our Privacy Policy.
I bought BS3D a while ago and have never used it. I watched many tutorials but I'm not sure this program is for me. I can't seem to wrap my head around it.
I need to use it now. I have a uv mapped prop with a texture map. I was able to import the prop and apply my texture map to it. I now need to fix the seams.
This is the reason that I bought BS3D.
My question is what is the best way to proceed. I saw a video on selections and he showed a 'touch up brush' for a moment during the video that seems like what I might need. Or should I use the clone brush? He says that the clone brush in pre version 4 can be low resolution but I am using version 4. Or should I paint on the textures with a map? I don't really understand the difference between the clone and palnting on the texture.