
LuxXeon opened this issue on Dec 15, 2013 · 66 posts
LuxXeon posted Sun, 15 December 2013 at 10:33 PM
With the "7 Days, 7 Models" challenge officially complete, I was thinking we could use this thread as a way to discuss what went on over the 7 days of modeling we did for the challenge, and possibly go over some techniques, or show tutelage of what we did to complete every model on time. Granted, the challenge wasn't intended to be overly difficult. Most of the models were, by design, easy enough for any intermediate modeler to accomplish in a day, or a single session; especially since no unwrapping or rendering was required.
The three of us in this forum who participated ended up creating some very good models in the given time, and I think it was a very successful forum challenge. Especially considering this forum isn't the most active 3dsmax forum around.
One thing I noticed, when I reviewed some of my own models from the challenge, is that some of them were riddled with topology errors; particularly the ones that I didn't have enough time to work on properly. In particular, something went wrong with my hairdryer model from day 02. When I collapsed the stack, it somehow converted the body into editable mesh, and removed all my interior edges, but left the verts? Looks like it kept my isoline edges from the Turbosmooth, but removed all the others. That never happened to me before, so it was either a bug, or I did something funky to cause it, because I was rushing through it. At any rate, I fixed the mesh, and re-uploaded it here, if anyone wants to take a closer look:
It's in Max 2012 scene file format. I think I'll actually "finish" some of these models; unwrap them, tweak them, and distribute them properly. One thing I really enjoyed was modeling objects that I normally wouldn't have considered working on. That was the most interesting part. Also seeing how the other guys were attacking the same models.
______________________________________
My Store
My Free Models
My Video Tutorials
My CG Animations
Instagram: @luxxeon3d
Facebook: https://www.facebook.com/luxxeon

bandolin posted Mon, 16 December 2013 at 6:38 AM
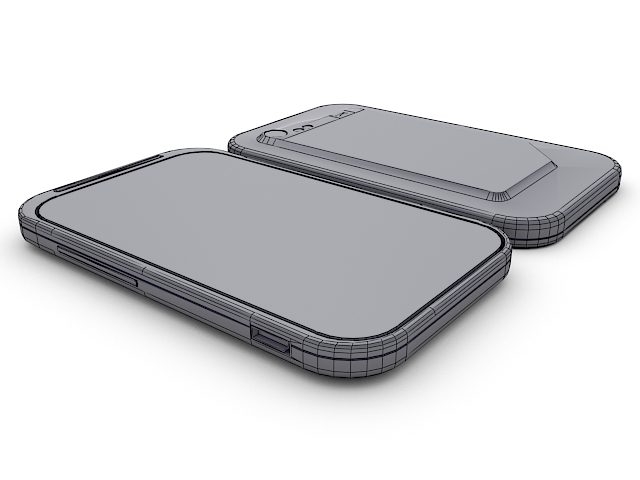
My models are nothing but topology errors. lol
I'm not a trained 3D artist, so topology errors is something I don't pay much attention to let alone even know what they are. From reading hundreds of articles and scrolling through almost as many forums and blogs I've come to learn what some of them are but not how to create a model to avoid them.
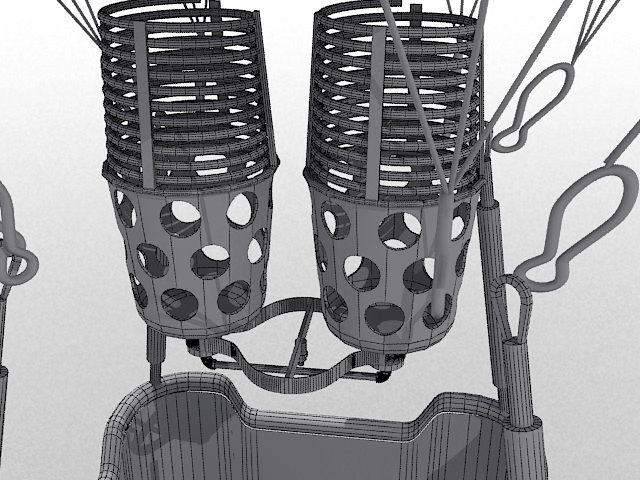
I know you are supposed to avoid N-gons and tris especially the long skinny kind. I found that out when I prepared two space ship environments for sale in poser here. I am particularly interested in how to create circular or rounded corner holes and negative extrusions while still maintaining quad topology. My Cell Phone is a prime example. Its riddled with N-gons. And the holes in the burners for my balloon were created using booleans because I wasn't sure how to subdivide the mesh in order to make the offset holes, especially under the time constraints we had.
<strong>bandolin</strong><br />
[Former 3DS Max forum coordinator]<br />
<br />
<a href="http://www.renderosity.com/homepage.php">Homepage</a> ||
<a href="http://www.renderosity.com/mod/sitemail/">SiteMail</a> ||
<a href="http://excalibur.renderosity.com/mod/gallery/browse.php?user_id=70375">
Gallery</a> || <a href="http://www.renderosity.com/mod/freestuff/index.php?username=bandolin">
Freestuff</a>
<p><em>Caution: just a hobbyist</em></p>
bandolin posted Mon, 16 December 2013 at 6:49 AM
<strong>bandolin</strong><br />
[Former 3DS Max forum coordinator]<br />
<br />
<a href="http://www.renderosity.com/homepage.php">Homepage</a> ||
<a href="http://www.renderosity.com/mod/sitemail/">SiteMail</a> ||
<a href="http://excalibur.renderosity.com/mod/gallery/browse.php?user_id=70375">
Gallery</a> || <a href="http://www.renderosity.com/mod/freestuff/index.php?username=bandolin">
Freestuff</a>
<p><em>Caution: just a hobbyist</em></p>
bandolin posted Mon, 16 December 2013 at 7:06 AM
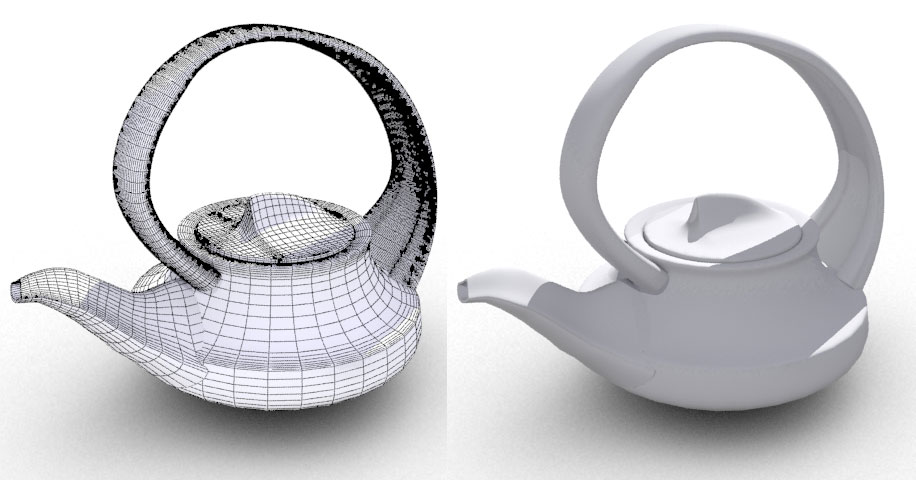
However, my biggest challenge is the teapot. I really like the design I chose from a reference image on google. I would really appreciate assistance in completing this. I'm at a loss on how to connect the handle and spout seamlessly.
<strong>bandolin</strong><br />
[Former 3DS Max forum coordinator]<br />
<br />
<a href="http://www.renderosity.com/homepage.php">Homepage</a> ||
<a href="http://www.renderosity.com/mod/sitemail/">SiteMail</a> ||
<a href="http://excalibur.renderosity.com/mod/gallery/browse.php?user_id=70375">
Gallery</a> || <a href="http://www.renderosity.com/mod/freestuff/index.php?username=bandolin">
Freestuff</a>
<p><em>Caution: just a hobbyist</em></p>
LuxXeon posted Mon, 16 December 2013 at 7:51 AM
Bandolin, I have class this morning, but when I get back later, I'll address some of these models. Particularly we can discuss the way to avoid ngons, and create the spout on your model seamlessly (or at least as seamless as I can get it). The key there is to create holes first. , before the subdivision, then extrude the edges. You can avoid distortion by making the holes planar before extracting edges. I'll show an example using your model later. Gotta run for now.
______________________________________
My Store
My Free Models
My Video Tutorials
My CG Animations
Instagram: @luxxeon3d
Facebook: https://www.facebook.com/luxxeon

maxxxmodelz posted Mon, 16 December 2013 at 8:32 AM
Like bandolin, I'll be interested also in discussing topology, and how you began some of the models, and the workflow. I should be available later today too.
Tools : 3dsmax 2015, Daz Studio 4.6, PoserPro 2012, Blender
v2.74
System: Pentium QuadCore i7, under Win 8, GeForce GTX 780 / 2GB
GPU.
maxxxmodelz posted Mon, 16 December 2013 at 4:30 PM
Quote - What really intrigues me is the detail Lux and Max achieved with so few edges. If you compare my models to theirs, my poly count is way higher to achieve the same level of detail they were able to get.
However, my biggest challenge is the teapot. I really like the design I chose from a reference image on google. I would really appreciate assistance in completing this. I'm at a loss on how to connect the handle and spout seamlessly.
Is your model still uploaded? If so, can you provide a link so I can download it again and have a look? I'm pretty sure how lux will suggest doing this, but once I get your scene file (I'm using 2013, and I think lux has 2012), then I can assist by creating it directly on your geometry, or showing you how to optimize your topology first, if necessary. Once you see how it's done, you'll be kicking yourself at how easy it is. Well, easier than you probably think anyway.
There's a few ways you can create handles and such in a geometry, so lux might have a different idea there, but I'll give you the most basic way, without plugins or special scripts. I know that there are scripts out there for free that can assist in making handles and other looped extrusions much faster (I'm using the Rappatools 3 plugin, which has a feature called spline bridge), but it's possible without all that too.
Tools : 3dsmax 2015, Daz Studio 4.6, PoserPro 2012, Blender
v2.74
System: Pentium QuadCore i7, under Win 8, GeForce GTX 780 / 2GB
GPU.
LuxXeon posted Mon, 16 December 2013 at 7:49 PM
Bandolin, I'll give a quick tutorial on a typical workflow for creating the spout. This is just a generic workflow, and I'm not sure if you've ever used this before, but this result can be used as a basis for any kind of spout. Here's how I do it...
In order to create a round spout, for example, you will need to select and inset 4 faces in the area where you want the spout to extrude from your teapot. As a rule, you always need a minimum of 8 edges to create a minimal circle shape from edges, so to achieve a circular spout, you need to select 4 faces, and inset to produce 8 edges to work with.

Now, obviously, this is an oblong shape, due to the surface area of the inset polygons. So to get a circle here, you need to resize the inset faces a little. An easy way to get a "perfect" square from your inset polygons (which will ultimately translate to a perfect circle), is to go into your Graphite ribbon, and find "Geopoly" in your polygons tab. With the inset polys still selected, click "Geopoly".

Now you have a near perfect square. You can use the scale tool to make it even better, but this will due for now. So, next step to create the circle shape is to delete those polygons. You are actually after the edges here, because Max has great tools to work with edges. Much better than it's polygon tools. So delete those faces, then switch to "border" subobject level, and select the resulting border. Then with the border selected, switch over to "Edges" subobject level, and it will still retain your border edges as the selection.

Now that you have all the edges selected, go to your Graphite Ribbon again, and in your LOOPS tab, select "Loop Tools". This opens the Loop Tools dialogue panel. In the panel, click "Circle". This will transform your square edge selection to a circle shape.

If it looks a little messed up, use the rotate tool to get the edges lined up, and then click on the "Smooth 30" button in the Graphite ribbon, under the Properties tab. This will just give your object an autosmooth of 30, so that the normals are nice and smooth.

Ok, so now you have a nice circle hole in your surface. Now it's time to extrude a spout. So, to make the extruding process easy, we will use a feature called "Extrude Along Spline". To use that feature, you need a polygon or group of polys to extrude. So Just cap the circular hole to make a ngon.

Then, go to the side ortho view, and create a spline in the shape of the spout you wish to create.

Then go to Graphite Ribbon, or your Editable Poly command panel, and shift-click "Extrude On Spline". This will bring up the caddy for the tool, which you can adjust settings to. Choose the spline you created.

Play with the settings. In this case, I chose to extrude along normals, because it looked better.

Finally, I just added some taper to it from the caddy panel, and there's a decent spout. You can continue to edit this by adding a support loop (if you're going to turbosmooth), and quading up the ngon at the end, or deleting it entirely, to make the hole for the spout.

That's it for the spout.
If you can't view these images, let me know. I'm using Postimg.org free image hosting, and sometimes strange things go on with it not showing images. They should all be screen caps of the process I'm explaining,
______________________________________
My Store
My Free Models
My Video Tutorials
My CG Animations
Instagram: @luxxeon3d
Facebook: https://www.facebook.com/luxxeon
LuxXeon posted Mon, 16 December 2013 at 8:05 PM
BTW, that's just one way to attack the spout, or any kind of curved extrusion from a surface. There are other techniques. Maybe maxx has another workflow for this, but this is typically how I would do it.
______________________________________
My Store
My Free Models
My Video Tutorials
My CG Animations
Instagram: @luxxeon3d
Facebook: https://www.facebook.com/luxxeon
LuxXeon posted Mon, 16 December 2013 at 8:17 PM
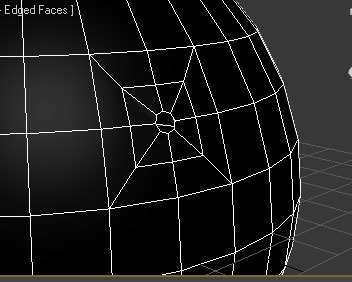
Another way to create a hole in any surface is to choose a vertex point at the center junction of any 4 adjacent polygons, and cut edges from the corner vertices of the polygons, to the center vertex. So the edges will look like a star. This creates the necessary 8 edges to create a circle. Now, select the center vertex, and chamfer it....


Then just use Geopoly tool to make the ngon a circle shape, and delete it, or extrude it, or whatever.

Or, just delete the faces, select the border edges, switch to edge mode, go to loop tools, and click Circle in the Loop Tools. Either way works. This is a good way to create any circular shaped extrusion or bevel, or simple circular holes, because unlike creating round shapes with Turbosmooth or Meshsmooth on a square, you won't need more than 1 iteration of smoothing to get a perfectly round shape in your surface. Saves on polycount dramatically, and avoids booleans.
______________________________________
My Store
My Free Models
My Video Tutorials
My CG Animations
Instagram: @luxxeon3d
Facebook: https://www.facebook.com/luxxeon
LuxXeon posted Mon, 16 December 2013 at 8:23 PM
Finally, to help you in many cases where the "Loop Tools" circle command will fail, or not give good circular results, there is a must-have free maxscript called "Loop Regularizer".
This great maxscript will create circles from polygon selections, edge selections, or border selections, where the native Loop Tools Circle command will only work on open edge loops. This script will circularize almost any selection, with the only limitation being it won't work on the Edit Poly modifier, only collapsed Editable Polygon geometry. Still, you will find this tool one of the most handy scripts ever written.
Just follow the instructions to install it. I have mine put into a quad menu for easy access to the tool.
http://www.scriptspot.com/3ds-max/scripts/loop-regularizer
______________________________________
My Store
My Free Models
My Video Tutorials
My CG Animations
Instagram: @luxxeon3d
Facebook: https://www.facebook.com/luxxeon
LuxXeon posted Mon, 16 December 2013 at 8:29 PM

______________________________________
My Store
My Free Models
My Video Tutorials
My CG Animations
Instagram: @luxxeon3d
Facebook: https://www.facebook.com/luxxeon
bandolin posted Mon, 16 December 2013 at 8:32 PM
Attached Link: Teapot
@ MaxxThe link to my teapot is there in the original sticky thread. But here it is again.
<strong>bandolin</strong><br />
[Former 3DS Max forum coordinator]<br />
<br />
<a href="http://www.renderosity.com/homepage.php">Homepage</a> ||
<a href="http://www.renderosity.com/mod/sitemail/">SiteMail</a> ||
<a href="http://excalibur.renderosity.com/mod/gallery/browse.php?user_id=70375">
Gallery</a> || <a href="http://www.renderosity.com/mod/freestuff/index.php?username=bandolin">
Freestuff</a>
<p><em>Caution: just a hobbyist</em></p>
bandolin posted Mon, 16 December 2013 at 8:50 PM
I had an issue right at the very beginning. Just working on a standard sphere I tried to follow along. I don't understand what Geopoly does. I tried it on a 4 selected polys which created a rectangular shape (like your example) and inset it. Then used Geopoly which only ended up making another inset. It never made it square. The only way for me to get it square was to use the scale tool.
The Smooth 30 is a pretty cool feature.
The extrude along spline is new to me and that was awesome. I love it.
<strong>bandolin</strong><br />
[Former 3DS Max forum coordinator]<br />
<br />
<a href="http://www.renderosity.com/homepage.php">Homepage</a> ||
<a href="http://www.renderosity.com/mod/sitemail/">SiteMail</a> ||
<a href="http://excalibur.renderosity.com/mod/gallery/browse.php?user_id=70375">
Gallery</a> || <a href="http://www.renderosity.com/mod/freestuff/index.php?username=bandolin">
Freestuff</a>
<p><em>Caution: just a hobbyist</em></p>
LuxXeon posted Mon, 16 December 2013 at 8:57 PM
Bandolin, the Geopoly tool will arrange the selection of polygons or edges into a uniform geometric shape (a rectangle to a square, for example). Try it again on another object. This time, make sure you have exited the Inset tool entirely. If you inset, then switch over to Geopoly and click it while the inset tool is still active, the result you experienced will occur. My guess is that you still had the original Inset command activated when you selected the Geopoly tool. Make sure you have dropped the Inset tool first. I just tested it again on a sphere, and it worked as expected, but if I Inset, then switch to Geopoly without dropping the inset tool, it does what you described.
______________________________________
My Store
My Free Models
My Video Tutorials
My CG Animations
Instagram: @luxxeon3d
Facebook: https://www.facebook.com/luxxeon
LuxXeon posted Mon, 16 December 2013 at 9:05 PM
______________________________________
My Store
My Free Models
My Video Tutorials
My CG Animations
Instagram: @luxxeon3d
Facebook: https://www.facebook.com/luxxeon
bandolin posted Mon, 16 December 2013 at 9:06 PM
I must be doing something wrong. Just tried it again, and still no result. I made sure I was completely out of the inset function.
Regularize is AWESOME!! <- the only time when bold, caps, underline and multiple exclamations are permitted to be used together.
<strong>bandolin</strong><br />
[Former 3DS Max forum coordinator]<br />
<br />
<a href="http://www.renderosity.com/homepage.php">Homepage</a> ||
<a href="http://www.renderosity.com/mod/sitemail/">SiteMail</a> ||
<a href="http://excalibur.renderosity.com/mod/gallery/browse.php?user_id=70375">
Gallery</a> || <a href="http://www.renderosity.com/mod/freestuff/index.php?username=bandolin">
Freestuff</a>
<p><em>Caution: just a hobbyist</em></p>
LuxXeon posted Mon, 16 December 2013 at 9:11 PM
Quote - I must be doing something wrong. Just tried it again, and still no result. I made sure I was completely out of the inset function.
Regularize is AWESOME!! <- the only time when bold, caps, underline and multiple exclamations are permitted to be used together.
Hmm. That's definitely very strange. I've done it several times, and even did it once with inset still active, and it worked each time. I'm starting to wonder, after hearing some of your other issues as well, if you don't have a corrupt installation of Max on your system or something?
Yes, Regularize is one incredibly useful script. A must-have, actually, for serious modeling. It's saved me tons of time, and allows you to keep a good clean quad topology in situations where you otherwise might have had to use a workaround to achieve a circular shape of quads. The Circle command in Loop Tools only works on open edge loops where there are edges connected to the outside of the border. Regularize solves that limitation.
______________________________________
My Store
My Free Models
My Video Tutorials
My CG Animations
Instagram: @luxxeon3d
Facebook: https://www.facebook.com/luxxeon
bandolin posted Mon, 16 December 2013 at 9:15 PM
Maybe I'm misunderstanding what Geopoly does. If I have a really oblong rectangle, one-click on Geopoly does alter it by making a slightly less oblong rectangle. After clicking on Geopoly several times, the rectangle eventually turns into a square.
<strong>bandolin</strong><br />
[Former 3DS Max forum coordinator]<br />
<br />
<a href="http://www.renderosity.com/homepage.php">Homepage</a> ||
<a href="http://www.renderosity.com/mod/sitemail/">SiteMail</a> ||
<a href="http://excalibur.renderosity.com/mod/gallery/browse.php?user_id=70375">
Gallery</a> || <a href="http://www.renderosity.com/mod/freestuff/index.php?username=bandolin">
Freestuff</a>
<p><em>Caution: just a hobbyist</em></p>
maxxxmodelz posted Mon, 16 December 2013 at 9:22 PM
Wow, lux! That's an impressive illustrated tutorial you posted there. That is exactly what my workflow for creating the teapot spout in my scene file. I think I even left the guide spline in my scene by mistake. I always forget about Geopoly though, and just create the circle using the circle tool after deleting the polys. I skip the geopoly step though, and just scale my shape with non-uniform scaling, then use the Circle tool.
I had regularize in my toolbox in the previous version of Max, and forgot to add it again when I upgraded. Thanks for reminding me! That is definitely a great tool, and using it you could skip another two steps from this tutorial actually. Just select the 4 polys with 8 edges, and click regularize. Boom. Done. No need to even delete faces to get a circle.
Tools : 3dsmax 2015, Daz Studio 4.6, PoserPro 2012, Blender
v2.74
System: Pentium QuadCore i7, under Win 8, GeForce GTX 780 / 2GB
GPU.
bandolin posted Mon, 16 December 2013 at 9:28 PM
Lux should write a book just on modelling. I've learned so much this past week.
<strong>bandolin</strong><br />
[Former 3DS Max forum coordinator]<br />
<br />
<a href="http://www.renderosity.com/homepage.php">Homepage</a> ||
<a href="http://www.renderosity.com/mod/sitemail/">SiteMail</a> ||
<a href="http://excalibur.renderosity.com/mod/gallery/browse.php?user_id=70375">
Gallery</a> || <a href="http://www.renderosity.com/mod/freestuff/index.php?username=bandolin">
Freestuff</a>
<p><em>Caution: just a hobbyist</em></p>
maxxxmodelz posted Mon, 16 December 2013 at 9:28 PM
Quote - Maybe I'm misunderstanding what Geopoly does. If I have a really oblong rectangle, one-click on Geopoly does alter it by making a slightly less oblong rectangle. After clicking on Geopoly several times, the rectangle eventually turns into a square.
Yeah, that's what it does. Depending on how non-uniform your selection is, you might need to click Geopoly several times to make it perfectly uniform. It averages the shape, based on the position of vertices in your polygon selection. So if you have a selection that is really non-uniform, it will average the verts in that selection incrementally every time you click it. So you may need to hit it multiple times to get a square. Geopoly doesn' t automatically make squares or perfect shapes. It just makes whatever shape you select a little more uniform than it was each time.
Tools : 3dsmax 2015, Daz Studio 4.6, PoserPro 2012, Blender
v2.74
System: Pentium QuadCore i7, under Win 8, GeForce GTX 780 / 2GB
GPU.
LuxXeon posted Mon, 16 December 2013 at 9:35 PM
Quote - Wow, lux! That's an impressive illustrated tutorial you posted there. That is exactly what my workflow for creating the teapot spout in my scene file. I think I even left the guide spline in my scene by mistake. I always forget about Geopoly though, and just create the circle using the circle tool after deleting the polys. I skip the geopoly step though, and just scale my shape with non-uniform scaling, then use the Circle tool.
You can do it that way too. The reason I use Geopoly first, is because sometimes when you use just the circle tool (or regularize tool for that matter), if the selection is too non-uniform, the circle command will twist the edges. It still makes a circle shape, but you need to manually use the rotate tool then to fix the turned edges so they line up nicely. Using a more uniform shape to start reduces the probability of this occuring (but doesn't always eliminate it). Using the scale tool to scale the shape first can cause the circle tool to act funny too at times. The reason is because you are creating a non-uniform scale to the edges, and the circle tool is using the original vertex scale of the shape, not the scaled one. That's my theory about it anyway.
______________________________________
My Store
My Free Models
My Video Tutorials
My CG Animations
Instagram: @luxxeon3d
Facebook: https://www.facebook.com/luxxeon
LuxXeon posted Mon, 16 December 2013 at 9:37 PM
Another tip that helps create a better shape is this; after you click the Circle tool in the Loop Tools panel to create your circle, click the Relax button, also in the Loop Tools, to relax the circle once or twice too. This helps fix the twisted edges effect that Circle can cause, if you used it on non-uniformly scaled edges.
______________________________________
My Store
My Free Models
My Video Tutorials
My CG Animations
Instagram: @luxxeon3d
Facebook: https://www.facebook.com/luxxeon
maxxxmodelz posted Mon, 16 December 2013 at 9:58 PM
Lux, I went ahead and reinstalled Regularize again. In the Customize menu, I added the script to my Quad panel, as you have. However, after saving my new UI with it in my quad menu, I right-click in the viewport to bring up my quads, and Regularize isn't in there. I know I had this thing working before, so I must be missing a step here? Any suggestions?
Tools : 3dsmax 2015, Daz Studio 4.6, PoserPro 2012, Blender
v2.74
System: Pentium QuadCore i7, under Win 8, GeForce GTX 780 / 2GB
GPU.
LuxXeon posted Mon, 16 December 2013 at 10:20 PM
Quote - Lux, I went ahead and reinstalled Regularize again. In the Customize menu, I added the script to my Quad panel, as you have. However, after saving my new UI with it in my quad menu, I right-click in the viewport to bring up my quads, and Regularize isn't in there. I know I had this thing working before, so I must be missing a step here? Any suggestions?
Assuming you installed it correctly to your Quad menus, or wherever you wish, this tool is only available when you have an editable polygon object selected, in sub-object mode. You won't see it visible in your menus if you are not in sub-object mode, or if you are not working on an editable polygon object. It's not availabe for edit poly modifiers in a stack either.
______________________________________
My Store
My Free Models
My Video Tutorials
My CG Animations
Instagram: @luxxeon3d
Facebook: https://www.facebook.com/luxxeon
bandolin posted Tue, 17 December 2013 at 6:02 AM
I didn't have to install regularize to my quad menu. It was automatically there just like in the installation guide.
<strong>bandolin</strong><br />
[Former 3DS Max forum coordinator]<br />
<br />
<a href="http://www.renderosity.com/homepage.php">Homepage</a> ||
<a href="http://www.renderosity.com/mod/sitemail/">SiteMail</a> ||
<a href="http://excalibur.renderosity.com/mod/gallery/browse.php?user_id=70375">
Gallery</a> || <a href="http://www.renderosity.com/mod/freestuff/index.php?username=bandolin">
Freestuff</a>
<p><em>Caution: just a hobbyist</em></p>
LuxXeon posted Tue, 17 December 2013 at 7:52 AM
I will post a tutorial on doing the handle this evening, if there's interest in it. Basically, similar workflow to the spout would apply, only slightly different, with bridge tool coming into play.
Yeah, Regularlize does indeed install automatically to the quads now. I guess he updated the script some since I downloaded it last. However, it still only appears available there when in subobject mode on editable polygon I believe.
______________________________________
My Store
My Free Models
My Video Tutorials
My CG Animations
Instagram: @luxxeon3d
Facebook: https://www.facebook.com/luxxeon

wheatpenny posted Tue, 17 December 2013 at 8:08 AM Site Admin
If you want, you can upload the tutorial to the Tutorials section, so it will be easier to find in the future (if it's posted in the forum, it will disappear into the archive after a while (even if it's stickied).
Jeff
Renderosity Senior Moderator
Hablo español
Ich spreche Deutsch
Je parle français
Mi parolas Esperanton. Ĉu vi?
LuxXeon posted Tue, 17 December 2013 at 8:16 AM
Quote - If you want, you can upload the tutorial to the Tutorials section, so it will be easier to find in the future (if it's posted in the forum, it will disappear into the archive after a while (even if it's stickied).
Sure, that would be great, and probably more convenient for all. Can you tell me how I go about that? Is there a way for me to do it with the one I already uploaded here as well?
______________________________________
My Store
My Free Models
My Video Tutorials
My CG Animations
Instagram: @luxxeon3d
Facebook: https://www.facebook.com/luxxeon
wheatpenny posted Tue, 17 December 2013 at 8:33 AM Site Admin
The easiest way is to either link to it on another website, or convert it to a PDF and upload it that way. To upload it, click on the "Tutorial" button at the top of this forum, and select "Upload Tutorial". It will take you to the upload page.
Jeff
Renderosity Senior Moderator
Hablo español
Ich spreche Deutsch
Je parle français
Mi parolas Esperanton. Ĉu vi?
LuxXeon posted Tue, 17 December 2013 at 9:45 PM
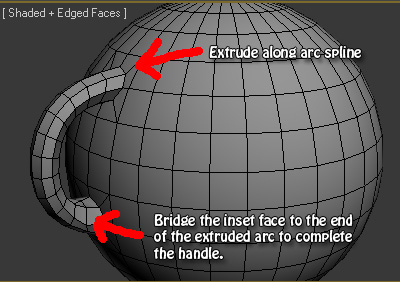
Making the handle on a teapot, or any spherical or cylindrical object, is quite simple as well. It's a 3 or 4 step process at most.
Pick two spots on your surface you want to connect with a handle. Inset 4 polygons in both areas; inset, then delete the inset faces. Select the border edge on each inset hole, and in your Loop Tools panel, click Circle (same process as creating the spout, illustrated on page01 of this thread). If you are using the Regularize maxscript discussed on the previous page, then skip the deletion part, and just regularize the faces instead to make a nice circle. Then, cap the circular holes with ngons. Now, in Ortho view from the side, create an arc spline from the top ngon to the bottom, but not quite all the way to the bottom ngon. It should be a semi-arc that almost meets the bottom ngon, because you're actually going to bridge the two faces at the very end, so leave some room for a bridge. You can either use an actual Arc spline for this, or a line with bezier points (this offers more control). Now extrude the top polygon along the arc. The extrusion should almost meet the bottom ngon, but not quite. Now select the end face of your extruded ngon and bridge it to the bottom circular ngon. That should complete the handle, as illustrated in the attached image.
Very simple process. Now you may wish to tweak the results by selecting all the polygons on your new handle, and relaxing for 1 iteration to make it smooth, or apply a smooth 30 on the entire object.
______________________________________
My Store
My Free Models
My Video Tutorials
My CG Animations
Instagram: @luxxeon3d
Facebook: https://www.facebook.com/luxxeon
LuxXeon posted Tue, 17 December 2013 at 10:08 PM
Now that you know the way to do a handle with the standard tools in Max, I'll give you a tip to do it even easier, and with even more control over the resulting shape of the handle. It's a free maxscript by Miauu, called ** Super Poly Bridge**. Check out the video examples of what this script can do at the page in the link.
The script will allow you to build a closed, "looped" bridge extrusion, between any two faces, or group of faces on an object, all in one go. It's handy for all sorts of modeling needs, where you may want to quickly create a curved bridge of polygons between two areas of your model; like a teacup or teapot, or urn, or anything with a curved handle. It's faster than the standard "Extrude On Spline" technique, because it eliminates the need to do the final step of bridging the two end-polys together. I have this script tool permanently in my quad menu as well.
______________________________________
My Store
My Free Models
My Video Tutorials
My CG Animations
Instagram: @luxxeon3d
Facebook: https://www.facebook.com/luxxeon
LuxXeon posted Wed, 18 December 2013 at 1:48 PM
Quote - However, my biggest challenge is the teapot. I really like the design I chose from a reference image on google. I would really appreciate assistance in completing this. I'm at a loss on how to connect the handle and spout seamlessly.
Bandolin, the techniques we reviewed in this thread should be helpful to achieve what you're looking to do with that teapot, but there's some additional workflow to getting the kind of shape for that style design. It's definitely a bit more challenging than just a circular spout, or handle; but still possible, and not that hard overall, with the proper technqiues. Later this evening, I'll work on reproducing your teapot as a single geometry, or at least with a connected spout and handle, and post the results and scene file for you to review. I'll share the steps I take to get there, and hopefully it will help.
Meanwhile, I was also going to show another technique called "Hinge From Edge", which is what I used to quickly create the spout on my teapot in the challenge. It's not a new feature; it's been in 3dsMax for some time now (at least since version 6), but is often overlooked, or misunderstood. It can be tricky to control the results of the tool, but it's a great little feature that can make short work of many common modeling issues. Not sure if you've ever experimented with it or not, but that was my workflow for the type of spout I went for.
______________________________________
My Store
My Free Models
My Video Tutorials
My CG Animations
Instagram: @luxxeon3d
Facebook: https://www.facebook.com/luxxeon
maxxxmodelz posted Wed, 18 December 2013 at 6:29 PM
The Super Poly Bridge script is a really excellent, if not slightly quirky, plugin. I like it, and it definitely makes the creation of extruding loops much easier, once you figure out how to handle the script's interface and options. By default, it only builds a guide spline with one vertex in the center, regardless if you choose "smooth" or "bezier". I've found the results with just one vertex on the spline less than satisfactory, no matter what vertex type you use. I would recommend immediately changing this to at least 3 vertices on your guide spline first, and possibly more, for better extrusion results.
Tools : 3dsmax 2015, Daz Studio 4.6, PoserPro 2012, Blender
v2.74
System: Pentium QuadCore i7, under Win 8, GeForce GTX 780 / 2GB
GPU.
LuxXeon posted Wed, 18 December 2013 at 8:14 PM
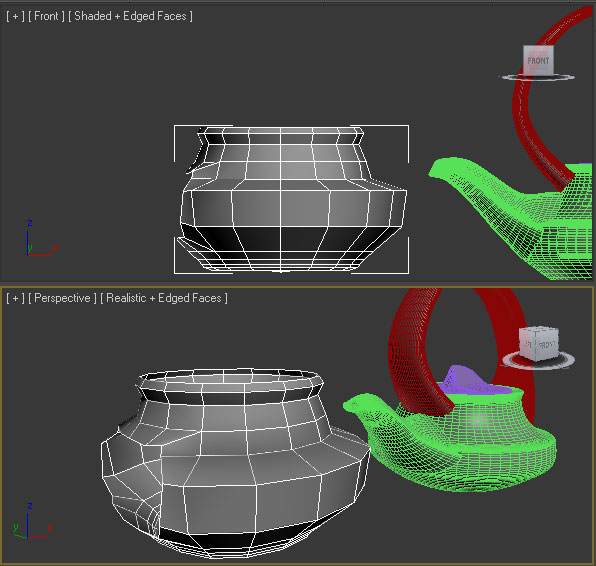
I started by making a very rudimentary copy of the base of your pot. I'm not sure what workflow you employed for that part originally, but it looks like it could have been a lathe, or perhaps you started with a cylinder? I decided to start by simply inserting the default 3dsmax teapot primitive in the scene, and scaled it to roughly match your teapot dimensions. I used the parameter dials to dial down the edges to the most economical shape, while providing the resolution I knew I'd eventually require for the future editing operations. Anyway, I deleted the lid, spout, and handle that are part of the parametric teapot, and converted the base to editable polygon. Next, I added a turbosmooth modifier to the stack (I could have used meshsmooth, or just enabled Nurms in the editable polygon panel for the same results), and began shaping the pot to match yours with simple subD techniques. Then, I selected and removed the faces in the front of the pot that will eventually be where the pouring spout will sit. This left me with the object you see attached here.
______________________________________
My Store
My Free Models
My Video Tutorials
My CG Animations
Instagram: @luxxeon3d
Facebook: https://www.facebook.com/luxxeon
LuxXeon posted Wed, 18 December 2013 at 8:19 PM

I selected the ngon that was at the tip of the extrusion and deleted it, to create the hole for the spout tip.
Next step will be to create the handle. This might take a little more work, and I may use the Super Poly Bridge to do it. However, it can be done also with Extrude on Spline. I'll try that first.
______________________________________
My Store
My Free Models
My Video Tutorials
My CG Animations
Instagram: @luxxeon3d
Facebook: https://www.facebook.com/luxxeon
LuxXeon posted Wed, 18 December 2013 at 8:56 PM
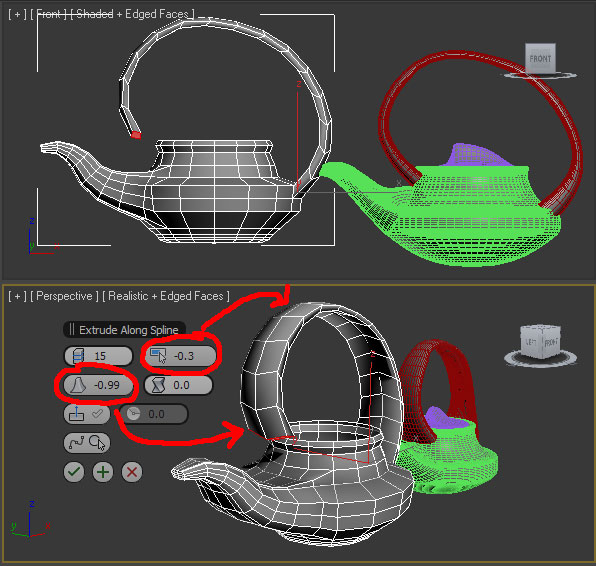
So, with that in mind, the way I'm going to attack this handle is two-fold. My first step is to create a spline that matches the handle you have on your model. After creating the spline, I adjusted it so that one end is directly in contact with the polygons I plan to extrude, and the ending point is near, but not too close, to the polygons I intend to bridge it with to complete the loop.
This is the result of the Extrude on Spline function, with the settings shown in the caddy menu. I added some taper, so that the end is more in the shape of the polys in that area where I will bridge, and I added some taper to the curve, because the handle is thinner at the top than where it starts and ends.
Now I'll attempt to bridge the end polys to complete the loop.
______________________________________
My Store
My Free Models
My Video Tutorials
My CG Animations
Instagram: @luxxeon3d
Facebook: https://www.facebook.com/luxxeon
LuxXeon posted Wed, 18 December 2013 at 9:19 PM
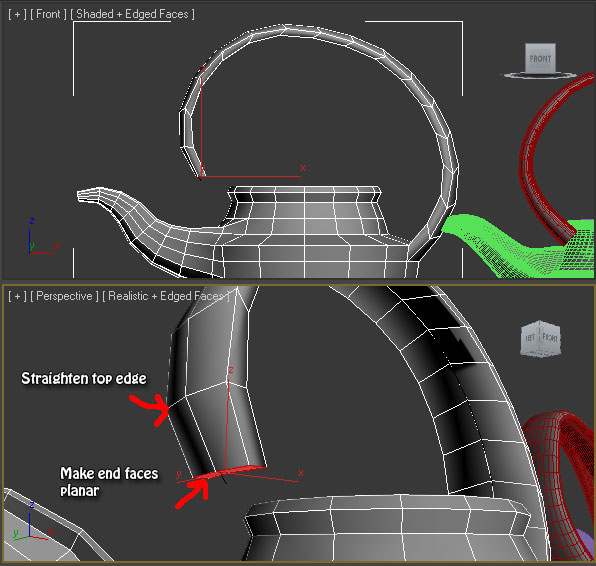
What I did here was just to select the edge loop that is just above the faces I will bridge in the extrusion, and I made it straight. While this isn't necessary for the most part, I feel I get more predictable bridging when the topology near the polygons I am working with is even, and logical. So I just scaled the loop on the Z axis until it was straight (you could also just go to Align-X in the Graphite ribbon, or X in the make planar tools of Editable Poly panel). Then I made the faces at the bottom planar as well, and just adjusted the angle a bit with the rotate tool, so they were slightly facing the polygon faces I will bridge to. All of this is most likely NOT necessary for this, but I do it anyway, because I'm anal.
______________________________________
My Store
My Free Models
My Video Tutorials
My CG Animations
Instagram: @luxxeon3d
Facebook: https://www.facebook.com/luxxeon
LuxXeon posted Wed, 18 December 2013 at 10:04 PM
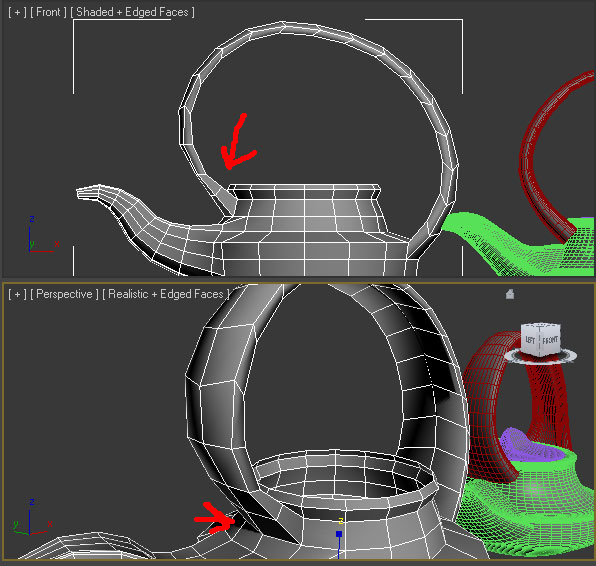
We now have a base model that is only 440 polygons, and with 1 iteration of Turbosmooth, is as smooth as your finished version, but only weighs 3,116 polygons. Meanwhile, your handle alone contained 15,000 polygons after smoothing. So we've become far more economical as well.
______________________________________
My Store
My Free Models
My Video Tutorials
My CG Animations
Instagram: @luxxeon3d
Facebook: https://www.facebook.com/luxxeon
LuxXeon posted Wed, 18 December 2013 at 10:13 PM
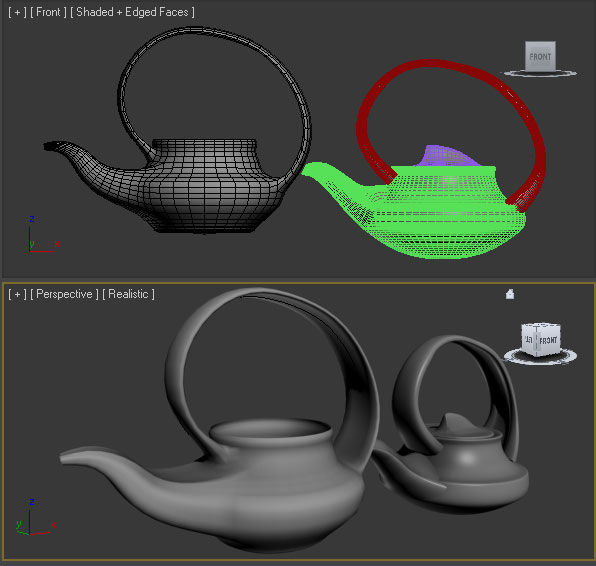
Hope this was helpful in some way.
______________________________________
My Store
My Free Models
My Video Tutorials
My CG Animations
Instagram: @luxxeon3d
Facebook: https://www.facebook.com/luxxeon
maxxxmodelz posted Wed, 18 December 2013 at 10:30 PM
Excellent workflow, lux. Really. I probably should start using extrude on spline more often. I tend to get lazy, and avoid drawing splines. So I would have just extruded the spout with the bevel tool, and adjusted the curvature after the fact, by manually moving vertices or edge loops to bend it into the shape I needed. I see now that your technique of extruding on the spline is much more elegant, and possibly faster. I don't think it offers more control, but I can't argue with your result. It's very close to the original.
Before seeing this tutorial, I would have tried doing the handle by creating a spline like you did, but I would have simply used Loft or Sweep to create the geometry from the spline shape, and bridged both ends to the body. The only trick to my worflow would be I'd need the exact number of edges on my Loft or Sweep object to make an accurate bridge with the faces on the body of the teapot. That part requires some thought, and the possibility for something going wrong is higher. Your technique shown here is probably the easiest, and most fool-proof way to do it.
Great stuff.
Tools : 3dsmax 2015, Daz Studio 4.6, PoserPro 2012, Blender
v2.74
System: Pentium QuadCore i7, under Win 8, GeForce GTX 780 / 2GB
GPU.
LuxXeon posted Thu, 19 December 2013 at 8:28 AM
A couple things I noticed this morning is that the original spout is shaped more like a diamond, and the bottom of the pot is rounded. These are very easy things to go back and fix on our new version, since we're working with a very light base mesh with only 400 polygons. Some vertex and edge adjustments, perhaps a few new edges, and we should have a shape just about exact to the original.
______________________________________
My Store
My Free Models
My Video Tutorials
My CG Animations
Instagram: @luxxeon3d
Facebook: https://www.facebook.com/luxxeon
bandolin posted Thu, 19 December 2013 at 8:49 PM

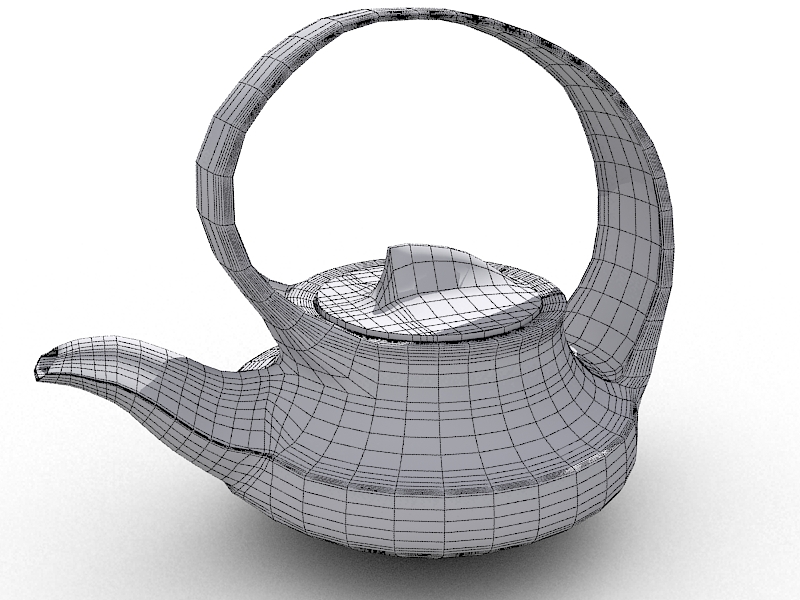
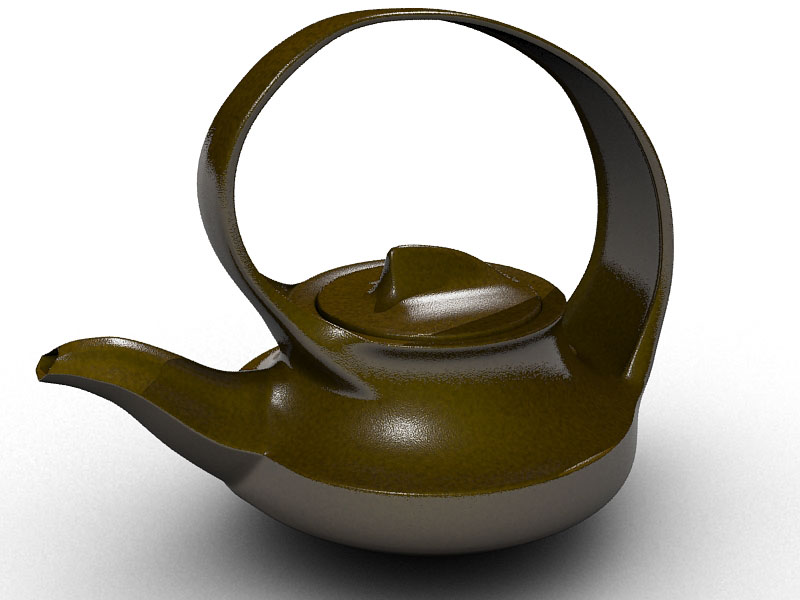
So, my completion of my teapot was accomplished without seeing any of you techniques Lux. My apologies.
<strong>bandolin</strong><br />
[Former 3DS Max forum coordinator]<br />
<br />
<a href="http://www.renderosity.com/homepage.php">Homepage</a> ||
<a href="http://www.renderosity.com/mod/sitemail/">SiteMail</a> ||
<a href="http://excalibur.renderosity.com/mod/gallery/browse.php?user_id=70375">
Gallery</a> || <a href="http://www.renderosity.com/mod/freestuff/index.php?username=bandolin">
Freestuff</a>
<p><em>Caution: just a hobbyist</em></p>
bandolin posted Thu, 19 December 2013 at 8:50 PM
<strong>bandolin</strong><br />
[Former 3DS Max forum coordinator]<br />
<br />
<a href="http://www.renderosity.com/homepage.php">Homepage</a> ||
<a href="http://www.renderosity.com/mod/sitemail/">SiteMail</a> ||
<a href="http://excalibur.renderosity.com/mod/gallery/browse.php?user_id=70375">
Gallery</a> || <a href="http://www.renderosity.com/mod/freestuff/index.php?username=bandolin">
Freestuff</a>
<p><em>Caution: just a hobbyist</em></p>
bandolin posted Thu, 19 December 2013 at 8:51 PM
<strong>bandolin</strong><br />
[Former 3DS Max forum coordinator]<br />
<br />
<a href="http://www.renderosity.com/homepage.php">Homepage</a> ||
<a href="http://www.renderosity.com/mod/sitemail/">SiteMail</a> ||
<a href="http://excalibur.renderosity.com/mod/gallery/browse.php?user_id=70375">
Gallery</a> || <a href="http://www.renderosity.com/mod/freestuff/index.php?username=bandolin">
Freestuff</a>
<p><em>Caution: just a hobbyist</em></p>
bandolin posted Thu, 19 December 2013 at 9:23 PM
I've gone back and read your tut Lux. I appreciate the time you spent on it for me and I learned a few techniques that were new to me and a couple I had forgotten.
Despite the fact I've been tooling around with 3D apps since the mid 90's, as a hobbyist the amount of hours spent using the apps is largely inconsistent at best.
It doesn't help taking a 3 year hiatus from Max whereby I never even launched the program once because I was addicted to EvE online. I finally let my subscription lapse after their last upgrade was no longer compatible with the graphics card I had at the time. When I got back into Max this past March it was like starting all over again. I've had to relearn most the skills that were once second nature. Not to mention the Slate material editor and the graphite modelling tools which didn't exist for me 3 years ago.
But I'm having a blast getting back into it, and I hope we have another challenge soon. Perhaps a weekly challenge where we can work on a single more complex scene. Maybe throw in a Material Challenge or monthly challenge like they do over at CGtalk.
<strong>bandolin</strong><br />
[Former 3DS Max forum coordinator]<br />
<br />
<a href="http://www.renderosity.com/homepage.php">Homepage</a> ||
<a href="http://www.renderosity.com/mod/sitemail/">SiteMail</a> ||
<a href="http://excalibur.renderosity.com/mod/gallery/browse.php?user_id=70375">
Gallery</a> || <a href="http://www.renderosity.com/mod/freestuff/index.php?username=bandolin">
Freestuff</a>
<p><em>Caution: just a hobbyist</em></p>
bandolin posted Thu, 19 December 2013 at 9:27 PM
BTW I immediately installed super poly tools, but I can't for the life of me find how to access it.
<strong>bandolin</strong><br />
[Former 3DS Max forum coordinator]<br />
<br />
<a href="http://www.renderosity.com/homepage.php">Homepage</a> ||
<a href="http://www.renderosity.com/mod/sitemail/">SiteMail</a> ||
<a href="http://excalibur.renderosity.com/mod/gallery/browse.php?user_id=70375">
Gallery</a> || <a href="http://www.renderosity.com/mod/freestuff/index.php?username=bandolin">
Freestuff</a>
<p><em>Caution: just a hobbyist</em></p>
LuxXeon posted Thu, 19 December 2013 at 9:50 PM
Quote - BTW I immediately installed super poly tools, but I can't for the life of me find how to access it.
Bandolin, your teapot looks great. Much better topo than the first one. Is that wire subdivided, or is that the base mesh? Either way, good work.
As for SPB, check out your Customize User Interface. It's a MacroScript. So, you need to "install" it before you can add it to your UI.
To do this, just drag and drop the mzp file from anywhere on your hard drive into 3ds max open viewport, or launch it from Maxscript > Run Script menu, then restart max. Then go to Customize > Customize User Interface > miauu" category, and it should appear as Super Poly Bridge, or SPB. You can install it to whatever part of the UI you prefer, from there. I have mine installed into the tools 1 Quads, as well as under the Tools menus.
______________________________________
My Store
My Free Models
My Video Tutorials
My CG Animations
Instagram: @luxxeon3d
Facebook: https://www.facebook.com/luxxeon
LuxXeon posted Thu, 19 December 2013 at 9:53 PM
Once you find it in the proper category in the Customize User Interface screen under the appropriate tab for the part of the UI you are going to install it, just drag it from the Category over into the area on the right that lists the UI menus, quads, or toolbars. This script doesn't have a custom icon, so I wouldn't install it to a toolbar, but you still can, it will just be a text button.
______________________________________
My Store
My Free Models
My Video Tutorials
My CG Animations
Instagram: @luxxeon3d
Facebook: https://www.facebook.com/luxxeon
bandolin posted Fri, 20 December 2013 at 6:22 AM
Thanks. Mission accomplished.
What is the difference between:
I noticed on the command panel there are certain tools not there. Only availabe under the graphite modelling tools. The same goes for Vertex and Edge selection as well. What's up with that?
<strong>bandolin</strong><br />
[Former 3DS Max forum coordinator]<br />
<br />
<a href="http://www.renderosity.com/homepage.php">Homepage</a> ||
<a href="http://www.renderosity.com/mod/sitemail/">SiteMail</a> ||
<a href="http://excalibur.renderosity.com/mod/gallery/browse.php?user_id=70375">
Gallery</a> || <a href="http://www.renderosity.com/mod/freestuff/index.php?username=bandolin">
Freestuff</a>
<p><em>Caution: just a hobbyist</em></p>
LuxXeon posted Fri, 20 December 2013 at 8:12 AM
Edit Poly modifier is just a way to pass some of the modeling functions you get in editable polygons up the stack. There are some operations that can't be passed up as a modifier, so you will find there are things you can't do in the edit poly modifier that can be done at the base level. However, there's some things very useful about the edit poly as a modifier as well, like the ability to maintain animated information, or to "hold" settings (in animated mode), which allows you to go back down and adjust those parameters later.
For example, if you set the edit poly modifier to "animated" mode, instead of the default "model" mode, and add any kind of modeling operation, like say an inset, you can add other modifiers to the stack, do more changes to the object, but the parameter settings of your inset on the edit poly modifier are stored eternally. So, you can go back down to that modifier, click on the inset again button again, and actually re-adust the settings at any point in the creation process. As long as your stack is intact.
This can be very powerful for visualization, for example, or for any kind of presentation purposes; you can show clients what the results would look like, for example, at different parameter settings, which could result in a different object appearance. If you have multiple edit poly modifiers in your object, set to "animate" mode, you have the power to adjust whatever operation you did on those modifiers, even if you have them keyframed. It's been refered to as the "ultimate undo", and while there are some benefits also to a modeling history, as in other apps like Maya and Cinema 4D, the procedural nature of the modifier stack offers certain functionality not possible any other way.
______________________________________
My Store
My Free Models
My Video Tutorials
My CG Animations
Instagram: @luxxeon3d
Facebook: https://www.facebook.com/luxxeon
LuxXeon posted Fri, 20 December 2013 at 8:28 AM
Lets count how many times I can say "for example" in a sentence. Sorry bout that. I kept getting distracted as I was typing that response.
______________________________________
My Store
My Free Models
My Video Tutorials
My CG Animations
Instagram: @luxxeon3d
Facebook: https://www.facebook.com/luxxeon
bandolin posted Fri, 20 December 2013 at 12:43 PM
"For example, if you set the edit poly modifier to "animated" mode, instead of the default "model" mode"
I'm not sure I know what this is. Where is this mode changer. I don't think I've ever noticed it.
<strong>bandolin</strong><br />
[Former 3DS Max forum coordinator]<br />
<br />
<a href="http://www.renderosity.com/homepage.php">Homepage</a> ||
<a href="http://www.renderosity.com/mod/sitemail/">SiteMail</a> ||
<a href="http://excalibur.renderosity.com/mod/gallery/browse.php?user_id=70375">
Gallery</a> || <a href="http://www.renderosity.com/mod/freestuff/index.php?username=bandolin">
Freestuff</a>
<p><em>Caution: just a hobbyist</em></p>
LuxXeon posted Fri, 20 December 2013 at 2:11 PM
Quote - I'm not sure I know what this is. Where is this mode changer. I don't think I've ever noticed it.
There's two radio tickers directly beneath the "Edit Poly Mode" rollout in the modifier. One for Model, and another for Animate.
The help files say:
"The Edit Poly modifier provides explicit editing tools for different sub-object levels of the selected object: vertex, edge, border, polygon, and element. The Edit Poly modifier includes most capabilities of the base Editable Poly object, except for Vertex Color information, Subdivision Surface rollout, Weight and Crease settings, and Subdivision Displacement rollout. Edit Poly lets you animate sub-object transforms and parameter changes. In addition, because it's a modifier, you can retain the object creation parameters and change them later."
When it's in modeling mode, which is default, the modifier locks you into whatever procedure you do on it. In Animate mode, the last operation; be it an extrusion, bevel, inset, or whatever, is perserved to be edited later, if necessary, or animated with keyframe animation, and passed up the stack.
______________________________________
My Store
My Free Models
My Video Tutorials
My CG Animations
Instagram: @luxxeon3d
Facebook: https://www.facebook.com/luxxeon
LuxXeon posted Fri, 20 December 2013 at 2:17 PM
Don't feel bad about never noticing that. If we hadn't covered it in our classes, I would have never noticed either, and I've talked to many excellent modelers who didn't know what that feature can really do, and thought it was just for animating objects or something mundane.
It's a really powerful procedural feature, that lends a great deal of practical use to the edit poly modifier, and gives options to your workflow that I haven't seen an equal to in many other modeling packages.
______________________________________
My Store
My Free Models
My Video Tutorials
My CG Animations
Instagram: @luxxeon3d
Facebook: https://www.facebook.com/luxxeon
bandolin posted Fri, 20 December 2013 at 2:48 PM
If animation mode is so powerful it begs the question why as to why model mode is the default. I'll have to experiment with it. Thanks.
<strong>bandolin</strong><br />
[Former 3DS Max forum coordinator]<br />
<br />
<a href="http://www.renderosity.com/homepage.php">Homepage</a> ||
<a href="http://www.renderosity.com/mod/sitemail/">SiteMail</a> ||
<a href="http://excalibur.renderosity.com/mod/gallery/browse.php?user_id=70375">
Gallery</a> || <a href="http://www.renderosity.com/mod/freestuff/index.php?username=bandolin">
Freestuff</a>
<p><em>Caution: just a hobbyist</em></p>
LuxXeon posted Fri, 20 December 2013 at 3:08 PM
Quote - If animation mode is so powerful it begs the question why as to why model mode is the default. I'll have to experiment with it. Thanks.
Because holding attributes is probably more process intensive, and there are modifiers which can screw up the results of the animation mode. You have to know how or when it's logical to pass cetain procedures up the stack to achieve specific results. Most people just want to model something static, and don't care about the ability to change or animate what they are doing, as they go. Also, because it retains procedure or animation information, using Animate mode for every edit poly modifier in the stack will eventually cause the system to slow down, if your stack gets really deep.
______________________________________
My Store
My Free Models
My Video Tutorials
My CG Animations
Instagram: @luxxeon3d
Facebook: https://www.facebook.com/luxxeon
bandolin posted Fri, 20 December 2013 at 7:30 PM
Now that I'm home and have Max in front of me, I've had the opportunity to take a gander at the different modes. I've reread your posts at least 5 times each and I still can't quite wrap my head around exactly what the Animate Mode does.
"When it's in modeling mode, which is default, the modifier locks you into whatever procedure you do on it. In Animate mode, the last operation; be it an extrusion, bevel, inset, or whatever, is perserved to be edited later, if necessary, or animated with keyframe animation, and passed up the stack."
If I understand correctly, the animate mode allows me to modify the last operation even after I've clicked the check mark. I thought it would allow me to modify the 2nd, 3rd or 4th previous operation similar to what History does in Photoshop.
For example:
Can I go back to the original inset and change the size because it was too small (or large) to begin with?
<strong>bandolin</strong><br />
[Former 3DS Max forum coordinator]<br />
<br />
<a href="http://www.renderosity.com/homepage.php">Homepage</a> ||
<a href="http://www.renderosity.com/mod/sitemail/">SiteMail</a> ||
<a href="http://excalibur.renderosity.com/mod/gallery/browse.php?user_id=70375">
Gallery</a> || <a href="http://www.renderosity.com/mod/freestuff/index.php?username=bandolin">
Freestuff</a>
<p><em>Caution: just a hobbyist</em></p>
LuxXeon posted Fri, 20 December 2013 at 8:16 PM
Quote - Now that I'm home and have Max in front of me, I've had the opportunity to take a gander at the different modes. I've reread your posts at least 5 times each and I still can't quite wrap my head around exactly what the Animate Mode does.
"When it's in modeling mode, which is default, the modifier locks you into whatever procedure you do on it. In Animate mode, the last operation; be it an extrusion, bevel, inset, or whatever, is perserved to be edited later, if necessary, or animated with keyframe animation, and passed up the stack."
If I understand correctly, the animate mode allows me to modify the last operation even after I've clicked the check mark. I thought it would allow me to modify the 2nd, 3rd or 4th previous operation similar to what History does in Photoshop.
For example:
- I create an inset,
- then extrude that inset,
- followed by a negative bevel to create a cavity,
- finally a chamfer to round out the inside of the bevel.
Can I go back to the original inset and change the size because it was too small (or large) to begin with?
You can, if you put those other operations on their own edit poly as well. It's for having a procedural link back to that particular modeling operation in the stack. Do this exercise...
This will bring up your Inset caddy again, with the same settings you performed in that inset command, and now you can adjust the inset you had created to a different amount. Do that, and you will see the holes in your grid getting bigger or smaller as you adjust the amount.
I imagine you can see how this is a powerful feature for presentation purposes (for arch/viz designers), or a great way to create unusual animations on your model (if you keyframe those changes), or just a good way to experiment with different settings as you model an object, to see how different parameters would affect the result.
______________________________________
My Store
My Free Models
My Video Tutorials
My CG Animations
Instagram: @luxxeon3d
Facebook: https://www.facebook.com/luxxeon
bandolin posted Fri, 20 December 2013 at 8:33 PM
Man, you just blew my mind. I always had a feeling Max could do this and I've seen tuts where guys did do exactly this, but never really grasped how they did it.
Awesome.
<strong>bandolin</strong><br />
[Former 3DS Max forum coordinator]<br />
<br />
<a href="http://www.renderosity.com/homepage.php">Homepage</a> ||
<a href="http://www.renderosity.com/mod/sitemail/">SiteMail</a> ||
<a href="http://excalibur.renderosity.com/mod/gallery/browse.php?user_id=70375">
Gallery</a> || <a href="http://www.renderosity.com/mod/freestuff/index.php?username=bandolin">
Freestuff</a>
<p><em>Caution: just a hobbyist</em></p>
maxxxmodelz posted Fri, 20 December 2013 at 8:48 PM
My god. All these years, and I never knew how to use that animate mode, because I never tried clicking the damn Settings button to bring up the parameters! My stubbornness just assumed it was for adjusting something already animated! Not only that, but I'm totally ashamed to admit that I didn't realize until now that the DELETE MESH modifier could also be used on sub-object selections! Yep. Believe that one? I thought it was just there to be used for deleting a mesh at the object level, and useful for making things "disappear" in an animation (which it is). I feel completely amateur right now, after 10 years of using Max.
Really quick, one other interesting thing I noticed is that I can add two or more edit polys in the stack as you said, and all the parameters seem editable until I press "commit", or "cancel" buttons. It appears I can also decide to select different sets of polygons on the object, in those edit poly modifiers, and completely change where I first created those actions (insets, extrusions, bevels, or whatever). This is more than interesting to me! This is very useful, and I really didn't know I could do this. Why weren't these features pushed as bullet points by Autodesk when they were implimented?! I'm assuming these things were available for a very long time in Max, and I never knew it until now because no one talks about them! I guess if I read the manual like a novel, I would know, but this is really cool stuff here, and should have been considered revolutionary capabilities at the time they were put into the software years ago! Sorry to sound like a newb here guys, but I'm doing a face-palm to myself right now.
Tools : 3dsmax 2015, Daz Studio 4.6, PoserPro 2012, Blender
v2.74
System: Pentium QuadCore i7, under Win 8, GeForce GTX 780 / 2GB
GPU.
maxxxmodelz posted Fri, 20 December 2013 at 8:56 PM
Quote - Man, you just blew my mind. I always had a feeling Max could do this and I've seen tuts where guys did do exactly this, but never really grasped how they did it. Awesome.
Ditto! Read my post above. I'm dumbfounded right now. I mean, I knew that there were options that made max a very unusual and powerful modelling app, but I really thought that this animate mode was something totally different, and for a totally different purpose than it is for. That was just my stubborn assumptions, and I never bothered to look it up, or dig deeper.
Man, all these YEARS I could have been putting all this great functionality to use, and I just never did. I can't believe it.
I remember reading about some of this kind of thing over at CGArchitect.com a couple years back, but I really thought it was only for overall animation puposes, and not for this kind of thing. The delete mesh on subobject is what I'm really killing myself over. How did I not know that this long? It's in the damn manual I'm sure, but I never bothered to look. I mean, I thought I knew what it was for. LOL!
Tools : 3dsmax 2015, Daz Studio 4.6, PoserPro 2012, Blender
v2.74
System: Pentium QuadCore i7, under Win 8, GeForce GTX 780 / 2GB
GPU.
LuxXeon posted Fri, 20 December 2013 at 9:28 PM
Maxxx, this is what I was talking about that day in the email, about animating the holes in a surface, but there's a lot more you can do with it as well, as you can imagine.
You can use the modifier stack, along with Animate Mode in Edit Poly, to do some really amazing procedural effects as well, without complex wiring of parameters, or using plugins.
One really amazing thing you can do is create morph targets, using the edit poly Animate Mode, which can be used to create some very interesting or useful animated geometry effects. You can add changes to the topology in edit poly, and then extract those changes with the Morpher modifier, using "Capture Current State", and use them in different morph channels very easily. Of course, this only works with topology changes that are performed through parameter-driven operations (inset, extrude, bevel, outline, bridge, etc). Manual changes to subobjects in the edit poly are not, to my knowledge, editable in Animate Mode. I'm pretty sure that any operation which can bring up a caddy, to change parameters, can be adjusted in Edit Poly Animate Mode. I could be mistaken there though.
______________________________________
My Store
My Free Models
My Video Tutorials
My CG Animations
Instagram: @luxxeon3d
Facebook: https://www.facebook.com/luxxeon
maxxxmodelz posted Sat, 21 December 2013 at 9:35 AM
All of this just shows it pays to read the manual. :blushing:
Tools : 3dsmax 2015, Daz Studio 4.6, PoserPro 2012, Blender
v2.74
System: Pentium QuadCore i7, under Win 8, GeForce GTX 780 / 2GB
GPU.
bandolin posted Sat, 21 December 2013 at 12:12 PM
RTFM baby!
<strong>bandolin</strong><br />
[Former 3DS Max forum coordinator]<br />
<br />
<a href="http://www.renderosity.com/homepage.php">Homepage</a> ||
<a href="http://www.renderosity.com/mod/sitemail/">SiteMail</a> ||
<a href="http://excalibur.renderosity.com/mod/gallery/browse.php?user_id=70375">
Gallery</a> || <a href="http://www.renderosity.com/mod/freestuff/index.php?username=bandolin">
Freestuff</a>
<p><em>Caution: just a hobbyist</em></p>