
RAMWorks opened this issue on Aug 03, 2009 · 15 posts
RAMWorks posted Mon, 03 August 2009 at 12:02 PM
OK, I do have a question about exporting from DAZ Studio, not Poser, to prepare a obj to for painting in ZBrush (not morphs, painting!!).
So when I bring up the export dialog.
In the Basic tab there are 3 options:
Ignore Invisible Nodes
Use Bone Welds
Removed Unused Vertices
Which are checked?
In the Advanced tab there are 3 sections with sub options:
Swap Y and Z Orientation
Write UV Coordinates
Write Normals
Write Object Statements
Write Groups (section 2)
Use Existing Groups
Use Node Name(s)
Use Surface Name(s)
Use Figure Name(s)
Write Surfaces (section 3)
Write Material Library (sub options below)
No Maps
Collect Maps
Convert Maps (for Bryce)
Which of these areas should be checked and which sub options should be checked?
Again, this is to export for bringing a figure into ZBrush (single template) for painting, nothing more....
Thanks much!! :biggrin:
---Wolff On The Prowl---

RHaseltine posted Mon, 03 August 2009 at 2:04 PM
You would tick Ignore invisible if there are other things in the scene that you don't want to paint, and if you've set them to hidden (Visible:No). Otherwise, for painting, those shouldn't matter.
You need the uv coordinates, the other stuff should be optional.
You don't need groups at all
You might want Surfaces, if you are going to paint only selected material zones. You will certaibly want them if this is a figure that uses different maps on different parts, like the DAZ humans.

fivecat posted Mon, 03 August 2009 at 2:26 PM
Quote - OK, I do have a question about exporting from DAZ Studio, not Poser, to prepare a obj to for painting in ZBrush (not morphs, painting!!).
Are you using a morphed obj? If not, why not use the original obj in the geometries folder?
If you are using the daz figures, I have a tutorial at my site byfivecat.com on. If the tutorial is not clear, than please feel free to ask me specific questions.
As far as the export dialog:
Quote - So when I bring up the export dialog.
In the Basic tab there are 3 options:
Ignore Invisible Nodes
Use Bone Welds
Removed Unused VerticesWhich are checked?
Leave Ignore Invisible Nodes checked. Others unchecked.
Quote -
In the Advanced tab there are 3 sections with sub options:
Swap Y and Z Orientation
Write UV Coordinates
Write Normals
Write Object StatementsWrite Groups (section 2)
Use Existing Groups
Use Node Name(s)
Use Surface Name(s)
Use Figure Name(s)Write Surfaces (section 3)
Write Material Library (sub options below)
No Maps
Collect Maps
Convert Maps (for Bryce)Which of these areas should be checked and which sub options should be checked?
Write UV, write normals.
For painting, use surface names.
You do not need to write surfaces, so leave all unchecked.
RAMWorks posted Mon, 03 August 2009 at 2:27 PM
RAMWorks posted Mon, 03 August 2009 at 2:32 PM
OK, going to try this. I wanted to ask, is there a better export preset or just keep at Custom and keep that 1% as is??
---Wolff On The Prowl---
fivecat posted Mon, 03 August 2009 at 2:37 PM
Quote - OK, going to try this. I wanted to ask, is there a better export preset or just keep at Custom and keep that 1% as is??
I would recommend using custom.
Ram, I understand wanting to learn from others, but don't be afraid to try stuff youself. I learned a lot by just trying things and seeing what happened. We don't always know what is best for you... only you can find what is your best workflow.
RAMWorks posted Mon, 03 August 2009 at 2:41 PM
OK, thanks much! 
I think your tutorials are nice but they are a bit text for me. I'm more of a visual learner and I realize no one like to sit there and organize a zillion and one image references. I sure don't but for some of us too much text and our minds go to mush. So I have to ask as I go along to keep it all straight!! LOL
Hope that's OK...
---Wolff On The Prowl---
RAMWorks posted Mon, 03 August 2009 at 2:48 PM
Wanted to ask one more question.
This one pertains to the ZBrush main work area. Is there a way to customize the UI to make the most of the work space? I've got a 30" monitor. When the UI is full maximized I end up with this FAT border around the the area and it's such a waste of space. If I use the top Zoom tool it will zoom this area better to fit but then the model looks a bit pixeled around the edges!
---Wolff On The Prowl---
RAMWorks posted Mon, 03 August 2009 at 2:55 PM
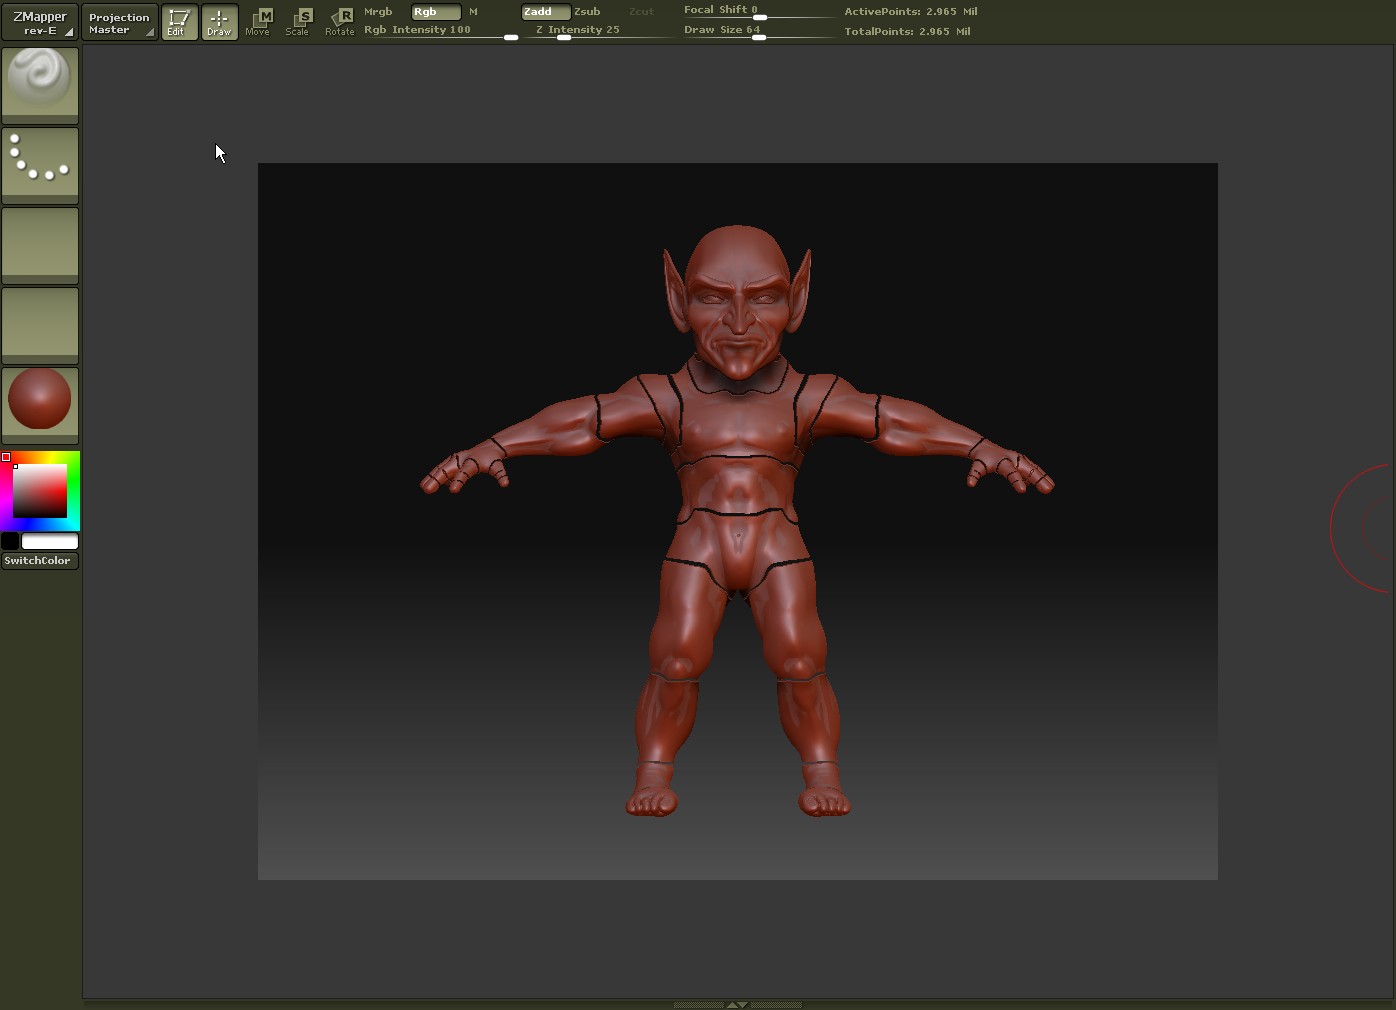
Also, in order to start a new document I get an error. Basically asks me to try again when I've deselected the tool. Only way I can get past that so far is to restart ZBrush! :huh:
Image shows that huge border I mentioned and the mesh as I've exported it as it looks when subdivided up 3 times!
---Wolff On The Prowl---
RHaseltine posted Tue, 04 August 2009 at 9:06 AM
if you are painting, why subdivide? Or are yuo painting displacement? You are right, though - if you are going to SubD it it needs to be welded.
RAMWorks posted Tue, 04 August 2009 at 9:29 AM
It's been said that by subdividing you can add in better detail while painting.
In any case I think I remember from the Meats DVD that he said to make sure and mentioned that you should first hit the Crease button and then subdivide. That keeps the mesh from blowing apart like that..
---Wolff On The Prowl---

Cimaira posted Wed, 05 August 2009 at 10:48 AM
RAMWolff, I hope you do not mind my asking a question here. It is directed at fivecat. I am also new to ZBrush and UV Mapper. I have Classic. I was reading over your tut on how to prepare a figure for painting. Being very new to the UV mapper program, I'm not sure exactly how to go about selecting to create new groups. So that part of the tut is unclear to me. Could you explain how I should select the parts to create new groups.
Again RAMWolff, I apologize if I seem to be highjacking your thread, I can create another thread for this question if you prefer.
thanks, cimaira
fivecat posted Wed, 05 August 2009 at 1:09 PM
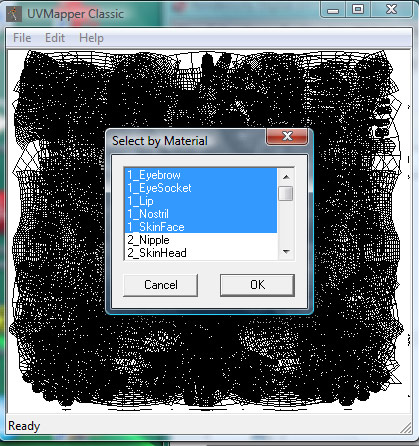
Go to Edit-->Select-->by Material and select all the materials that are on one texture map. For Victoria 4 they made this easy, as each set of materials is preceded by a number. You can see in the attached image that I have selected all the materials on the head texture map (all materials have the 1- prefix).
With the materials selected, go to Edit-->Assign-->to Group. Type in a name for a new group such as FaceMap and Click okay. Do this for all the material groups.
When you are finished, Save Model with a new name -- Don't overwrite your original object file!
You can now bring this object into zBrush, and the groups will be the Material groups you created.
RAMWorks posted Wed, 05 August 2009 at 4:05 PM
Hijack away, good info is good info for all!!
---Wolff On The Prowl---
Cimaira posted Wed, 05 August 2009 at 9:13 PM
Thank you so much fivecat! That's exactly what I need to know. And thank you RAMWolff, for so graciously allowing me to piggyback my questions on your thread :)