
Jedi_Padawan opened this issue on Jan 01, 2008 · 14 posts
Jedi_Padawan posted Tue, 01 January 2008 at 11:24 PM
Hello all together,
I'm just beginning to wet my hands at C6, so please bear with me if this is a stupid question.
Whenever I import a new figure into a scene the texture looks like plastic! I.e. like in that pic (no postwork in that one, just the plain picture to visualize my problem):

What am I doing wrong?! Is it something with the ilghts or with the shaders? And how can I get rid of that problem and achieve a much more realistic look?
Whenever I look in the Carrara Gallery there's never an image with these plastic textures... :mad:
Thanks a lot for your help, it's highly appreciated!
Take care,
~Sassy~

bwtr posted Wed, 02 January 2008 at 2:37 AM
bwtr

MarkBremmer posted Wed, 02 January 2008 at 7:26 AM
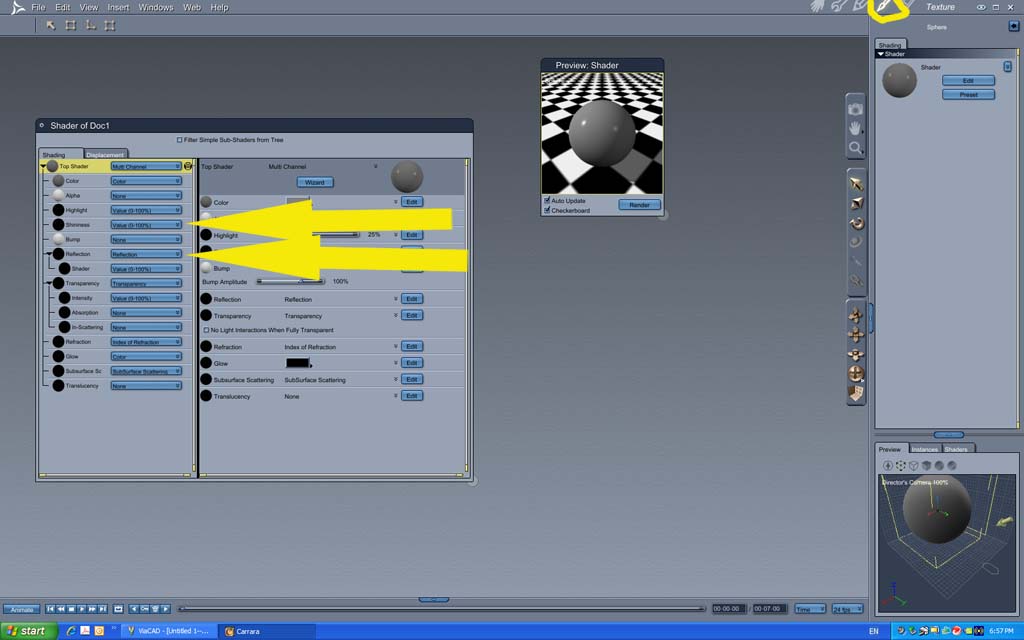
Hi Sassy, Nice to see you around! In Carrara, you control that in the Shader room with the Highlight and Shininess settings. To better understand their interaction, imagine a sphere that has a single light on it: the Highlight adjustment controls how bright the reflected "spot of light" is; the Shininess controls how big the reflected spot of light is. Skin doesn't have a very bright or very strong highlight quality unless it's wet. So, back to skin, the Highlight doesn't have to be a value slider. It can be a color which is what I usually do - a darker color of the skin tone. Or, if your figure has a texture map for the color channel, you can simply duplicate/copy-paste the texture map into the Highlight channel and then dial down the brightness of the texture map to about 50 percent. Here's a little secret about the Shininess channel. While you can slide the Value slider down to something like 2 or 3 percent, an easy way to bring some believable variation into the shininess is to duplicate/copy-paste the bump map (if there is one) into the Shininess channel and then dial down it's brightness to 30 percent or so. What you adjust it down to depends a little on how your scene is lit. This technique shows off and compliments the detail that will be revealed in the bump channel. In fact there is times that I remove thee bump entirely and let the texture map in the Shininess channel fake the bump instead. Doing this allows faster renders when using Global Illumination. Mark

boeing posted Wed, 02 January 2008 at 9:51 AM
Excellent explaination, if a specular map was to be applied to a figure, would it go in the highlight or shininess shader?
Thanks,
Philip
boeing posted Wed, 02 January 2008 at 9:55 AM
I guess I needed to finish reading Mark's post!! Thanks

Miss Nancy posted Wed, 02 January 2008 at 2:05 PM
sassy, it's a good render, well-composed IMVHO one other tip is that non-directional lites may cut way down on the shiny skin.
Jedi_Padawan posted Wed, 02 January 2008 at 4:38 PM
Thank you all so much for your replies!
Miss Nancy: I haven't started with the light settings yet, in these pics I've just used the standard light that comes with an empty scene, but I'll have to work on that soon, that's for sure.
Mark: Thanks a lot for your excellent explanation! Finally something that is easily to understand.
Well, I tried like you suggested: Highlight with the texture map and Brightness turned down to 50%, Shininess with the bumpmap and Brightness turned down to 30%. Worked wonderful on the shirt, though on the skin - hmm, what do you say?

In that version, I changed the Highlight with the texture map and Brightness turned down to 50%, but I turned the shininess slider down to 2% iso using the bump map (hand and face). Not glossy anymore, but shiny:

And that's the last try. I darkened the colors of the Highlights and used the bump maps with a brightness of 30% (hand and face).

IMO your suggestions all worked very well and now it's just a correct setting of the lights, as Miss Nancy already said.
Which settings would you suggest? Are there probably any finished lights available (yes, I know, I'm a lazy bum.... ;o) but this is just to get a start at that, as I haven't tried anything with the lights right now except then twist and turn them.....somehow.... :blushing:
Thanks,
~Sassy~
Miss Nancy posted Wed, 02 January 2008 at 7:00 PM
I would use the brighter of the two hdri presets (with the cornet). if it's a poser file, the figure may need to be rotated 180 deg. in z-axis.
Jedi_Padawan posted Wed, 02 January 2008 at 11:33 PM
Miss Nancy, you are an Angel!!!!!!!!!!!!!!!!!!!!!!!
That was the PERFECT suggestion! Thank you, thank you, thank you!!!!!!!!!!!!!!!!!
I mean, look at this, the skin, the shadow - it's lifelike! And that's jsut the beginning. Wow! You don't know how grateful I am for your help!
I never need Poser again! All I need now is Carrara and with these results, I can honestly skip this little bug I got when saving the scene (I found a workaround in the forum).
Man, I'm the happiest person on earth right now bounces up and down in her room :biggrin:


Thank you all so much!
Take care,
~Sassy~
bwtr posted Wed, 02 January 2008 at 11:45 PM
Well done!
Poser stuff is a handy "resource" for doing "short cut" exercises. But you can download most Poser type stuff directly into the Carrara6 Runtime now without having the need for the Poser app itself.
bwtr

Deecey posted Thu, 03 January 2008 at 10:50 AM
Miss Nancy posted Thu, 03 January 2008 at 1:42 PM
it's looking good, sassy. there are some settings to tweak to make it appear brighter, if desired. in some cases a directional light may also be needed, in which case the skin settings will need adjustment, as carrara interprets them differently from poser. note that poser 7 can also do hdri (although there may be some errors in how FFRender calculates the illumination). poser 7 can also do indirect lighting (enabled with GI in poser) using a python script, but as in carrara, when indirect lighting is enabled, it slows poser 7 down considerably.
Jedi_Padawan posted Thu, 03 January 2008 at 6:48 PM
There's a python script in Poser for indirect lighting? I didn't knew that. Interesting thing though. I used once or twice a light set with global illumination, but as you've said, it slowed everything down a lot.
Right now I'll keep on working with C6. So much to learn and I've just started with it. But I love to import the poser figures into C6, as they are the things that I use in my scenes usually (i.e. Jack ;o)
I'm sure I'll pop up here soon again with new questions.
~Sassy~
Miss Nancy posted Thu, 03 January 2008 at 7:33 PM
the GI variables in poser 7 are defined in the poser python manual. the feature is unsupported, as there were several errors in e-f's implementation of said variables. I expect that they will be fully functional in poser 8 (~$449).
