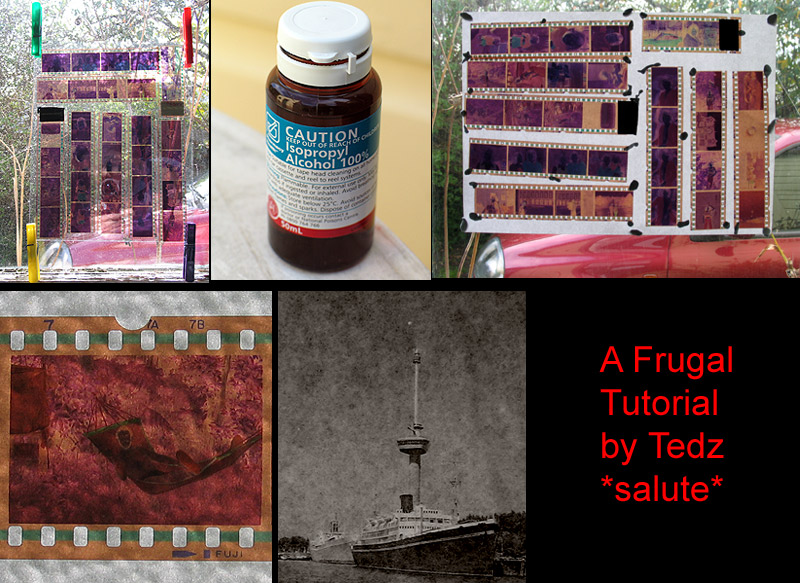
~~~ This is My Own Method for fixing up Old and Damaged Negatives, and these here are well over 30 Years Old and are Fungi Infected. Firstly, to View....I have placed the Negatives between 2 Panes of Glass....held snugly together with Clothes Pegs...(it is important to remove Your Smalls from the Pegs) ...you do this after You have cleaned the Negatives with a Solution of Isopropyl Alcohol ...Cotton Wool to wipe on...and a soft cloth to wipe off....yep...Drink what is left over. Then it is a matter of getting the Negatives, and sticking them to White Paper...held on with Blu-tak, or...Pegs. Then place this on a Clear Window Pane....You do not need a Red Car in the Back Ground... a Green or Blue Car will also suffice. Then, with Your Digital Camera & Tripod....take individual Photos of the Negative, in the Macro Mode. Once this is complete....put Your New Image of the Negative through PotatoShop...or even the Microsoft Program in Your PC...and turn into "negative"...or...."invert"...voila!....now You have an Image....depending on how bad the damage is. I find that to remove the Color is also advantageous...as the color has no doubt been eaten by the Mold Spores....so...a Black & White Image is easier to define. That Final Image of the 2 Ships is actually in Rotterdam, Holland....and...I used to Live in the Park... Sleeping under the Euro Tower...awaiting to Join a Vessel. Hope this wee Tutorial may benifit those as Frugal as Me. *salute* # Patent Pending# $$$$$$$$$$$