
LuxXeon opened this issue on Dec 15, 2013 · 66 posts
LuxXeon posted Tue, 17 December 2013 at 9:45 PM
Making the handle on a teapot, or any spherical or cylindrical object, is quite simple as well. It's a 3 or 4 step process at most.
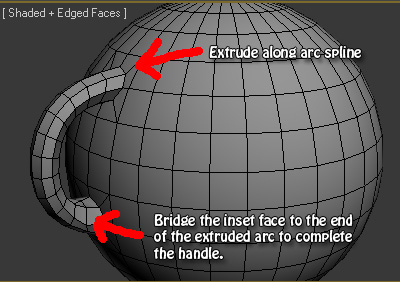
Pick two spots on your surface you want to connect with a handle. Inset 4 polygons in both areas; inset, then delete the inset faces. Select the border edge on each inset hole, and in your Loop Tools panel, click Circle (same process as creating the spout, illustrated on page01 of this thread). If you are using the Regularize maxscript discussed on the previous page, then skip the deletion part, and just regularize the faces instead to make a nice circle. Then, cap the circular holes with ngons. Now, in Ortho view from the side, create an arc spline from the top ngon to the bottom, but not quite all the way to the bottom ngon. It should be a semi-arc that almost meets the bottom ngon, because you're actually going to bridge the two faces at the very end, so leave some room for a bridge. You can either use an actual Arc spline for this, or a line with bezier points (this offers more control). Now extrude the top polygon along the arc. The extrusion should almost meet the bottom ngon, but not quite. Now select the end face of your extruded ngon and bridge it to the bottom circular ngon. That should complete the handle, as illustrated in the attached image.
Very simple process. Now you may wish to tweak the results by selecting all the polygons on your new handle, and relaxing for 1 iteration to make it smooth, or apply a smooth 30 on the entire object.
______________________________________
My Store
My Free Models
My Video Tutorials
My CG Animations
Instagram: @luxxeon3d
Facebook: https://www.facebook.com/luxxeon