Day 4
Review the checklist.
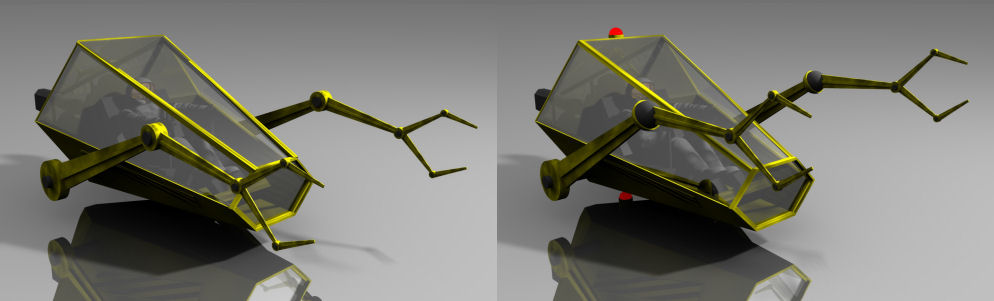
- Build some construction pods and put them into the scene doing some construction. Done (but needs more work). I built a little construction pod with two articulated arms and I put a little space suit dude in it (already had the space suit dude built for another project). The pod has two articulated arms and everything. The problem is that I need the arms to rotate in two dimensions instead of 1 so I will probably go back and update the model and replace the pods I already installed (plus I forgot a red light on the top and bottom, stupid!). The pods are about 30 pieces or so and it only took an hour to build. To update the arms is about 30 minutes and then another 20 minutes to replace the current pods. Not a big deal. I'll probably hack on the details a tweeny bit just because I'm anal even though you will NEVER see them (way too small).
- Add some dudes in some space suits welding on the hull. Didn't get to it last night.
- Build some panels for the construction pods to pack around. Didn't get to it last night.
- More tweakage on the lighting. Done. I hardened the angular falloff on two lights pointing at the primary hull, tweaked their projection angles and arcs and also added another spotlight to point at the starboard engine under construction.
- Conduit manipulation in the primary hull. Done (but will copy in a couple more). I did some reasonable manipulation of the conduits and got them looking a lot better and spread them out a little bit. I only have two groups in there and I will just copy a few more and stick them in (10 minutes work, no prob). It turns out that I have a lot of decking and junk already in the primary hull which obscures these conduits quite a bit but I don't really care. It's just a subtle detail that people who are looking will notice and people who don't look won't care and it's all good!
- More compartments in the primary hull. Probably a few more lights, diversify the colors, amp up the texture I put into the new decking. Done! I decided more compartments weren't necessary but I did amp up the textures and I cut a bunch of holes in the deck just for more diversity (hard to see them though but that's just fine, it's supposed to be subtle). I didn't actually cut holes in the mesh, I did it using transparency. I originally had a primitive cylinder with the z axis scaled to tiny to squash it for the deck. So, I took that cylinder into the modeling room, converted it to a vertex object, and then cut off the top to leave me just a single disc. Then I mixed 100% and 0% values with the squares procedural using a cutoff tolerance to "cut" holes in that circle using texturing (lots faster and looks good and I can control the hole counts and mixes really easy that way). I doubled the number of lights inside the primary hull and varied the lighting colors (looks good). Diversifying the colors makes a bigger difference than I thought it would. I dialed them more to the Oranges and reds (pinks sort of). Blue will be reserved for the welders on the outside.
- Finish up the details on the drydock blue panels. I'm going to add more details into the lines, put in a splash of red and some white squares. Done! This was a little bit more of a pain than I had planned but it came out the way I wanted it. I had to apply three layers with masks onto those panels (one for the blue pattern, one for the red stripes, and then one for the white squares). I also doubled up the details on the blue section. This part of the work is done mostly in paint shop pro to paint the mapping patterns and then the manipulation in the texturing engine requires some major brain whanging for me. I haven't done much of the more advanced texturing stuff that Carrara can do so it took me a while to figure out a way to bang it out. It's done though and it looks great! Complex texture layering is still somewhat of a mystery for me. Carrara's texture engine is really powerful and it's dangerous in the hands of a novice!
- Decrease the depth of all those crazy little blocks in the drydock ceiling. I like em but they need to be toned down a tad. Done. This was a two minute job. Just select the block that all the blocks are based on and rescaled it (WHAP!).
- Backdrop issues. I don't know if I want a planet in the backdrop yet. Seems like a good idea but then I have to make it and not only do I have to make it but it has to look good and make sense from different angles, yak yak yak yak.
Did not get to this last night. This is going to be last to do since it's such a big deal. It took a whole day to make the backdrop for the previous image I made. Carrara has a really super stupid model for Aura and it took 10 hours just to render the atmospheric halo (It's a bug in the code I'm sure, but it's the only way to get it so I just turn on the computer and go to bed, computers are good slaves). Then I rendered the planet and its atmosphere separately, rendered a mask, then combined in paint shop pro. It's a little dorked because I reduced the brightness of the stars a tweeny bit on accident but I'll live with it. The point is that it takes some time to crank out a background especially if you want it to look good so I'll just see what happens. You have to get the lighting right and you have to get the planet to have good details when you render it big and it gets even more tricky when you're just looking at a small section of a planet (ie, you're really zoomed in). In addition, it's hard to put a planet in the backdrop in the actual scene and just render the beast in one crunch. The reason is that you can't really put in a planet on the scale of a planet and get the lighting right. You put in a planet and size it and position it to get it where you want it and then render it and dang if your stupid ship and space station casts a shadow on the planet the size of Europe (scaling and such). In addition, there are other issues that get messed up when you put in a planet as a backdrop and it's a lot easier just to bash it out separate. We'll see what I come up with. It's kind of important because it pops out a lot of the details in the drydock. I'm thinking something blue/greenish that's subtle and dark with a cool atmosphere.
In addition, this whole beast is lit using only spotlights and one distant light (and now some bitty little bulb lights in the primary hull and I'll put in some beensy little blue lights for the welders). The point is that there is no GI in this thing so far. I kind of like it. The lighting in space would be sort of harsh and I think I have enough lights to fill in cracks and crevices so I think I'm just going to leave it as is and no GI (weird since I haven't rendered a final image without GI in about 4,000 years).
-Kix
